> ## Documentation Index
> Fetch the complete documentation index at: https://docs.sprig.com/llms.txt
> Use this file to discover all available pages before exploring further.
# Auth0
To enable SSO with Auth0, complete the following:
1. Contact [support@sprig.com](mailto:sso@sprig.com) to claim the email domain(s) that your SSO users will use to sign in.
2. Log into your Sprig account and navigate to **Settings >** [**Single Sign-On**](https://app.sprig.com/settings/sso).
3. Select the **SSO Enabled** option, and click **Save**.
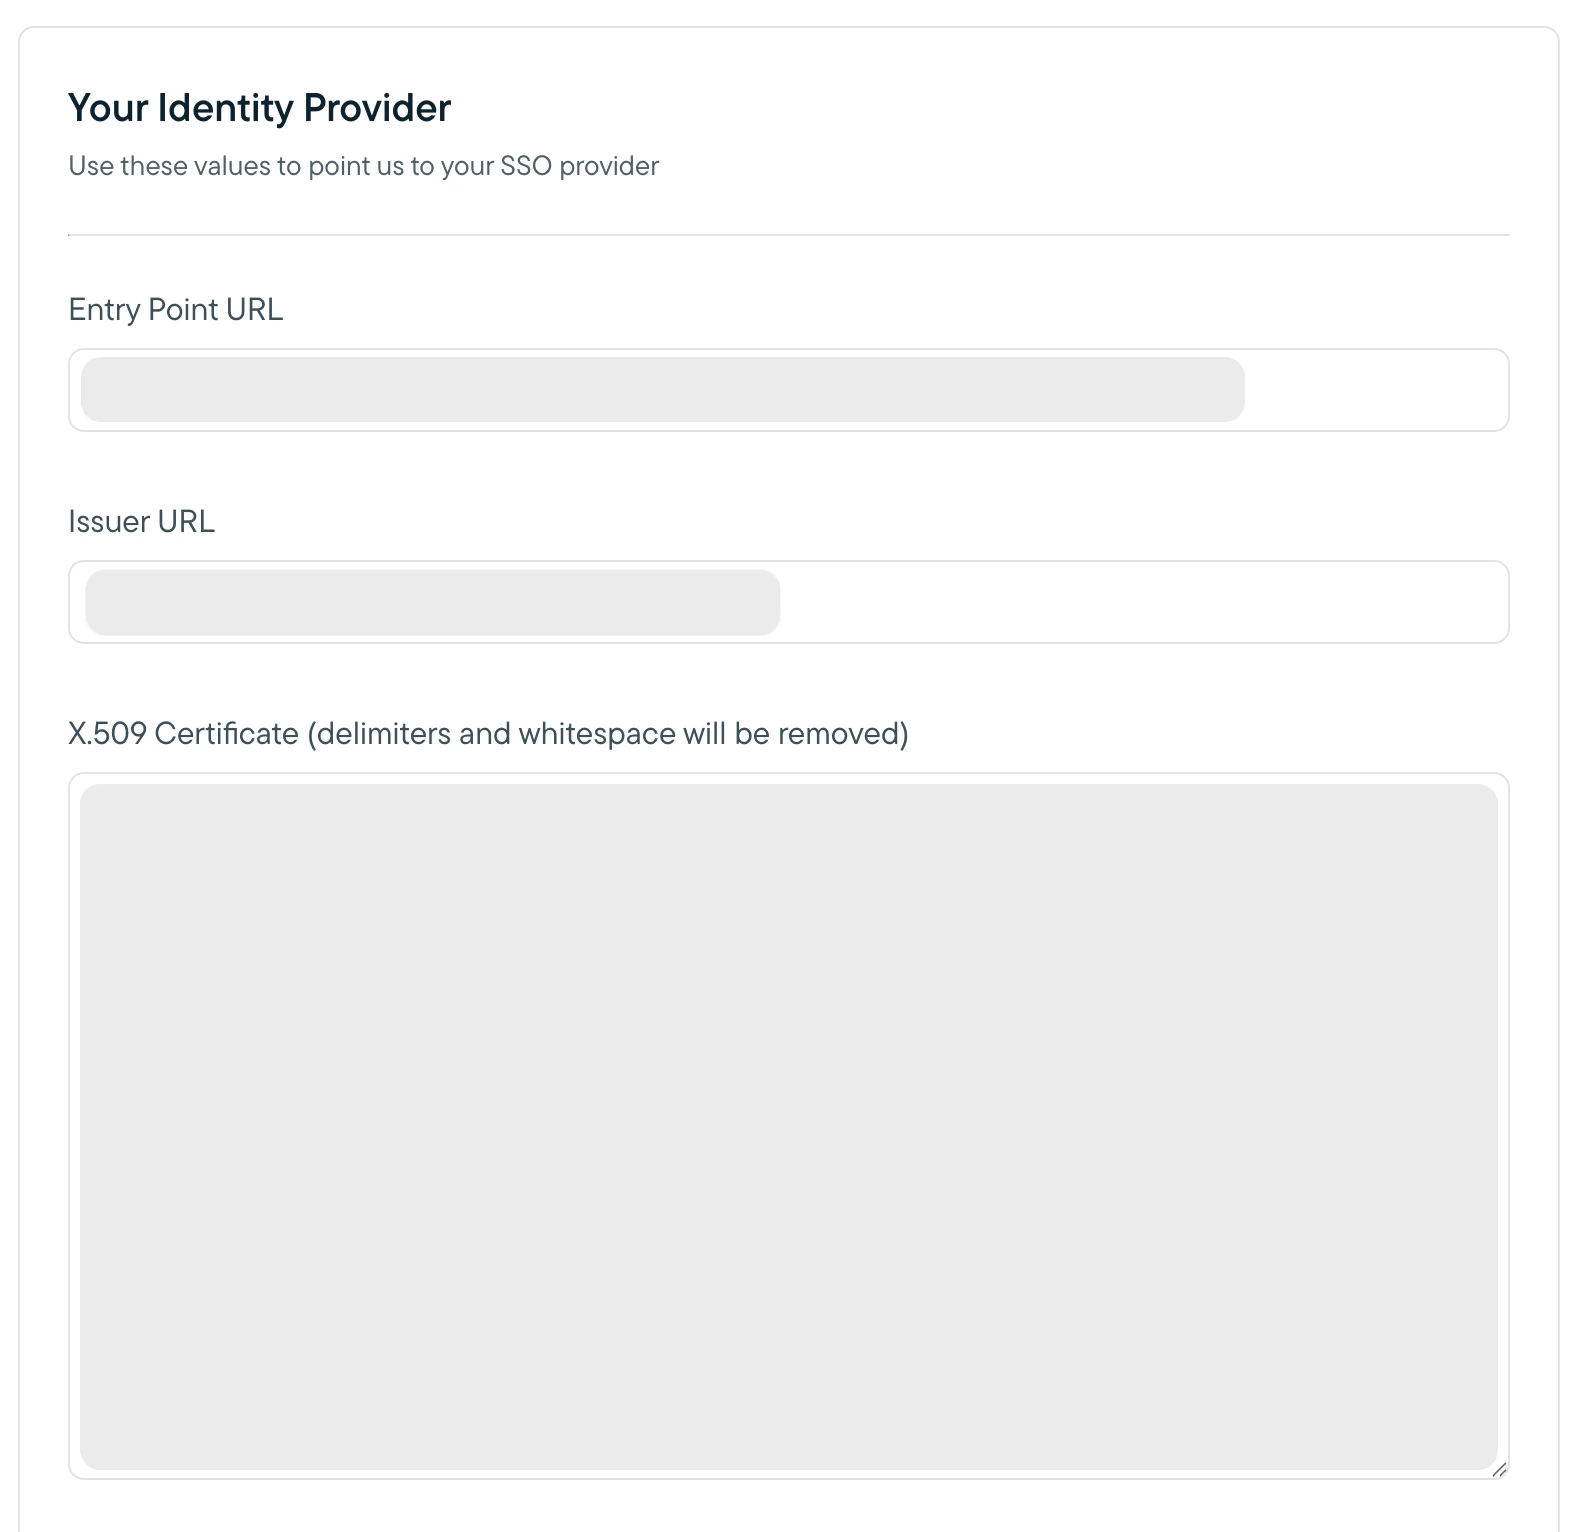
4. An **Important Values** section should appear. Copy the value of the **Entity URI** field into the **Issuer URL** field in the **Your Identity Provider** section, and click **Save**. Take note of the Entity URI and the ACS URL values provided. You will use them to configure your Auth0 integration in later steps.
5. Log into your Auth0 admin account. Navigate to the Applications page and click "Create Application."
 6. In the "Name" field, enter "Sprig" or whatever you would like the application to be called, select "Single Page Web Application and click Create.
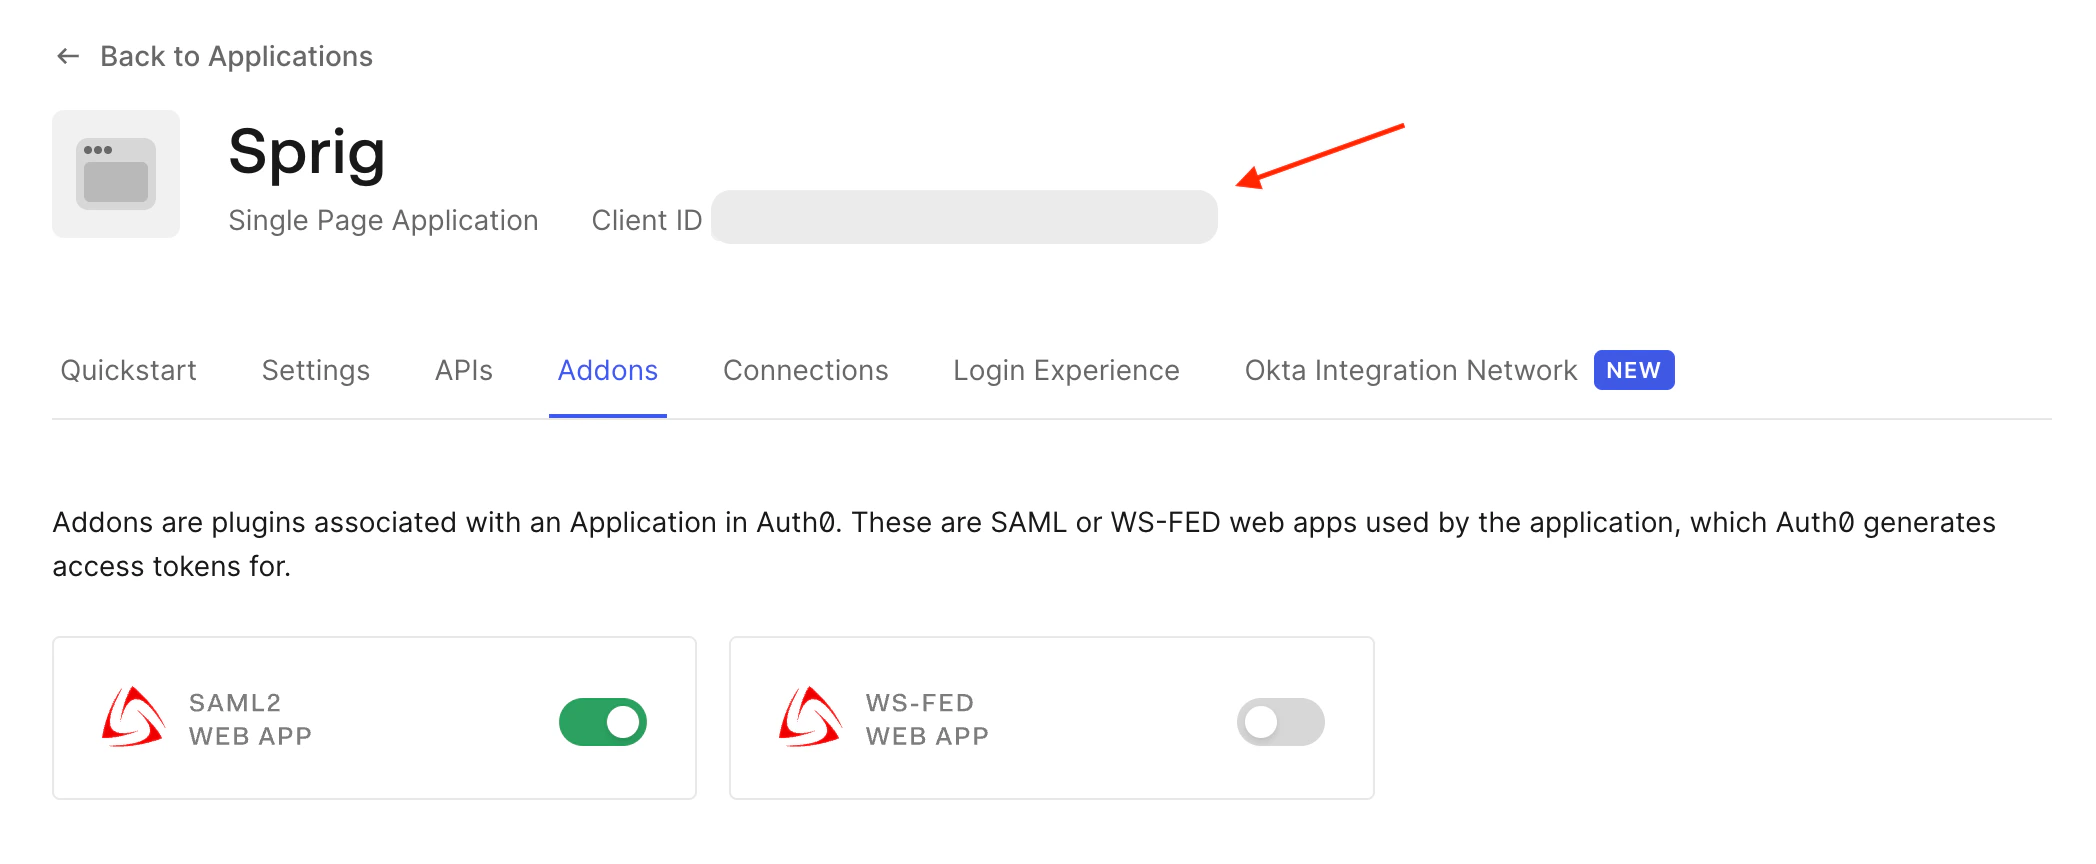
 7. Navigate to the Addons tab and click "SAML2 WEB APP."
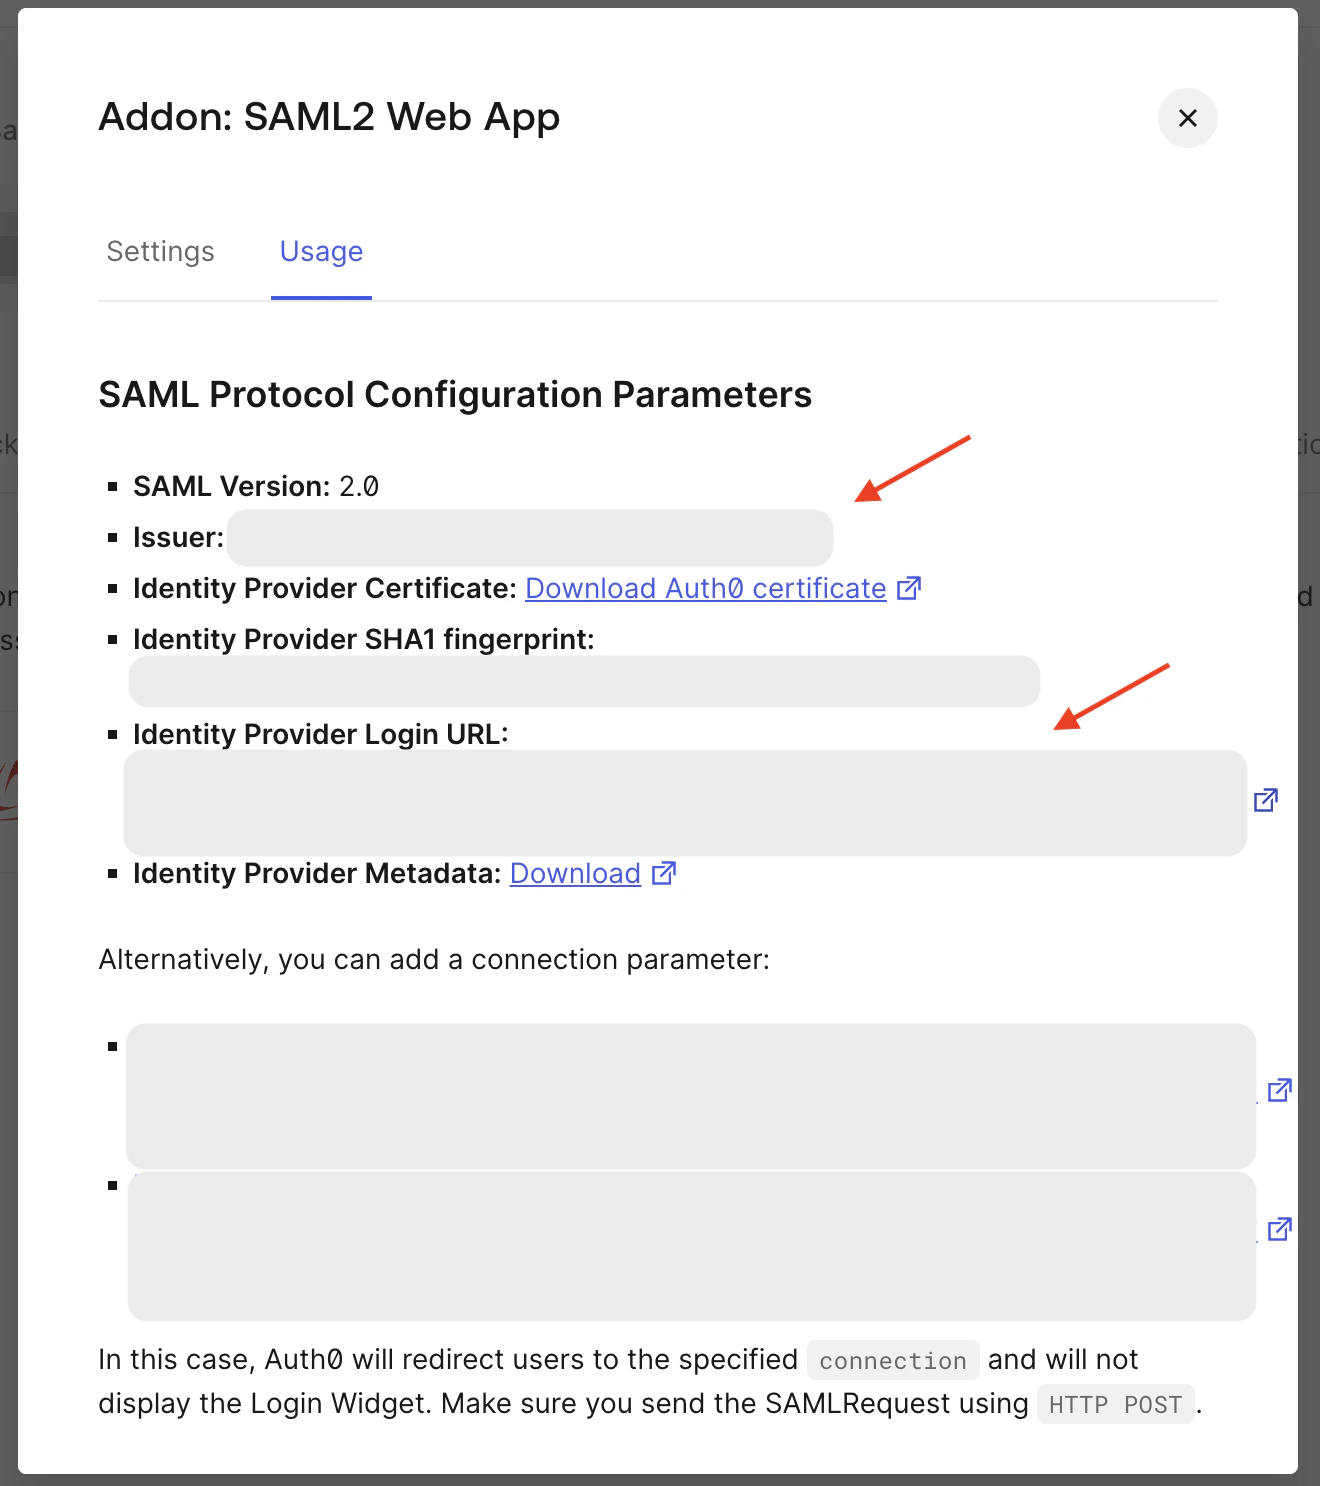
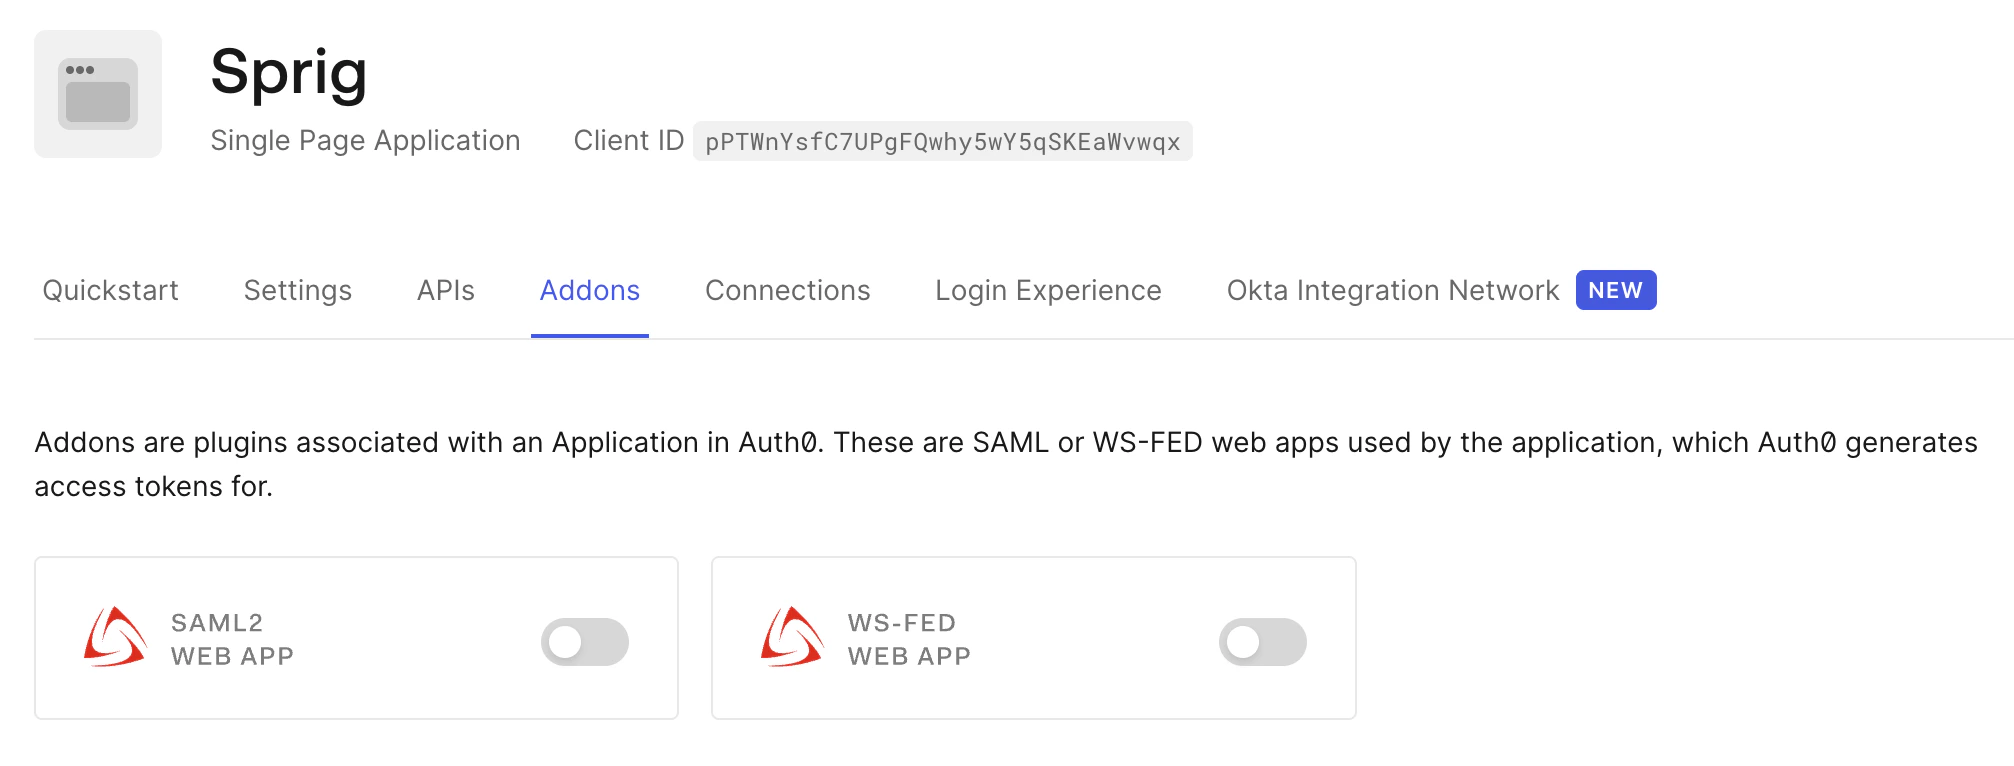 8. On the Usage tab:
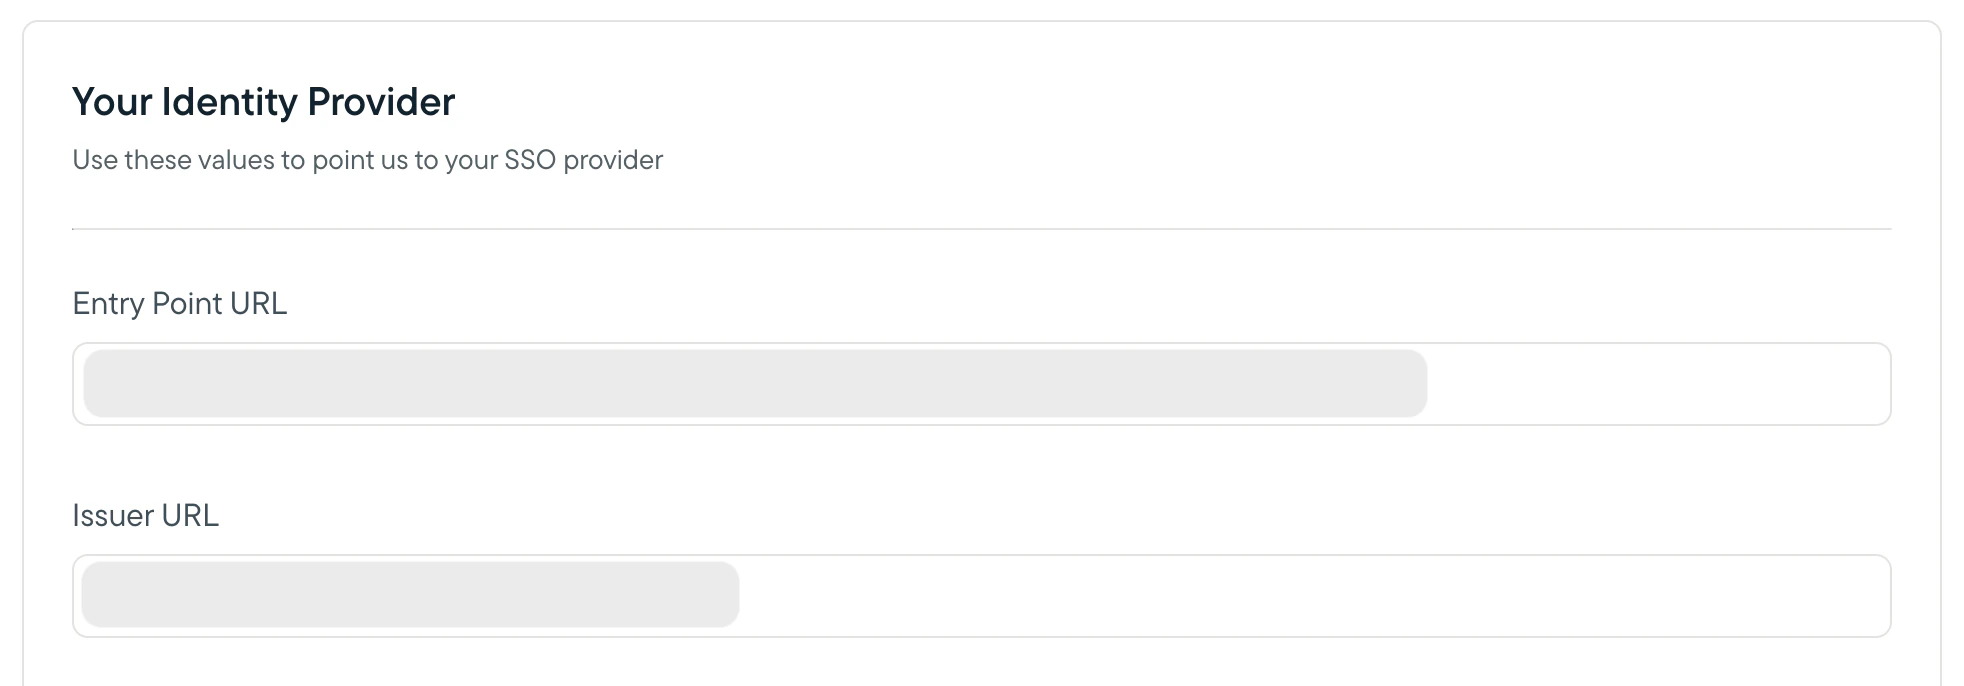
1. Copy the Issuer value and paste it into the Issuer URL field in the Sprig dashboard.
2. Copy the Identity Provider Login URL value and paste it into the Entry Point URL field in the Sprig dashboard.
8. On the Usage tab:
1. Copy the Issuer value and paste it into the Issuer URL field in the Sprig dashboard.
2. Copy the Identity Provider Login URL value and paste it into the Entry Point URL field in the Sprig dashboard.
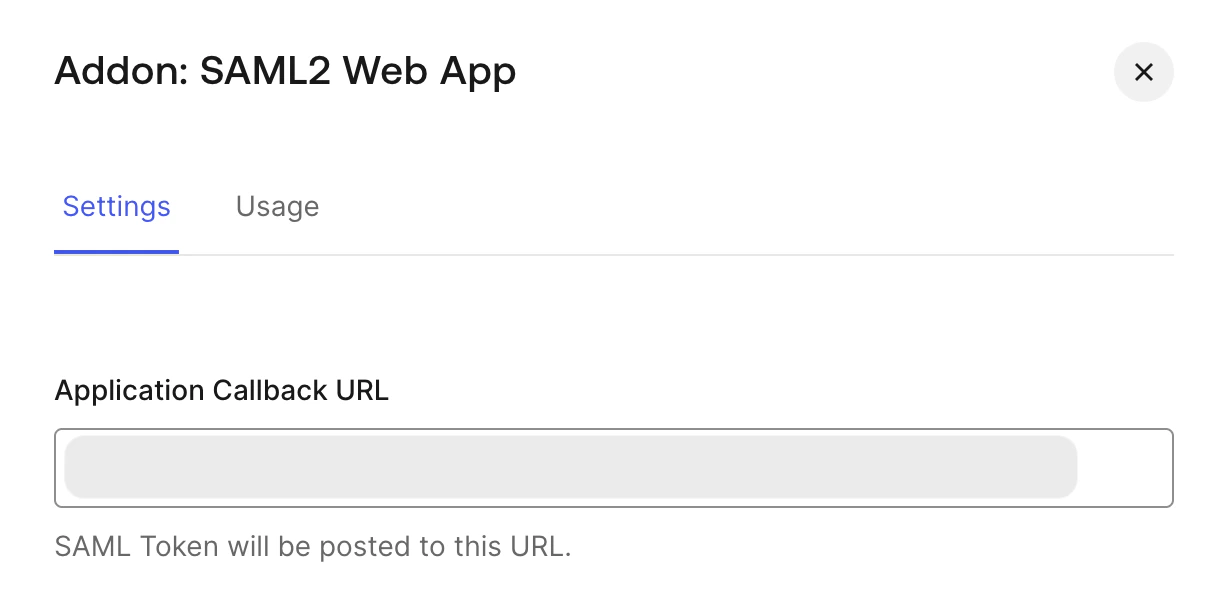
 9. Copy the ACS URL from the Sprig dashboard and paste it into the Application Callback URL field on the Settings tab in the Auth0 admin account.
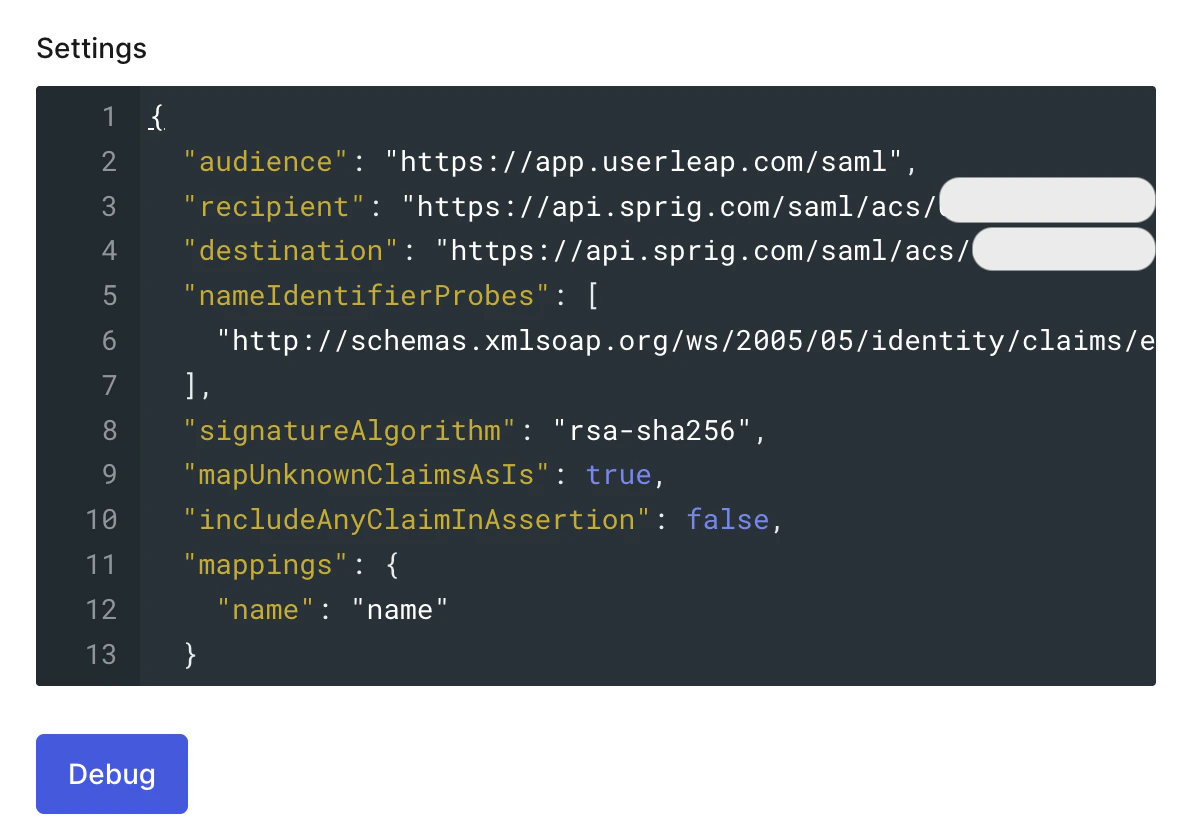
 10. In the Settings field, replace the default payload with the following, filling in the `recipient` and `destination` values with the ACS URL. At the bottom of the modal, click Enable.
```
{
"audience": "https://app.userleap.com/saml", // Entity URI
"recipient": "", // ACS URL
"destination": "", // ACS URL
"nameIdentifierProbes": [
"http://schemas.xmlsoap.org/ws/2005/05/identity/claims/emailaddress"
],
"signatureAlgorithm": "rsa-sha256",
"mapUnknownClaimsAsIs": true,
"includeAnyClaimInAssertion": false,
"mappings": {
"name": "name"
}
}
```
10. In the Settings field, replace the default payload with the following, filling in the `recipient` and `destination` values with the ACS URL. At the bottom of the modal, click Enable.
```
{
"audience": "https://app.userleap.com/saml", // Entity URI
"recipient": "", // ACS URL
"destination": "", // ACS URL
"nameIdentifierProbes": [
"http://schemas.xmlsoap.org/ws/2005/05/identity/claims/emailaddress"
],
"signatureAlgorithm": "rsa-sha256",
"mapUnknownClaimsAsIs": true,
"includeAnyClaimInAssertion": false,
"mappings": {
"name": "name"
}
}
```
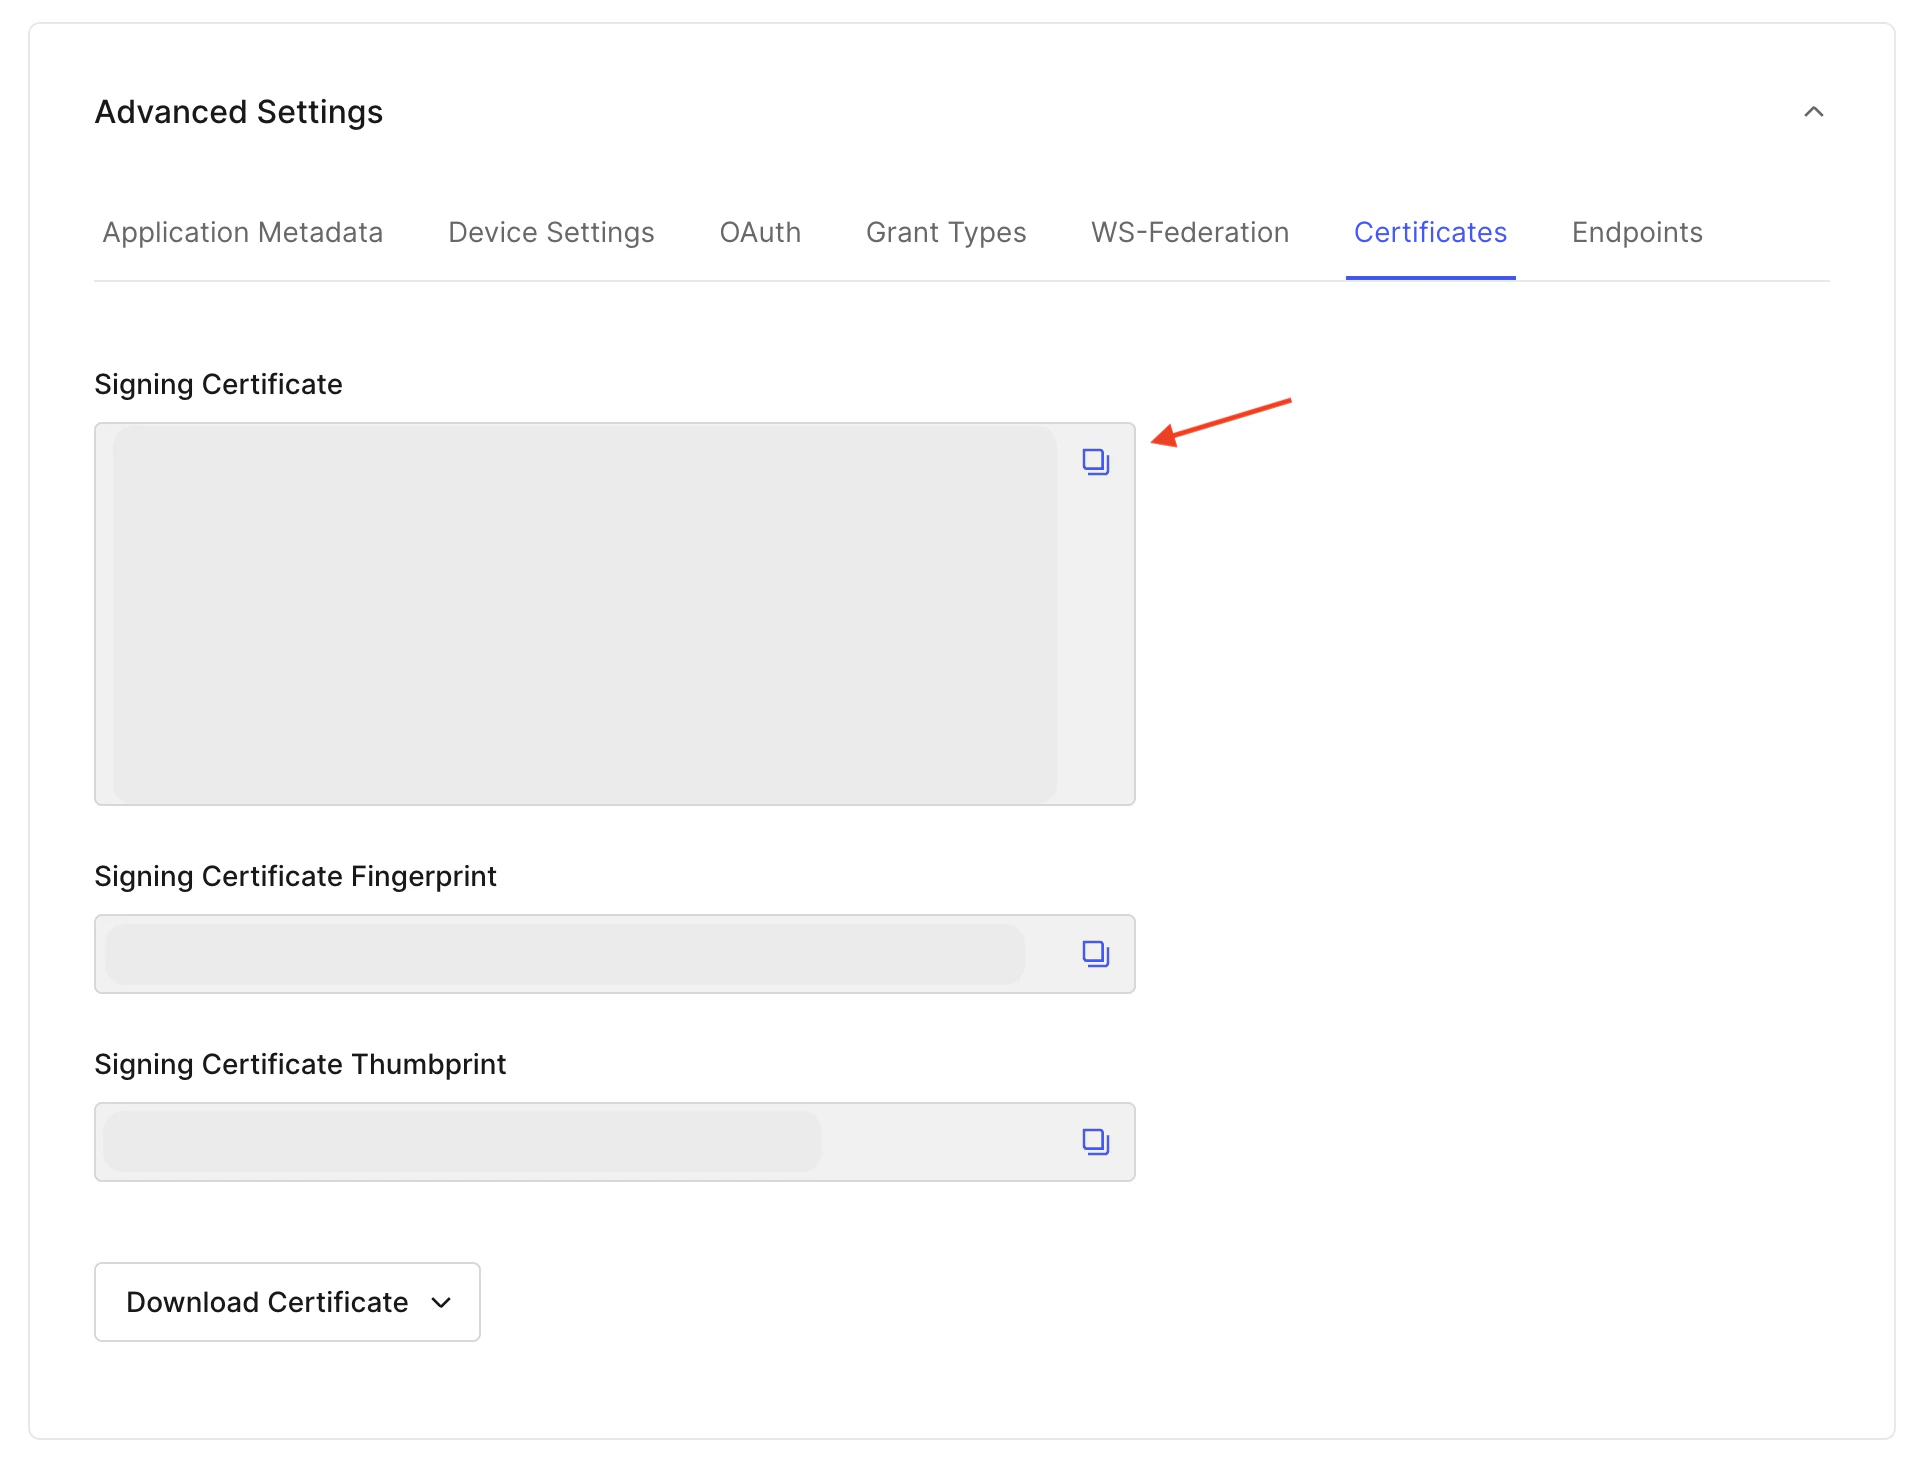
 11. Click on Settings > Advanced Settings > Certificates.
1. Copy the contents of the Signing Certificate, paste it into the X.509 Certificate field in the Sprig dashboard, and click Save.
11. Click on Settings > Advanced Settings > Certificates.
1. Copy the contents of the Signing Certificate, paste it into the X.509 Certificate field in the Sprig dashboard, and click Save.
 12. At the top of the Application page, copy the Client ID. It will be used in step 14.
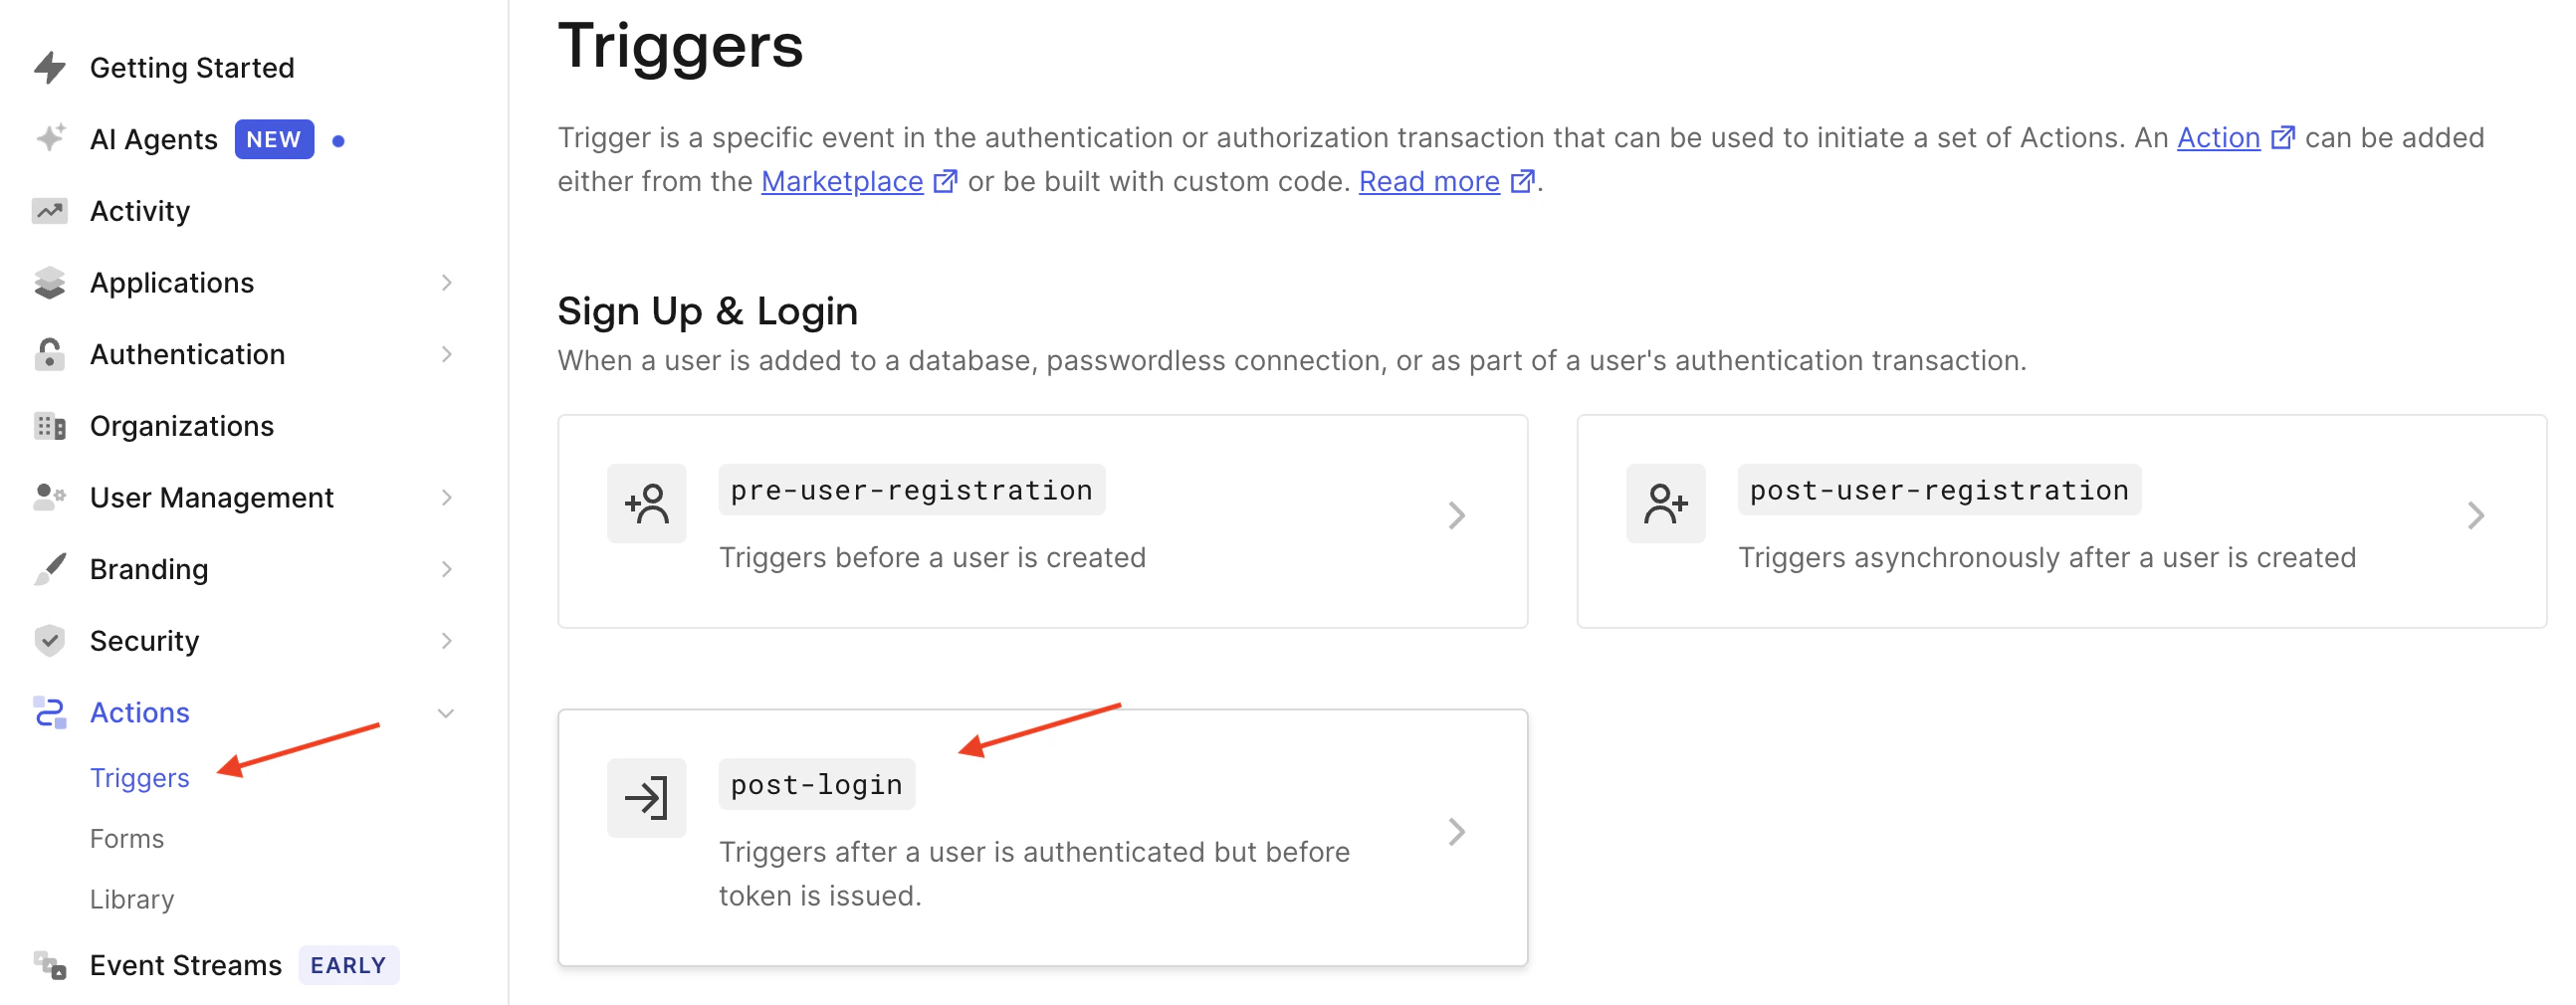
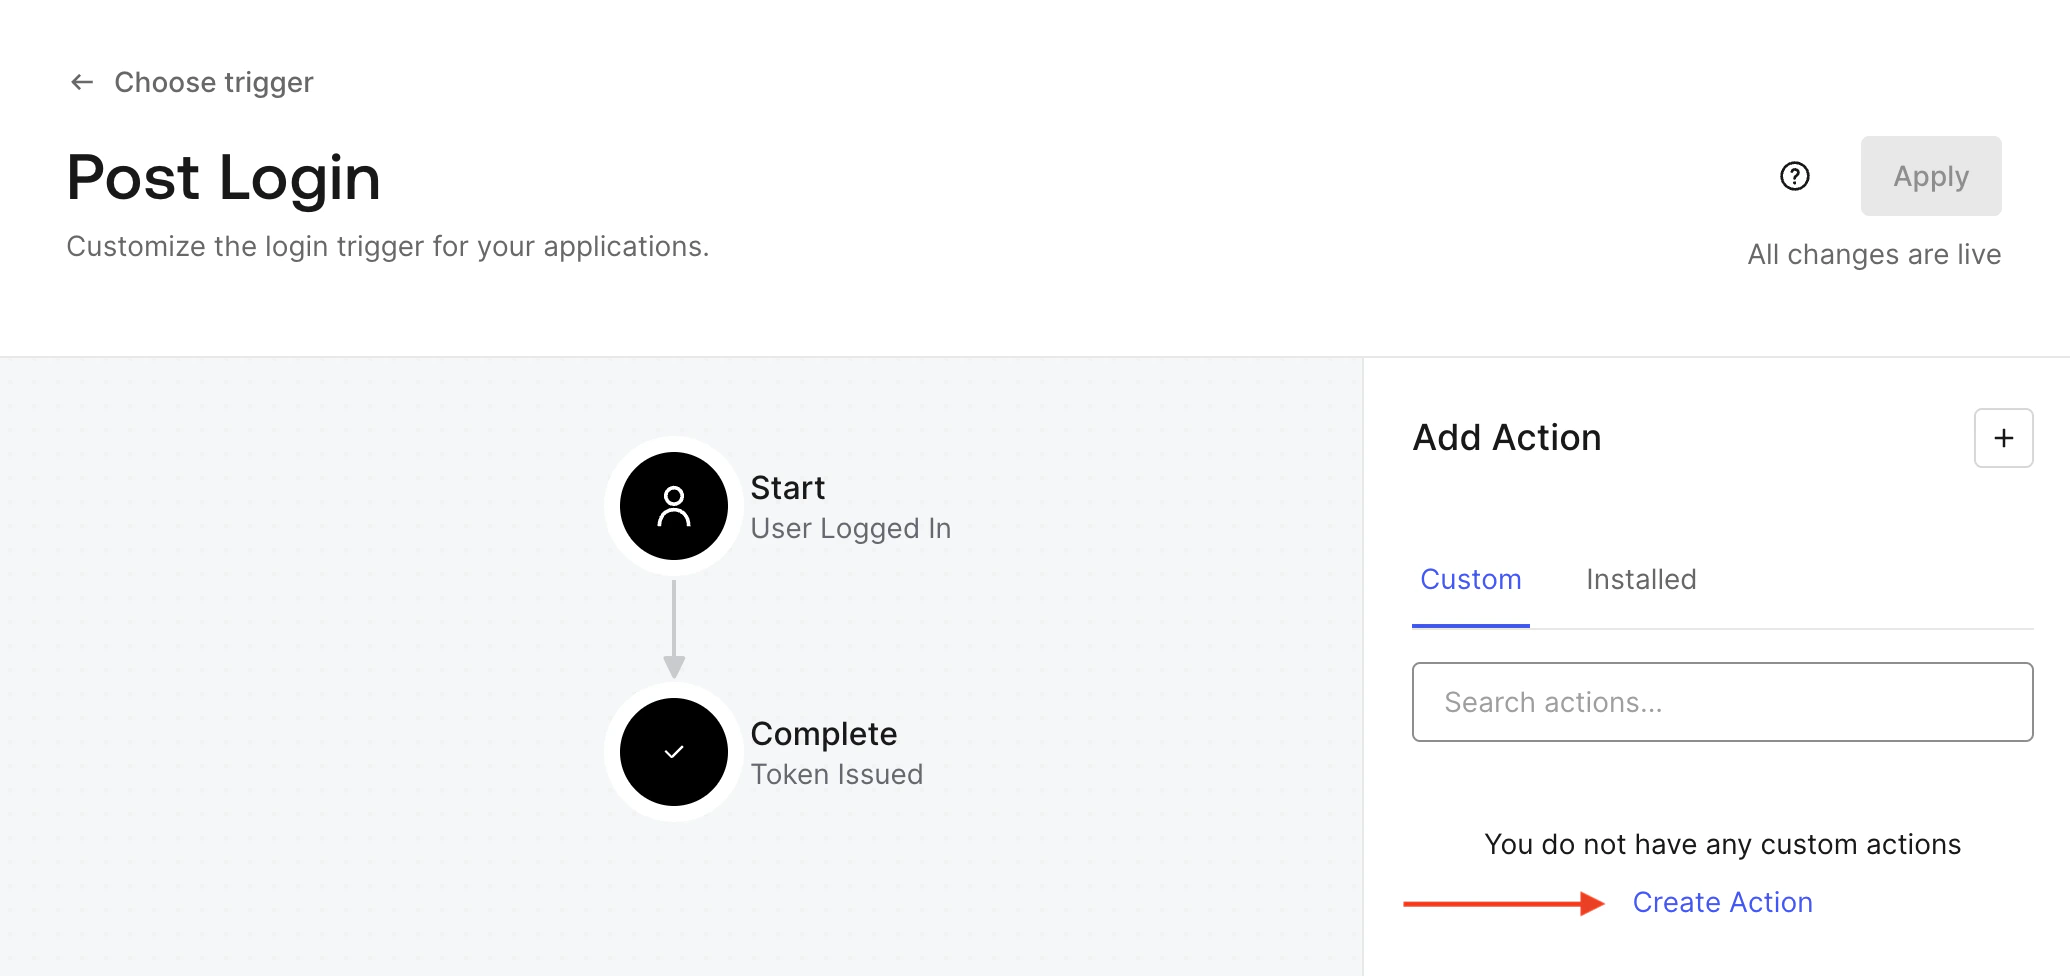
 13. In the left-hand sidebar, click on Actions > Triggers > post-login > Create Action.
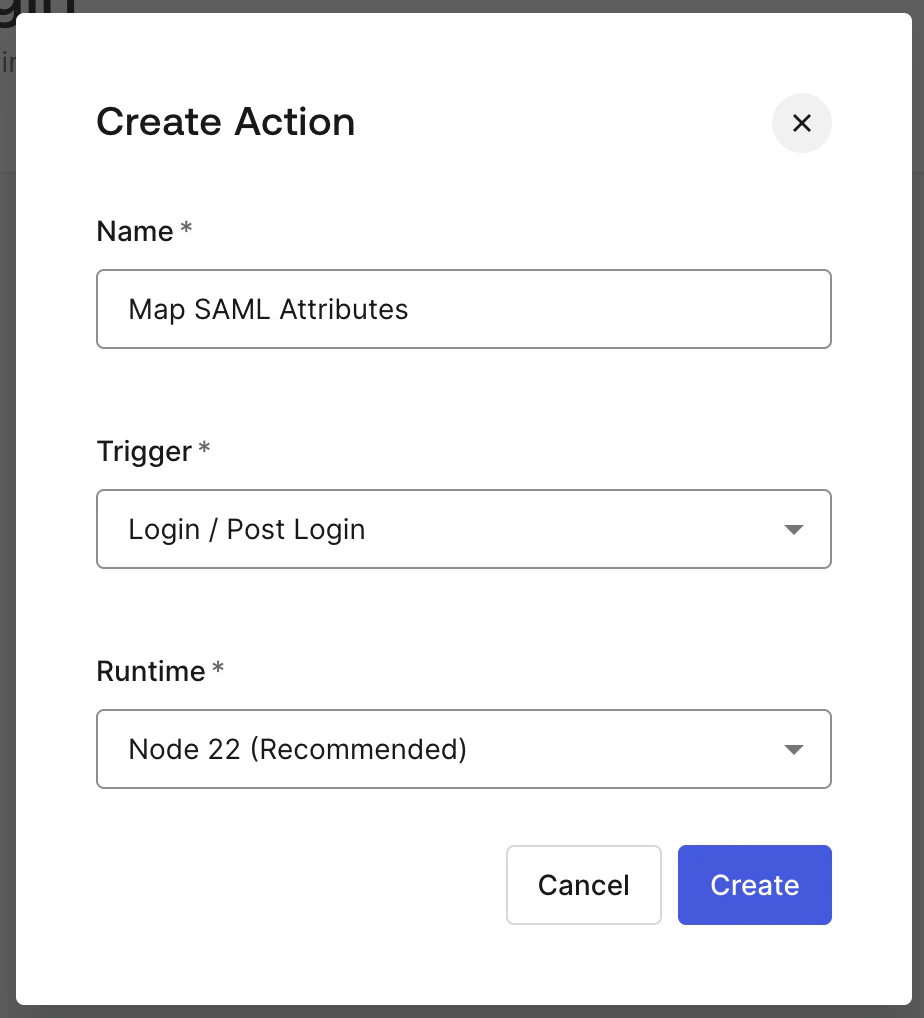
1. In the "Name" field, enter "Map SAML Attributes" or whatever you would like the action to be called.
2. Trigger should already be populated with "Login / Post Login."
3. For Runtime, choose "Node 22." Click Create.
13. In the left-hand sidebar, click on Actions > Triggers > post-login > Create Action.
1. In the "Name" field, enter "Map SAML Attributes" or whatever you would like the action to be called.
2. Trigger should already be populated with "Login / Post Login."
3. For Runtime, choose "Node 22." Click Create.
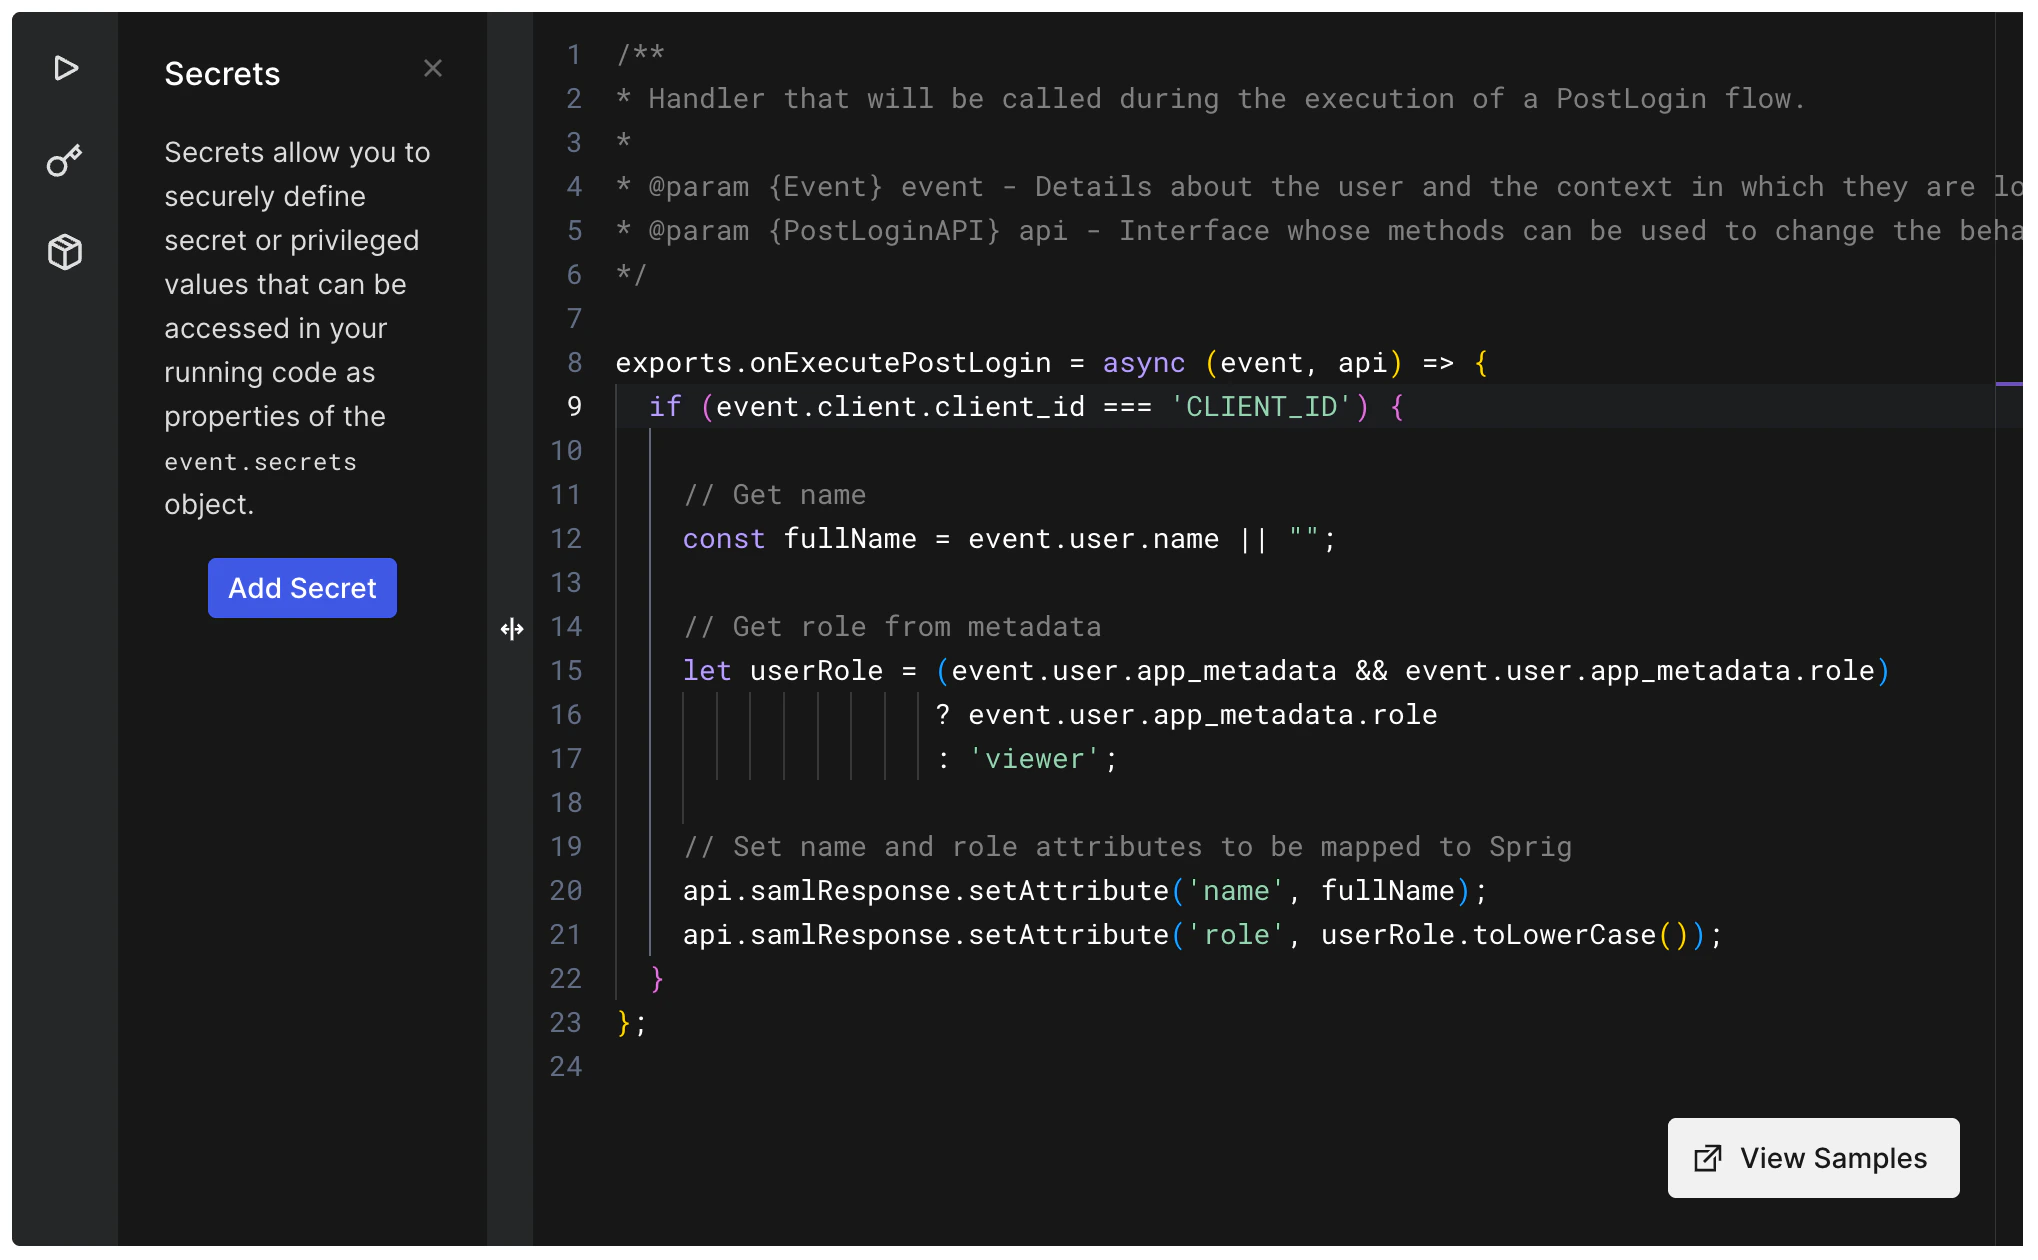
 14. In the new action, paste the following code into the code editor. Make sure to replace `CLIENT_ID` with the Client ID from step 12. Click Deploy.
```
exports.onExecutePostLogin = async (event, api) => {
if (event.client.client_id === 'CLIENT_ID') {
// Get name
const fullName = event.user.name || "";
// Get role from metadata
let userRole = (event.user.app_metadata && event.user.app_metadata.role)
? event.user.app_metadata.role
: 'viewer';
// Set name and role attributes to be mapped to Sprig
api.samlResponse.setAttribute('name', fullName);
api.samlResponse.setAttribute('role', userRole.toLowerCase());
}
};
```
14. In the new action, paste the following code into the code editor. Make sure to replace `CLIENT_ID` with the Client ID from step 12. Click Deploy.
```
exports.onExecutePostLogin = async (event, api) => {
if (event.client.client_id === 'CLIENT_ID') {
// Get name
const fullName = event.user.name || "";
// Get role from metadata
let userRole = (event.user.app_metadata && event.user.app_metadata.role)
? event.user.app_metadata.role
: 'viewer';
// Set name and role attributes to be mapped to Sprig
api.samlResponse.setAttribute('name', fullName);
api.samlResponse.setAttribute('role', userRole.toLowerCase());
}
};
```
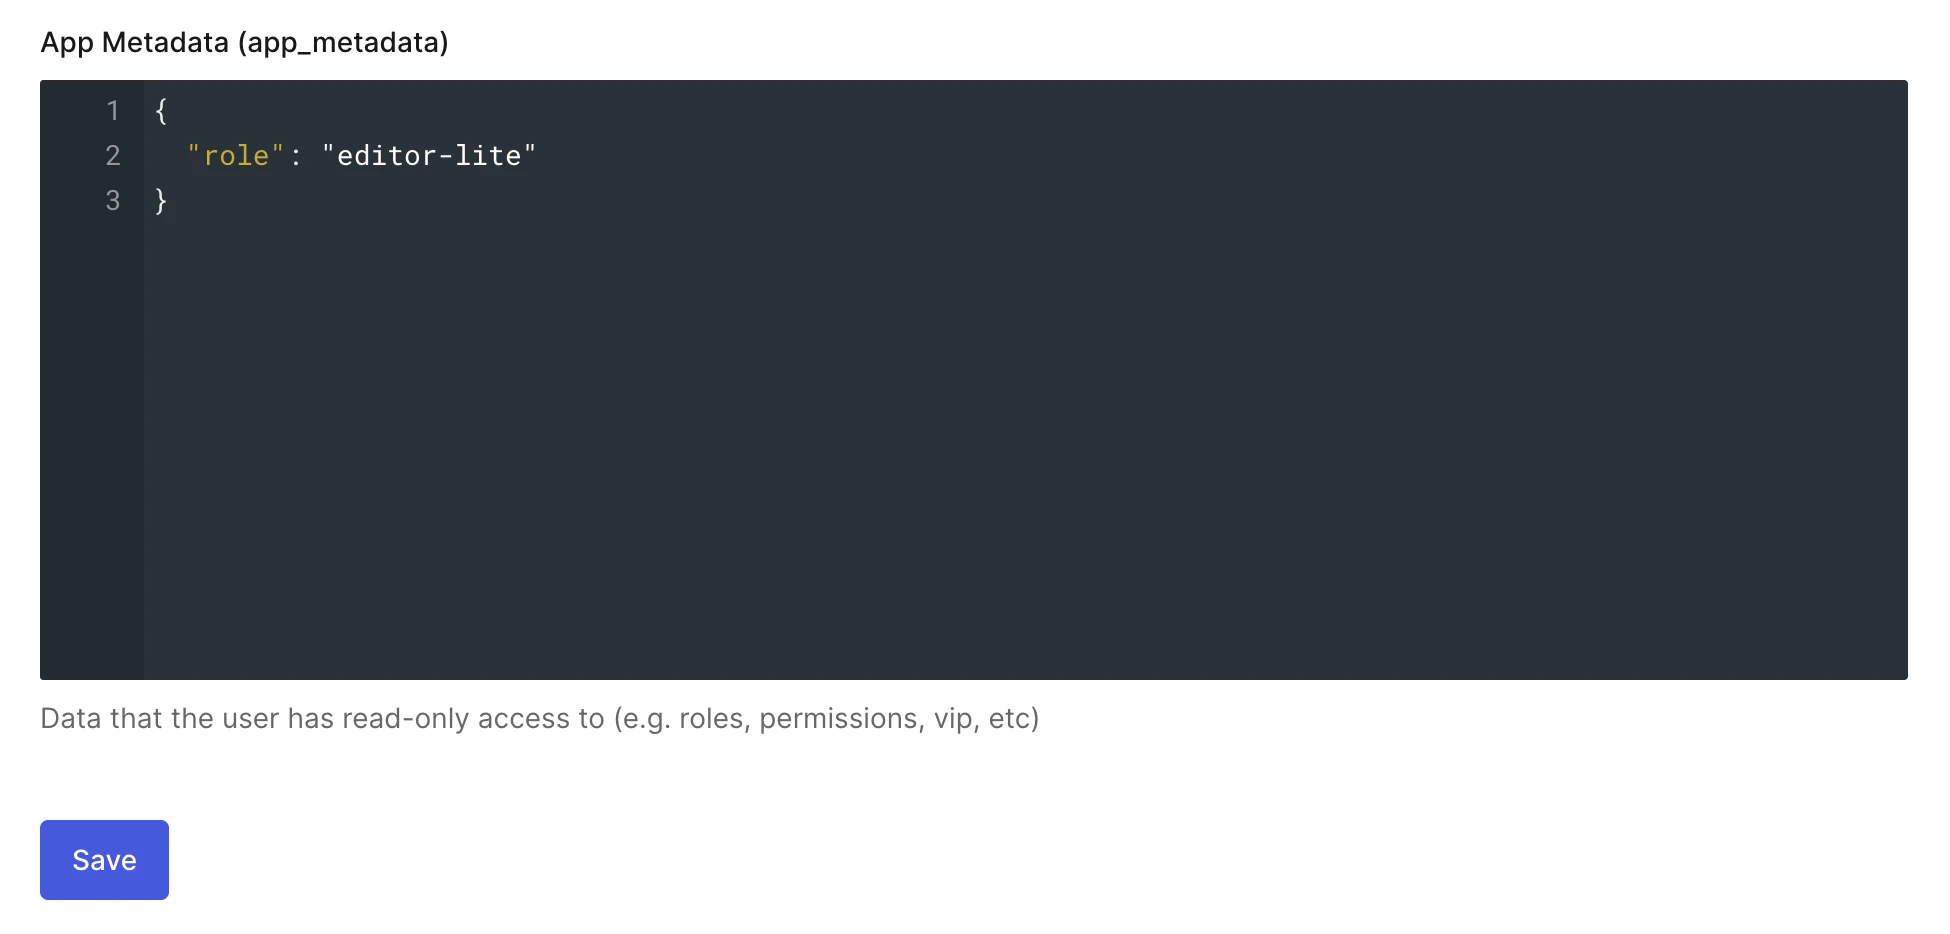
 15. Now that the SSO integration is set up, a `role` will need to be added to the profile of users who will use SSO to login to Sprig. If a role is not added to a user, it will default to `viewer` when they login for the first time. The available roles are `admin`, `developer`, `editor`, `editor-lite`, and `viewer`. For more information about the access permissions associated with each role, see our documentation on [Member Permissions](/docs/account-and-settings/team-management-roles/roles-permissions).
1. To add a role to a user, click on User Management > Users and click on a particular user. Under "App Metadata (app\_metadata)," enter the role as follows:
15. Now that the SSO integration is set up, a `role` will need to be added to the profile of users who will use SSO to login to Sprig. If a role is not added to a user, it will default to `viewer` when they login for the first time. The available roles are `admin`, `developer`, `editor`, `editor-lite`, and `viewer`. For more information about the access permissions associated with each role, see our documentation on [Member Permissions](/docs/account-and-settings/team-management-roles/roles-permissions).
1. To add a role to a user, click on User Management > Users and click on a particular user. Under "App Metadata (app\_metadata)," enter the role as follows:
 When using the Auth0 SSO integration, Sprig member permissions are controlled by Auth0. Any role changes will need to be made within the Auth0 admin account.
Users that are assigned to the Auth0 application integration will now be able to sign in using the Sprig [SSO login page](https://app.sprig.com/login/sso).
When using the Auth0 SSO integration, Sprig member permissions are controlled by Auth0. Any role changes will need to be made within the Auth0 admin account.
Users that are assigned to the Auth0 application integration will now be able to sign in using the Sprig [SSO login page](https://app.sprig.com/login/sso).