> ## Documentation Index
> Fetch the complete documentation index at: https://docs.sprig.com/llms.txt
> Use this file to discover all available pages before exploring further.
# iOS SwiftUI Session Replay Implementation Guide
# Background
Sprig Session Replays for iOS are schematic; each frame is a rough representation of what the user is seeing on the screen of the app. They are not screen shots of the UI itself.
To achieve this, the Sprig iOS SDK traverses the UIKit view hierarchy, collecting element details of the screen and then recreating them into an image, using the image as the basis for each video frame. This allows us to filter out text or images when customers select the Strict replay capture mode.
Starting with iOS26, some SwiftUI text and image elements no longer appear in the UIKit view hierarchy. In order to capture these elements in replays, we have created SwiftUI modifiers that host app developers can place in their code on elements that they would like rendered in session replays.
This content capture method also enables the capture of custom UI elements that could not previously be captured (a custom chart view, for example).
This replay capture enhancement is available starting with the Sprig iOS SDK v4.34.0.
# The Sprig SwiftUI session replay modifiers
Following are the modifiers you can add to SwiftUI elements in order to capture them in schematic session replays.
`.sprigSnapshotText()` - Views with this modifier will be captured as an image unless the privacy settings require masking of text, in which case they will not be captured, and instead placeholder text will be rendered in the same frame.
`.sprigSnapshotImage()` - Views with this modifier will be captured as an image unless the privacy settings require masking of images, in which case they will be rendered as a rectangle shape in the same frame with an image icon in the middle.
`.sprigSnapshotPlaceholder()` - Views with this modifier will be rendered as a rectangle shape in the same frame as the View.
`.sprigSnapshot()` - Views with this modifier will be captured as an image regardless of the current privacy settings. Use this only if you want to capture a custom View that is not being captured by the UIKit capture and does not contain PII.
# Example code and images
Following is an example of implemented modifiers in some basic SwiftUI:
```swift theme={null}
struct ExampleView: View {
var body: some View {
VStack(spacing: 20) {
Text("This is a Text element.")
.sprigSnapshotText()
Rectangle()
.fill(Color.green)
.frame(width: 200, height: 200)
.sprigSnapshotPlaceholder(color: Color.green)
Image("puppy")
.resizable()
.frame(width: 100, height: 100)
.cornerRadius(20)
.sprigSnapshotImage()
Image("puppy")
.resizable()
.frame(width: 100, height: 100)
.cornerRadius(20)
.sprigSnapshot()
}
}
}
```
Below are screenshots of the app itself (running the code above), a frame of the replay without masking and a frame of the replay with privacy set to Strict.
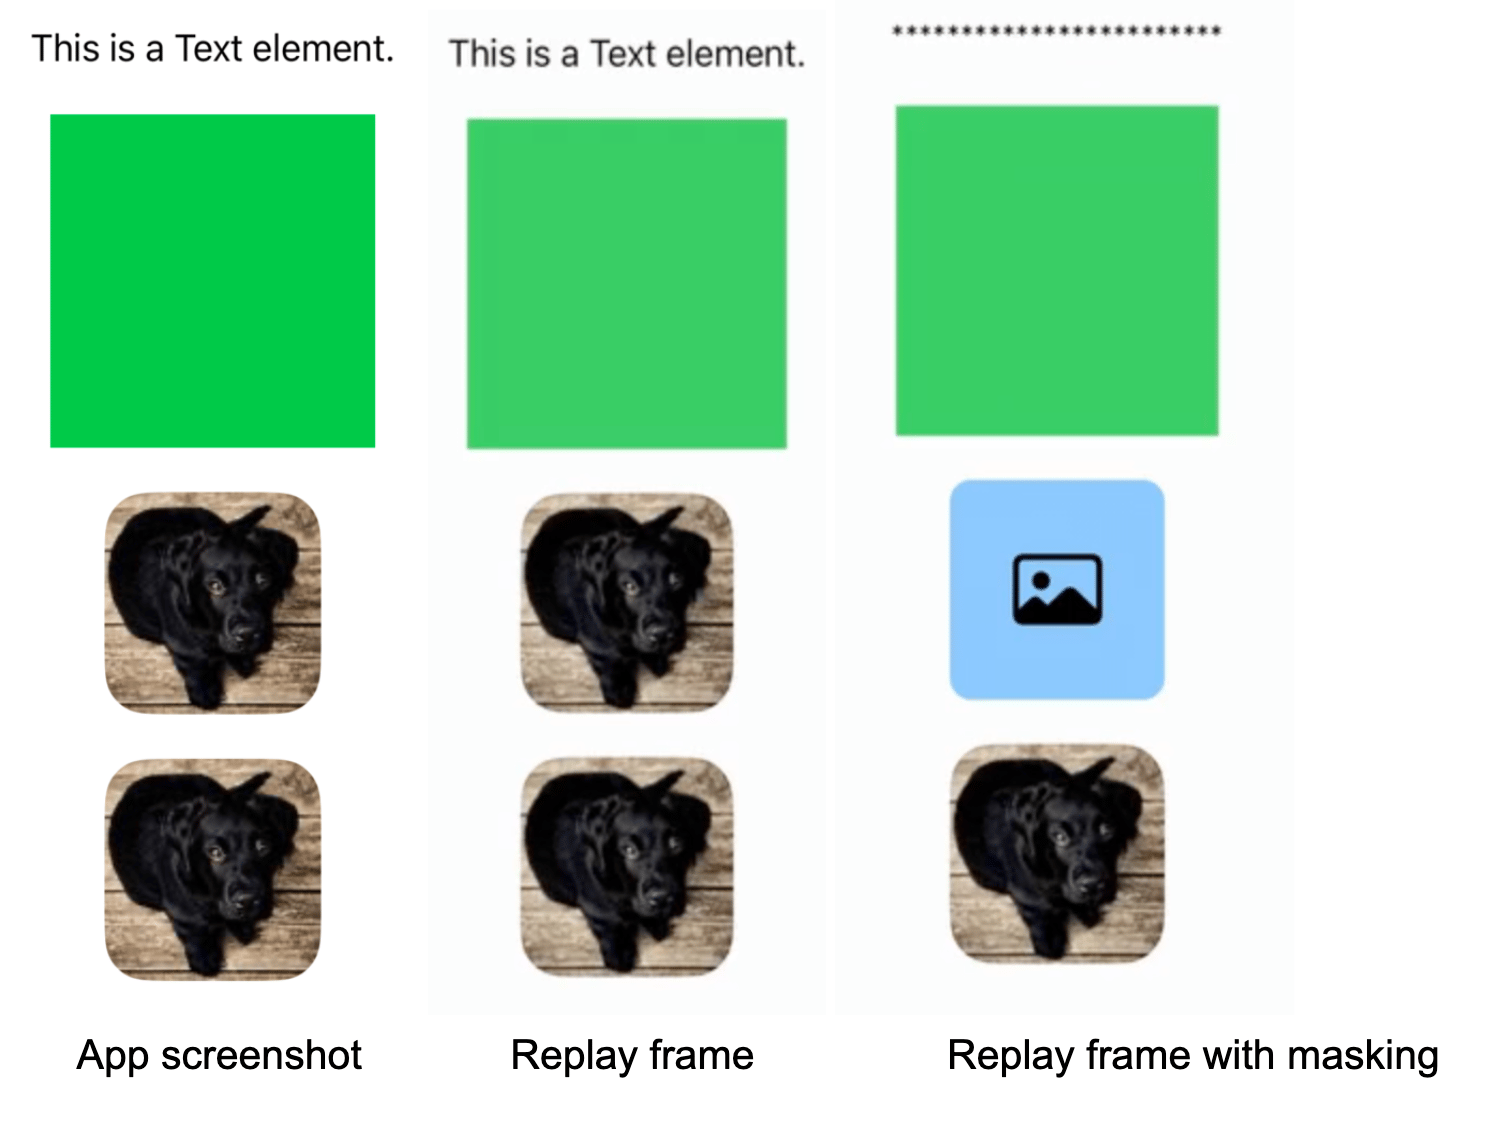 Note that the second puppy image used the`.sprigSnapshot()`modifier, which did *not* adhere to the privacy settings, and thus still fully rendered even when the privacy setting was on Strict.
# Considerations
When implementing the Sprig SwiftUI modifiers in your SwiftUI app, please keep the following in mind:
## Test first
Many SwiftUI elements *do* get translated down to UIKit elements and *will* show up in Sprig session replays without any additional code. Before adding the Sprig SwiftUI modifiers, you should run a replay capture on the user paths of your app that you would like captured and note any UI elements that are already being captured (and thus don’t need the modifiers).
## Smaller is better (most of the time)
The modifiers use`UIGraphicsImageRenderer`to capture the content of the View they are modifying. This happens on the main thread; as such you should use them sparingly and apply them to the smaller pieces that you want to capture. In other words, if you have a view that is made up of 5 text elements, rather than capture the entire view with one modifier, capture each text element with a modifier. Adding a modifier to each element rather than a parent View decreases the chance that you will accidentally capture an element with PII and decreases the total area that needs to be captured.
Having said that, due to the extreme complexity around SwiftUI rendering, if an element you are trying to capture is not showing up in the replay after adding a modifier, go up a level to the parent View and apply the modifier there.
## Think about PII
The Sprig SwiftUI replays modifiers are designed to respect the privacy settings that customers select in the Sprig dashboard. In order for this to work, developers need to use the modifier designed for the element they are trying to capture.
* Text elements should be captured with the`.sprigSnapshotText() `modifier.
* Image elements should be captured with the`.sprigSnapshotImage() `modifier.
Note that the`.sprigSnapshot()`modifier will capture everything in the view being modified, regardless of the privacy setting in the dashboard. It is designed to be used with UI elements that are not normally captured in the UIKit view hierarchy but should be rendered in a replay (for example, a custom chart view).
Use the`.sprigSnapshotPlaceholder()`modifier to put a placeholder colored box where PII content exists that you do not want to capture. This allows viewers of the replay to recognize that something is in that location without showing potential PII contained in that element.
## View snapshots are cached
In order to be as efficient as possible with our session replay capture, snapshots of elements are cached until the replay itself has been rendered. As such, dynamic elements in your UI that are being captured will only reflect their initial state in replays.
## Capturing complex stacked layouts
Given the nature of SwiftUI rendering of text and images, it is impossible for the SprigSDK to know the Z-index of an element being captured. Therefore, if you have multiple elements that live on top of each other that you would like to capture, you should pass a z-index value as a parameter in the modifier. This will allow the SprigSDK to render the elements in the proper order in the replay itself.
For example:
```swift theme={null}
ZStack {
// Bottom Layer: A large blue square.
Rectangle()
.fill(.blue)
.frame(width: 200, height: 200)
.sprigSnapshotPlaceholder(zIndex: 0, color: .blue)
// Middle Layer: A smaller green square.
Rectangle()
.fill(.green)
.frame(width: 130, height: 130)
.sprigSnapshotPlaceholder(zIndex: 1, color: .green)
// Top Layer: Text on top of everything.
Text("Front Layer")
.foregroundColor(.white)
.fontWeight(.bold)
.sprigSnapshotText(zIndex: 2)
}
```
## Gaining visibility into capture time on the main thread
In order to give host app developers visibility into how long screen captures are taking, we have provided the ability to subscribe to loggingEvents that contain the details of each UIKit and SwiftUI element capture.
To receive the capture details, simply pass a value of`true`to the`showReplayCaptureLogging`method on the Sprig singleton, and register to listen to logging events, like so:
```swift theme={null}
Sprig.shared.showReplayCaptureLogging(true)
Sprig.shared.registerEventListener(for: .loggingEvent) { data in
print(data["message"] ?? "(none)")
}
```
Note that the second puppy image used the`.sprigSnapshot()`modifier, which did *not* adhere to the privacy settings, and thus still fully rendered even when the privacy setting was on Strict.
# Considerations
When implementing the Sprig SwiftUI modifiers in your SwiftUI app, please keep the following in mind:
## Test first
Many SwiftUI elements *do* get translated down to UIKit elements and *will* show up in Sprig session replays without any additional code. Before adding the Sprig SwiftUI modifiers, you should run a replay capture on the user paths of your app that you would like captured and note any UI elements that are already being captured (and thus don’t need the modifiers).
## Smaller is better (most of the time)
The modifiers use`UIGraphicsImageRenderer`to capture the content of the View they are modifying. This happens on the main thread; as such you should use them sparingly and apply them to the smaller pieces that you want to capture. In other words, if you have a view that is made up of 5 text elements, rather than capture the entire view with one modifier, capture each text element with a modifier. Adding a modifier to each element rather than a parent View decreases the chance that you will accidentally capture an element with PII and decreases the total area that needs to be captured.
Having said that, due to the extreme complexity around SwiftUI rendering, if an element you are trying to capture is not showing up in the replay after adding a modifier, go up a level to the parent View and apply the modifier there.
## Think about PII
The Sprig SwiftUI replays modifiers are designed to respect the privacy settings that customers select in the Sprig dashboard. In order for this to work, developers need to use the modifier designed for the element they are trying to capture.
* Text elements should be captured with the`.sprigSnapshotText() `modifier.
* Image elements should be captured with the`.sprigSnapshotImage() `modifier.
Note that the`.sprigSnapshot()`modifier will capture everything in the view being modified, regardless of the privacy setting in the dashboard. It is designed to be used with UI elements that are not normally captured in the UIKit view hierarchy but should be rendered in a replay (for example, a custom chart view).
Use the`.sprigSnapshotPlaceholder()`modifier to put a placeholder colored box where PII content exists that you do not want to capture. This allows viewers of the replay to recognize that something is in that location without showing potential PII contained in that element.
## View snapshots are cached
In order to be as efficient as possible with our session replay capture, snapshots of elements are cached until the replay itself has been rendered. As such, dynamic elements in your UI that are being captured will only reflect their initial state in replays.
## Capturing complex stacked layouts
Given the nature of SwiftUI rendering of text and images, it is impossible for the SprigSDK to know the Z-index of an element being captured. Therefore, if you have multiple elements that live on top of each other that you would like to capture, you should pass a z-index value as a parameter in the modifier. This will allow the SprigSDK to render the elements in the proper order in the replay itself.
For example:
```swift theme={null}
ZStack {
// Bottom Layer: A large blue square.
Rectangle()
.fill(.blue)
.frame(width: 200, height: 200)
.sprigSnapshotPlaceholder(zIndex: 0, color: .blue)
// Middle Layer: A smaller green square.
Rectangle()
.fill(.green)
.frame(width: 130, height: 130)
.sprigSnapshotPlaceholder(zIndex: 1, color: .green)
// Top Layer: Text on top of everything.
Text("Front Layer")
.foregroundColor(.white)
.fontWeight(.bold)
.sprigSnapshotText(zIndex: 2)
}
```
## Gaining visibility into capture time on the main thread
In order to give host app developers visibility into how long screen captures are taking, we have provided the ability to subscribe to loggingEvents that contain the details of each UIKit and SwiftUI element capture.
To receive the capture details, simply pass a value of`true`to the`showReplayCaptureLogging`method on the Sprig singleton, and register to listen to logging events, like so:
```swift theme={null}
Sprig.shared.showReplayCaptureLogging(true)
Sprig.shared.registerEventListener(for: .loggingEvent) { data in
print(data["message"] ?? "(none)")
}
```