Events
In Sprig, Events are used to Trigger a Study. They cause your Study to be displayed to the user. All Web and Mobile studies require an event as a Trigger. Events can also be employed as an audience Filter, allowing you to refine further who is eligible to respond to the Study.
An Event is an action or occurrence in your website or application that allows you to track your users' behavior. Examples of Events include:
- Visiting a page
- Clicking or interacting with a button
- Scrolling to a specific point on a page
How to determine what kind of event you need?
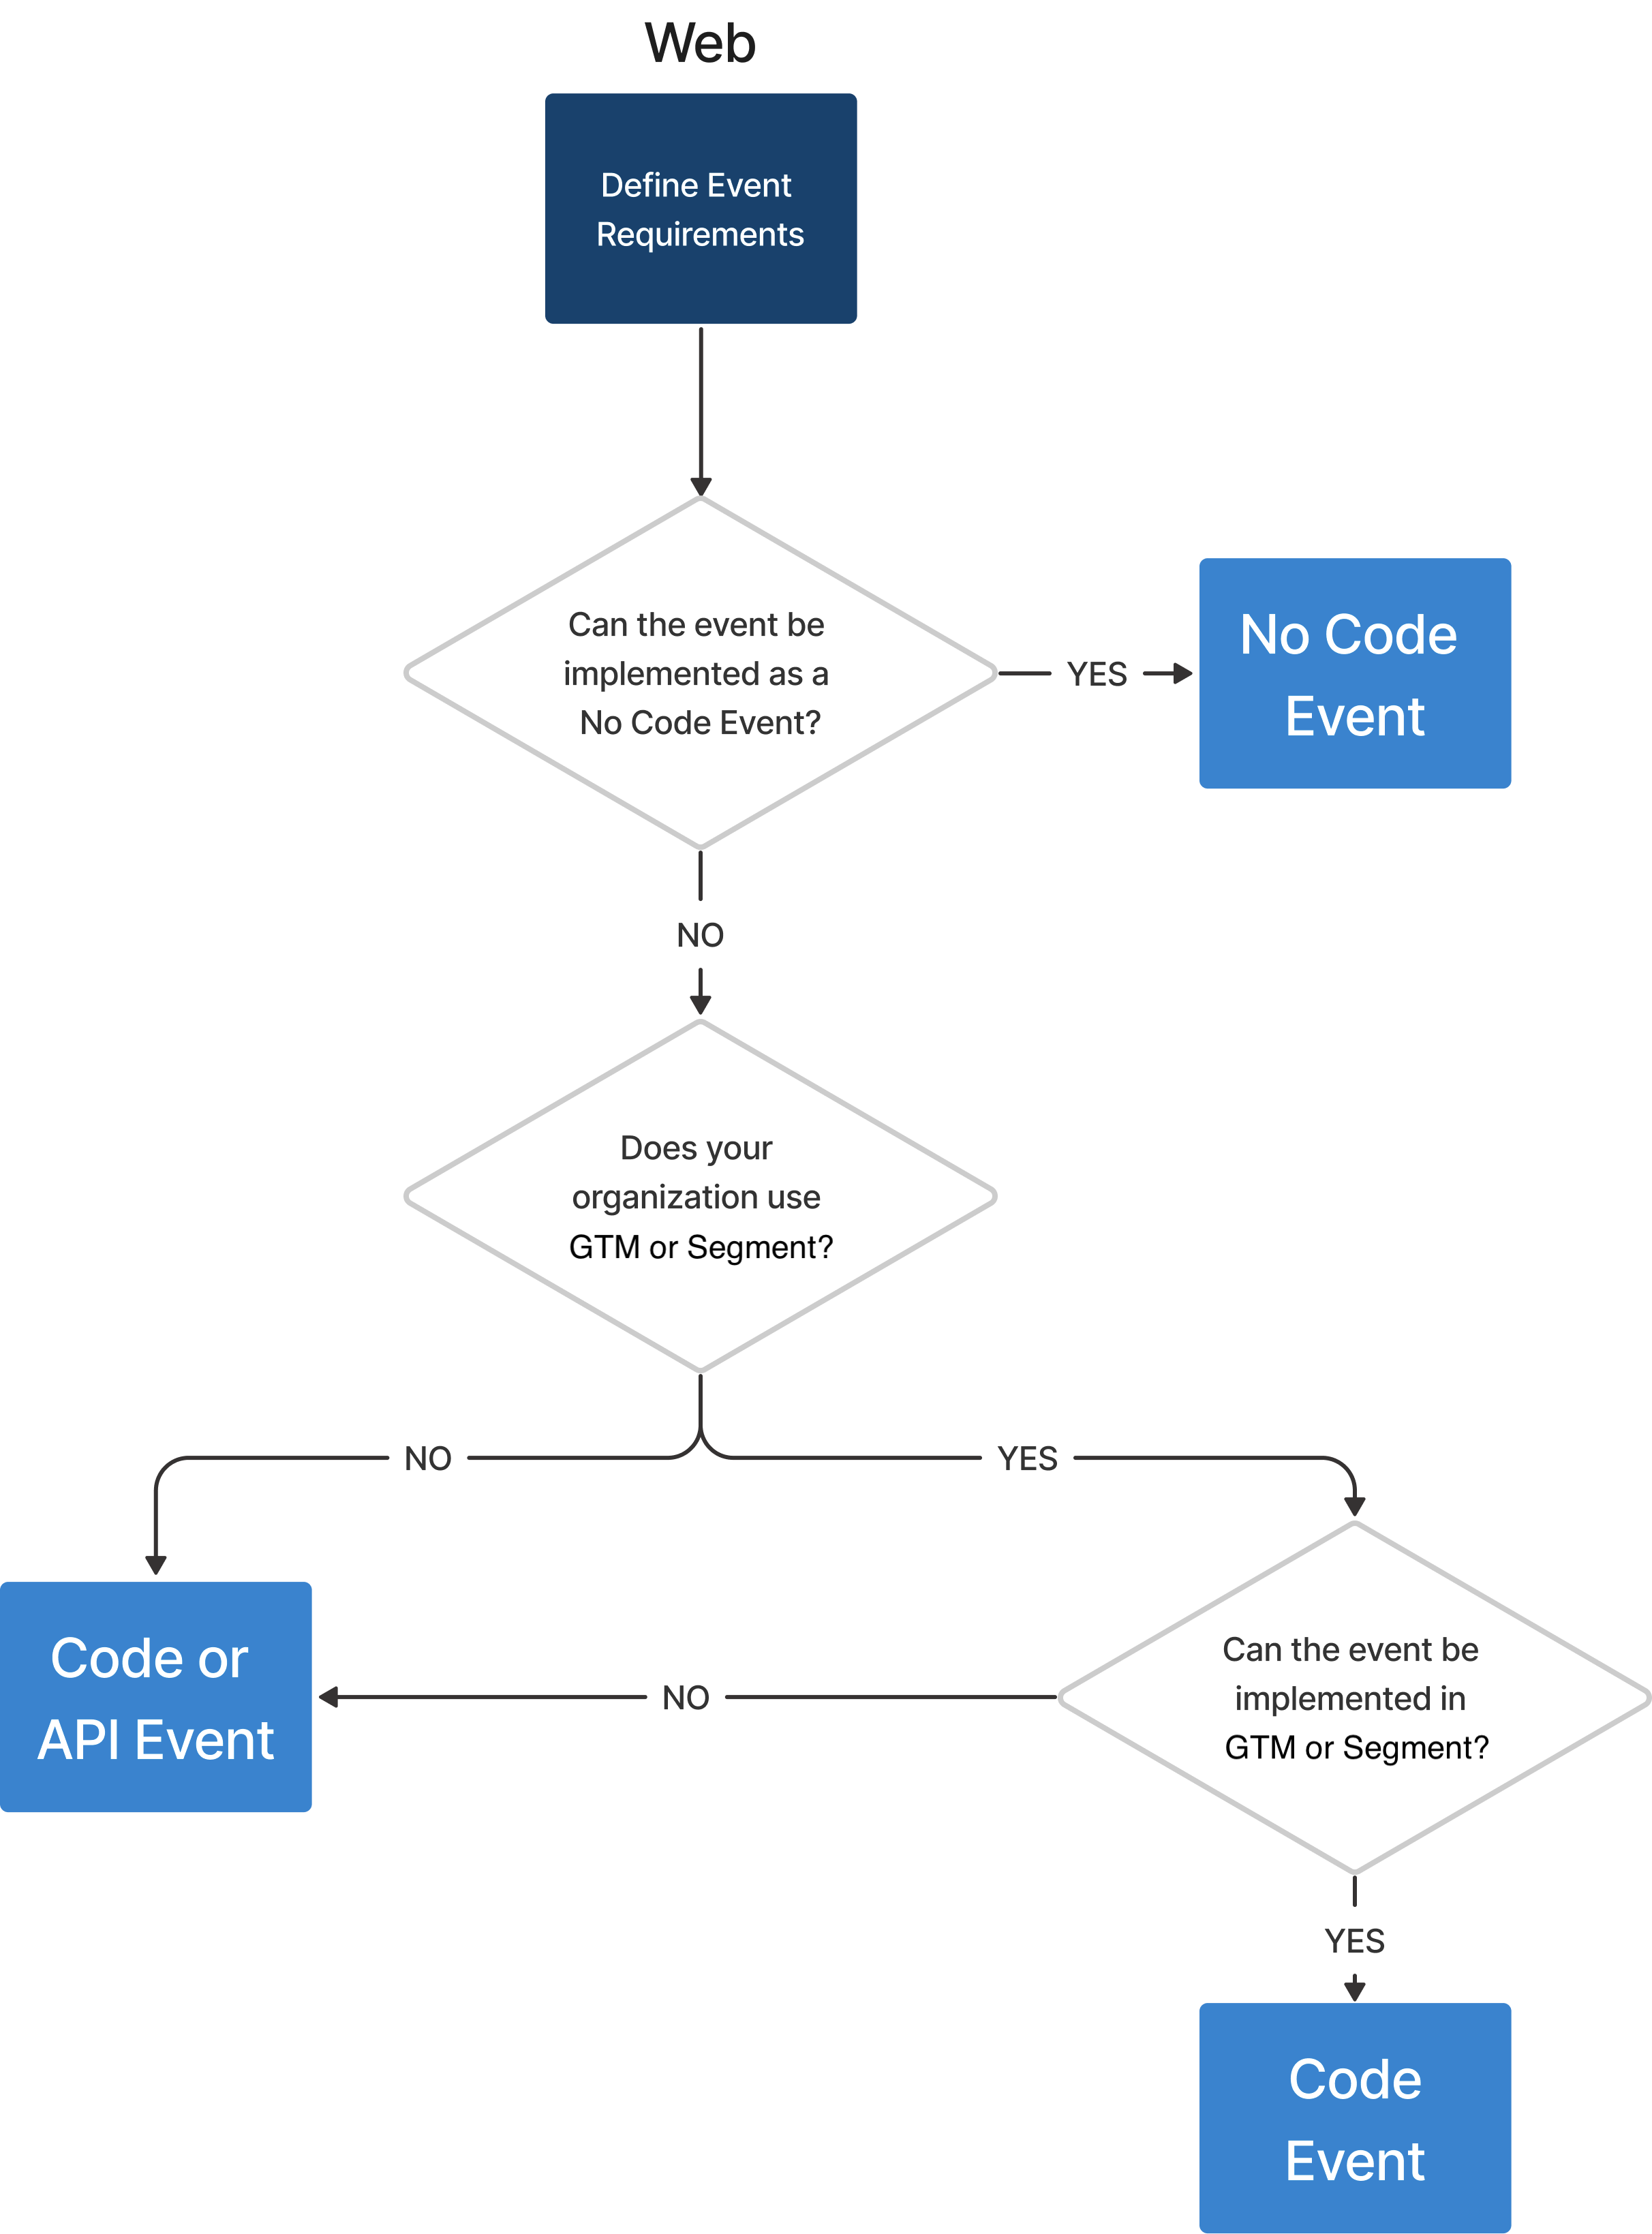
Sprig offers several different solutions on ways to deploy events in your environment. Deciding what kind of event to implement is dependent on study requirements and technological factors:
- What kind of action is it? Is it in a simple UI action like clicking a button or some higher-level concept like signing up for a new subscription? A No-Code event might support simple UI action but might not support a more complex semantic.
- What platform do you intend to launch your Study? Web studies support No-Code events, but mobile studies do not. Shareable Link studies do not support events.
- How good are your coding skills, and do you have access to the code? You may have to rely on a developer to implement your event, or you may have access to GTM or other integration and not depend on a developer.
- Is it an event or an attribute? For example, do you want the Study to be triggered when the visitor completes the new subscription action, or would you like it to occur at a different time and only study those customers who have recently enrolled in a new subscription?
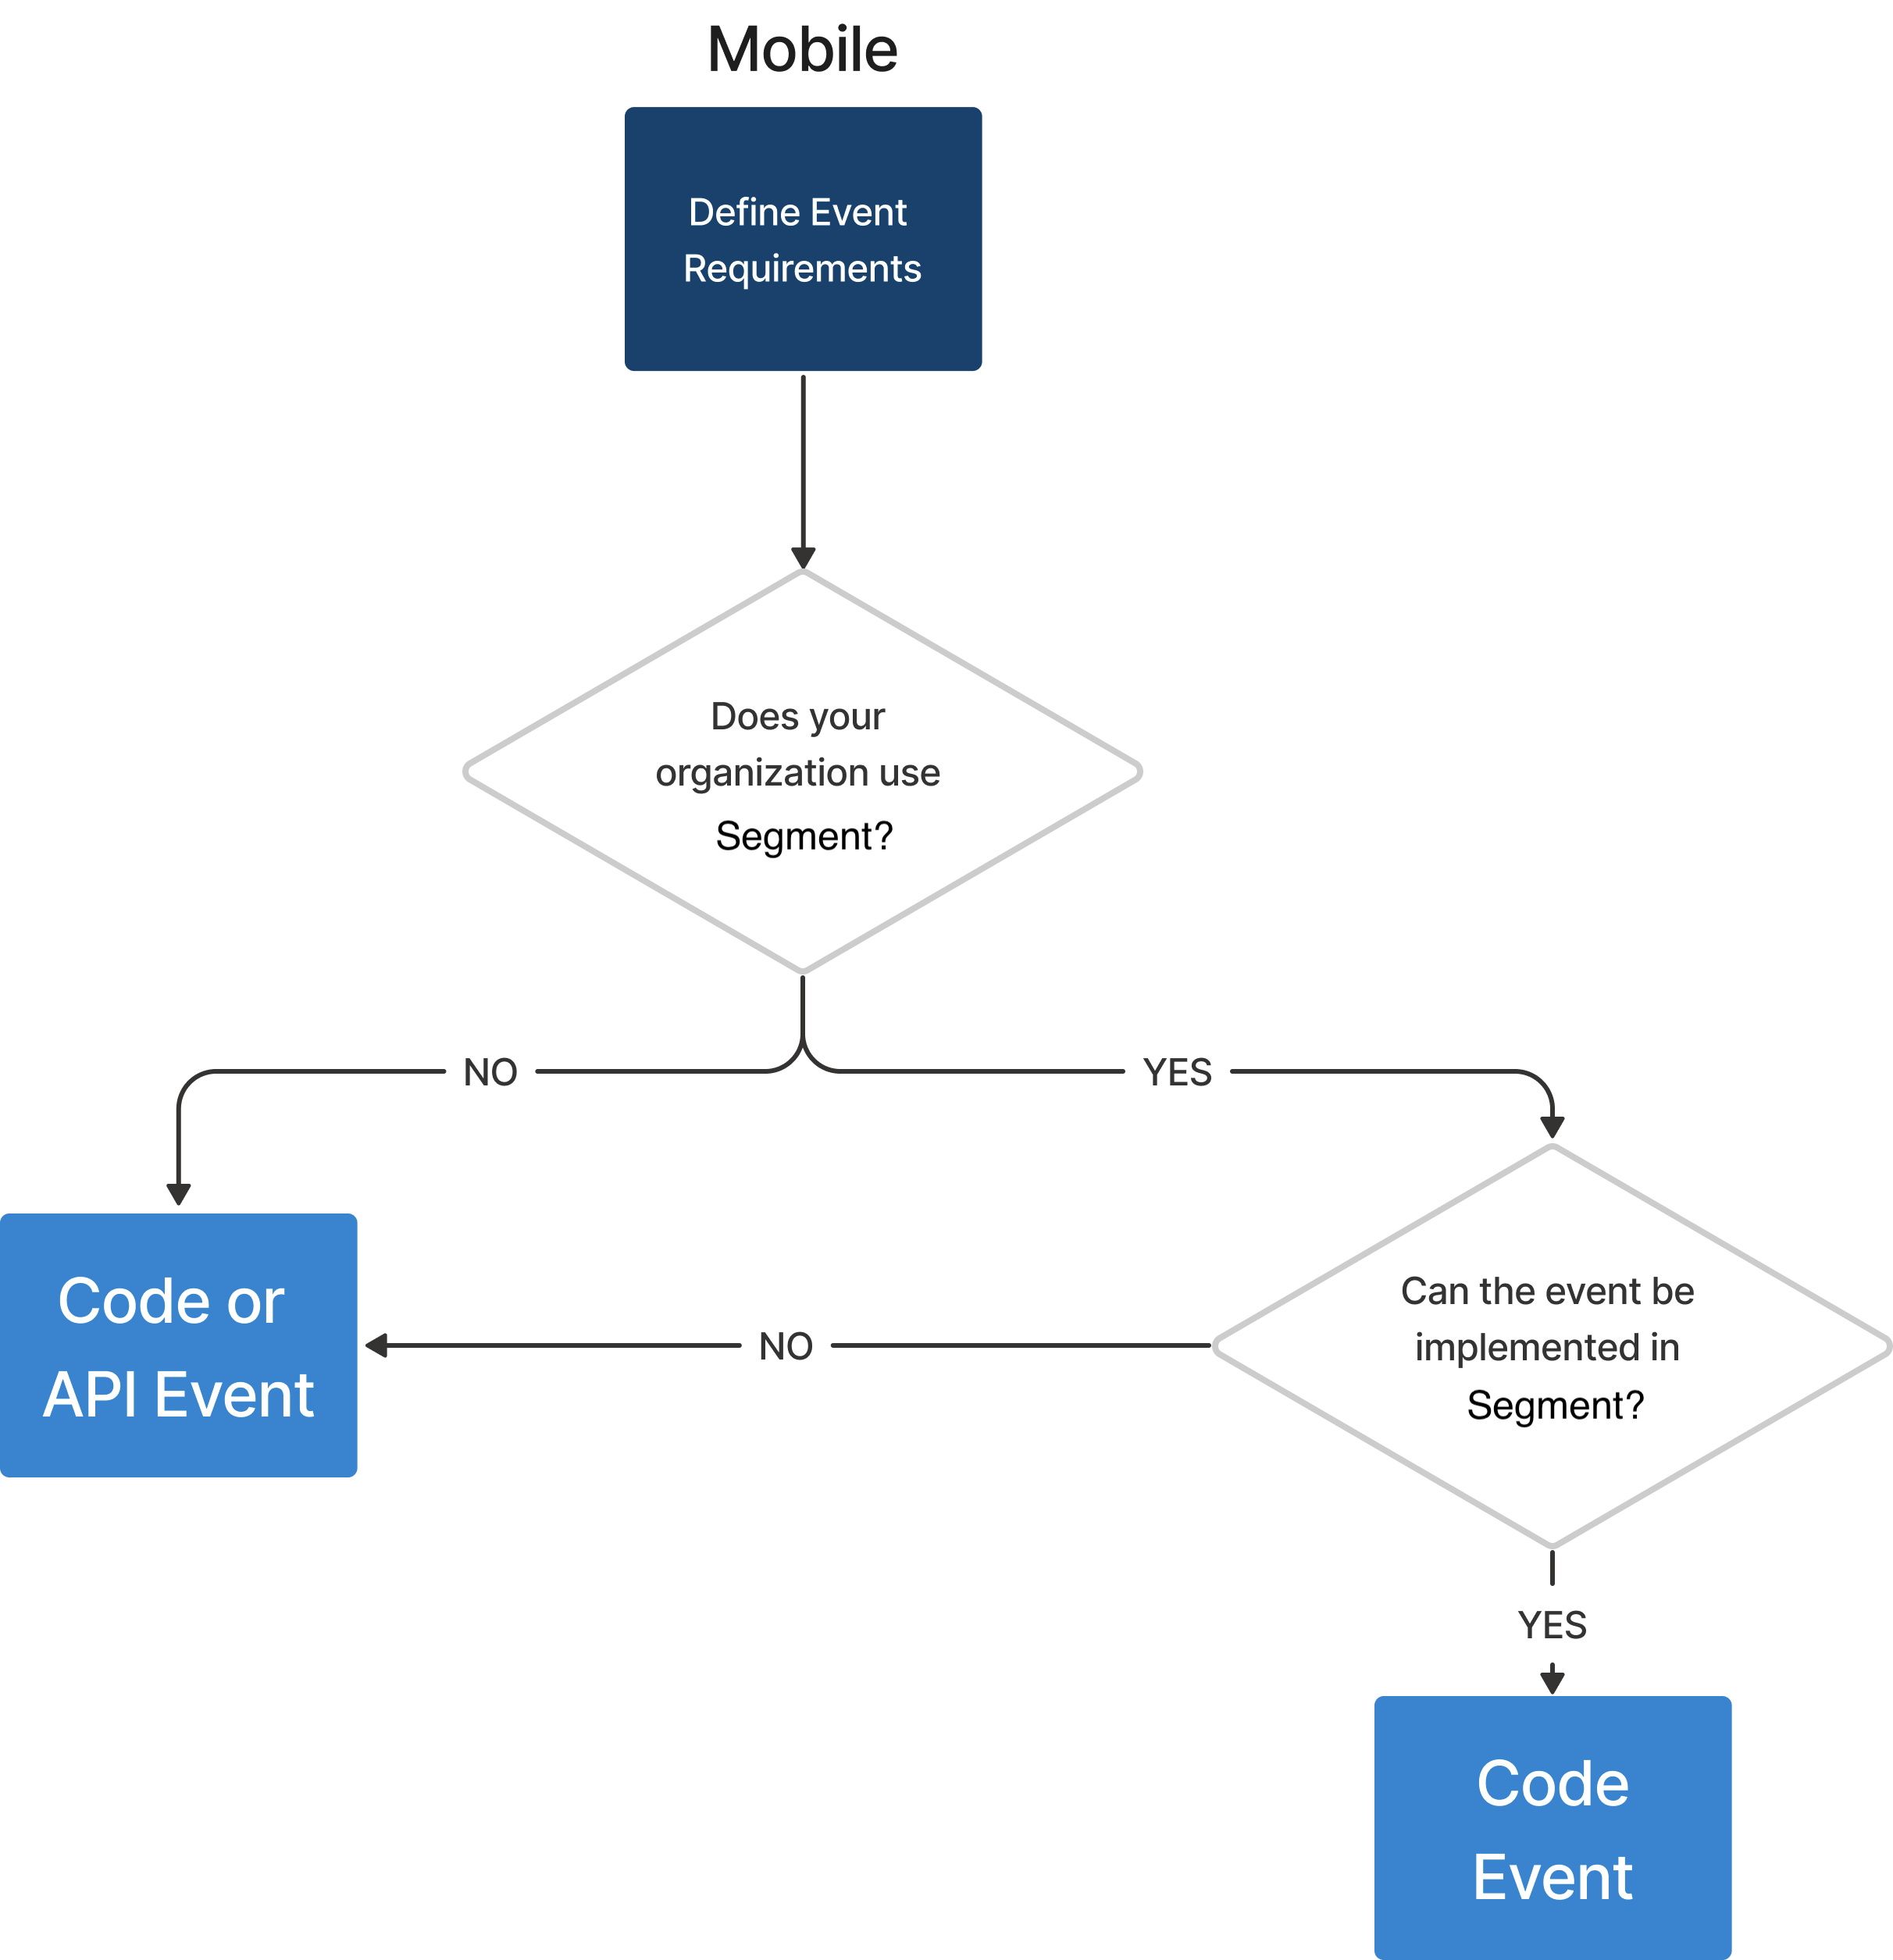
You could use two example workflows to determine what event type you need for Web and Mobile studies.
Where You Can Use Events
Configuring Trigger and Filtering events are supported in the Sprig Application (No-Code), the Web and Mobile SDKs, and Google Tag Manager. Segment can be used to Trigger Web Studies and coming soon Mobile studies. The API only supports events for filtering. CSV Import does not support events.
| Event Type | Trigger | Filter |
|---|---|---|
| Sprig Application (No-Code) | ✅ | ✅ |
| Web SDK | ✅ | ✅ |
| Google Tag Manager | ✅ | ✅ |
| Mobile SDK | ✅ | ✅ |
| API | ❌ | ✅ |
| Segment Actions | ✅ | ✅ |
| Segment Classic | ❌ | ✅ |
Adding Events
Web and Mobile studies require events to track user behavior to display studies at the appropriate moment. Link studies do not require events because they are delivered to respondents asynchronously. You can configure Sprig to listen for or receive events in two ways; either:
- Using the Sprig app, or
- Directly in the Website or App code where you launch your studies.
Events configured through the Sprig app are No-Code events. Events configured in the Website or App where you want to launch your studies are Code events.
The section describes the steps to add a No-Code and Code Event to Sprig
No-Code Event
No-Code events provide a way to configure Sprig to trigger Web studies without having to edit the source code on the server. No-Code events only support deploying Web-based studies. Code events may be used for web and Mobile studies using the appropriate SDK, API, or Integration.
No-Code events provide three different selection methods by which you can identify when an event occurs:
- Page URL - this fires an event when the browser views a particular page you specify by typing in its URL.
- Inner Text - an event fires when an element in a page containing the exact text specified, such as a button label, is clicked.
- CSS Selector - an event fires if an element in a page is clicked containing the CSS label specified.
Info
No-Code events are triggered when a specific condition is met (for example, when the current page URL matches a string you have defined). On page load, the system triggers the first event that matches that specific condition. If you have other No-code events with that same trigger condition, the system will not trigger those other events.
The steps to add a No-Code event are:
- Choose a page or a button on your website or web application.
- Keep that page open as you navigate to the next step; you will need to copy information from this page into the Sprig app. You may want to open the browser Inspect window if you intend to use the CSS selection method.
- In the Navigation Pane, click Events.
- Click Add Event.
- Click Create No Code Event.
- In the Display Name field, enter the Event name.
- n the Description field, enter the Event description.
- Click Page URL based on browser page viewing or Inner Text for a trigger based on a button, link, or UI element event on the page, else CSS Selector to select the class.
- In the URL field, enter the Page URL string that you want to match. Once you have entered the string, enter the URL you are trying to match in the Test Your Event field and click Test Event to test if the string you entered matches the URL. For more information on page URL matching click here.
- Enter the URL you are trying to match in the Test Your Event field and click Test Event to test your URL pattern.
- If Page URL was selected, click Add Event.
- If Inner Text or CSS Selector was selected, enter the appropriate text or CSS to identify the element.
- Open your browser's JavaScript console in your browser.
- Make sure you are on the correct page.
- Paste the code snippet into the console and hit Enter.
- If successful, the element information will be displayed in the console.
- Click Add Event.
Testing the Event
- In your browser, perform the user behavior to generate the event.
- Click
 Browser Reload to refresh the Events page contents.
 - In the Events page, hold the pointer over Daily Usage. You should see that an event has been received.
Code Event
Code events may only be used for Web and Mobile applications. There are two ways to add events to Sprig: create the Code Event in the Sprig app, or have your developer send an event from the SDK.
Proactive
If you use the Sprig app to create a Code event, a code snippet is generated with the matching SDK parameter that you can give to your developer to incorporate into their code.
- In the Navigation Pane, click Events.
- Click Add Event.
- Click Create Code Event.
- In the Key field, enter the Event name. The Event name must match the same SDK parameter you are using to track the event.
- Click Use Key as display name. to use a different string to describe the event instead of the Key label.
- In the Description field, enter the event description.
- Click Add Event. You’ll be directed to the Events page.
- Locate and Select the Event you just created.
- Click Configure to Toggle between JavaScript, iOS, or Android to see the snippet that your engineers will need depending on which study delivery platform you’re planning to use the Event on and share that snippet with engineering. Direct them to the Integrations section of the docs for more information on that specific platform, as well as how to locate the Environment ID.
Reactive
- Once your engineering team has sent a new event to Sprig, you will need to approve the request. You should see a banner similar to the following:

- In the Navigation Pane, click Events.
- Click Manage Requests.
- Click the check box next to the event(s) and click Approve.
- Click X to close the window.
Info
You must Approve of an Event Request before it can trigger a study.
If you Deny an Event Request, it will be removed from the Event Request list. However, if Sprig subsequently detects that same Event Request, it will re-appear in the list.If you do not see an Event Request for an event you expect, perform the user behavior to generate the event in your application, and then reload the Events page and return to Manage Requests to approve it.
Legacy Events do not have to be Approved.
Editing and More Info
- In the Navigation Pane, click Events.
- Click on the Event that you want to view.
- The Display Name and Description may be changed.
- For No-Code event, the trigger interaction can be toggled between Page URL, InnerText and CSS. The Page URL pattern can also be edited.
- For Code event, the Key cannot be modified as an external source generates it.
The Display Name updates the event label throughout Sprig; you can use it to provide a more readable label than Key.
Archiving
Archiving an event stops the Event, triggering studies. Events cannot be archived when associated with an in progress study. You will need to pause, archive, or complete the study related to that Event to archive the Event. You can unarchive a previously archived study.
Info
Unlike pausing a Study, archiving an Event also halts the MTU count.
- In the Navigation Pane, click Events
- Make sure the filter is set to Active Events.
- Click the check box next to the Event.
- Click Archive.
- Click Archive a second time when prompted.
Unarchiving
Similarly, if you want to restart using an event, you can unarchive a previously archived event.
- In the Navigation Pane, click Events
- Make sure the filter is set to Archived Events.
- Click the check box next to the Event.
- Click Unarchive.
Sorting
- In the Navigation Pane, click Events
- Click on the column header to sort the Events
- Click on the column header a second time to reorganize the sorting order of the Events
Filtering and Searching
- In the Navigation Pane, click Events
- Click All Sources and select the source to view.
- Click Active or Archived to select which events to view.
Info
If you select Web No Code Events as a source to view, if present, events from Segment Web and Google Tag Manager sources will also be included.
Inspecting and Diagnosing
- In the Navigation Pane, click Events.
- To learn more about how often the event is firing, hold the pointer over
 diagnostics in Usage.
 - If the diagnostics is grey
 , your event is either not added correctly or has been turned off from your website, web application, or mobile application.
 - If the diagnostics is green , your event is being tracked and is available for triggering or filtering a study.
- The following tooltip will be displayed:

Diagnostics Tooltip
If you are using other platforms, for example Segment, they will also be displayed in the tooltip.
Updated 7 months ago