

Getting Started
Overview
The Sprig iOS SDK, when installed in your native iOS app, allows you to track your customer’s in-product behavior and display Sprig studies when they perform certain actions.Requirements
- Join your teammates on Sprig (check with your Sprig admin whether team discovery is on, or simply have a team member invite you via your email address). This will give you access to your team’s environment IDs, as well as the interactive Installation Guide.
- Ensure you have access to your iOS codebase, and can deploy to a development and/or production environment
- The Sprig iOS SDK only supports iOS 16 and above.
- Xcode 14: If you have not updated to the Xcode 14, you may experience build issues since Xcode 14 removes bitcode. Check out Sprig’s legacy release for Xcode 13 compatibility.
Install SDK
There are three ways you can include Sprig in your application: SPM, CocoaPods, or manually.Install via SPM
To install using SPM, use our release repository and install the package from main branch: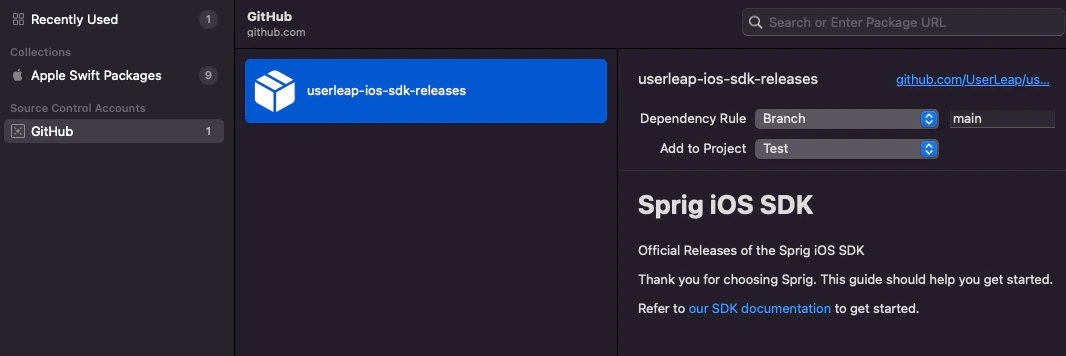
Install via CocoaPods
To install via CocoaPods, add the following statement to your Podfile:Install manually
If you’re unable to use Cocoapods or Carthage, you can also install Sprig manually. Download the latest framework as a zip from our Releases. Unzip the downloaded file and drag the UserLeap.framework folder into your project directory. Open Xcode and select your project in the “Project Navigator” pane, select your app under “TARGETS”. In the “Frameworks, Libraries, and Embedded Content” section, press “+”, “Add Other…”, “Add Files…” and select the UserLeap.framework folder. Be sure that UserLeap.framework is in your project settings “Framework Search Paths” or Xcode will throw the “no such module UserLeap” error.

Obtain an Environment ID
After you’ve installed, you must obtain an environment ID from Sprig. Sprig provides two environments, Development and Production, each with its own corresponding ENVIRONMENT_ID (which can be found in Integrations > iOS SDK). The Development environment is recommended for initially setting up and verifying your installation. Then, you can use the Production environment to deploy studies to real users.Initialize the SDK
Usage is simple and revolves around a singleton, conveniently namedSprig. The singleton must be configured before it can be used. A common pattern is to configure this in your ApplicationDelegate, but follow the best practices for your team and application.
configure will only accept 1 environment ID, and calling it multiple times with different IDs will have no effect.
Study Previews
Identify Users
Identifying users ensures that a user’s actions are all associated with the same profile so they can be targeted. Properly identifying users helps ensure:- Your users have a consistent experience across platforms, and do not see the same study multiple times
- You can accurately target the right users
- You are billed for the correct number of Monthly Unique Users (MUUs)
Set User ID
Sprig allows you to differentiate users by setting a unique USER_ID. You may want to ensure consistency between the User IDs sent to Sprig and the ones in your internal database, product analytics/CDP, or data warehouse. You can also use an anonymizing function or hash. A good User ID is…- Unique: Two users should not share the same User ID.
- Mappable: User IDs sent to Sprig should map back to your internal User IDs, either directly or anonymously.
- Static: Once assigned, a User ID should not change.
setUserIdentifier to identify a user with any string less than 256 characters. This function can be called multiple times safely, and stores the identifier locally. We recommend you set the User ID whenever the user logs in to your app, as well as after the configuring Sprig (if the user is already logged in).
Logout
When a user logs out of your app, make sure to log that user out of the Sprig SDK. This will prevent any new activity from being associated with the wrong user. Note that if you calllogout() on an unauthenticated user, Sprig will assign them a new profile and count this new user separately toward your MTU limit.
Track Events
Sprig uses events to trigger (display) studies after the user performs a specific action. They can also be used as a filter to target users who have previously performed an action. Once you’ve installed the Sprig SDK, the next step is to configure the tracking of events that you would like to use to trigger or filter a study. For mobile SDKs, you must configure Code events. (Sprig also offers No-Code events, but these are only available on web platforms.) An event’s properties can be used to further filter an event trigger for a survey. To set an event’s properties, provide key-values pairs where:KEYmust be a string less than 256 characters, and cannot start with an!(these names are reserved for use by Sprig)VALUEcan be string|number|boolean that is less than 256 characters
SwiftUI
After sending a new Code event to Sprig, you must approve the new event request on the Events page before it can be used to trigger or filter surveys. Alternatively, after sending each tracking event, you can check if a new survey is ready for the user. If a survey is ready, you can decide to present the survey to the user. The survey will be presented onto the provided viewController from the bottom of the screen.
Track Attributes
Sprig allows you to track attributes, which can provide more context about the user to help you better understand their feedback. You can also use these attributes to filter your audience and target specific kinds of users. Some example attributes that can be tracked are:- Plan type
- Super users / power users
- Company
KEYmust be a string less than 256 characters, and cannot start with an!(these names are reserved for use by Sprig)VALUEcan be string|number|boolean that is less than 256 characters
Set Email Address
Setting the user’s email address is optional. Setting emails is not required for web or mobile studies, but can be used to target users or create a Group of users based on their email. Check your organization’s guidelines around personally-identifiable information before sending email addresses to Sprig.Test & Deploy
To verify your SDK is configured properly, we recommend testing with your developmentENVIRONMENT_ID.
- Create a survey in your Sprig Development Environment
- Choose an approved event as a trigger for your study
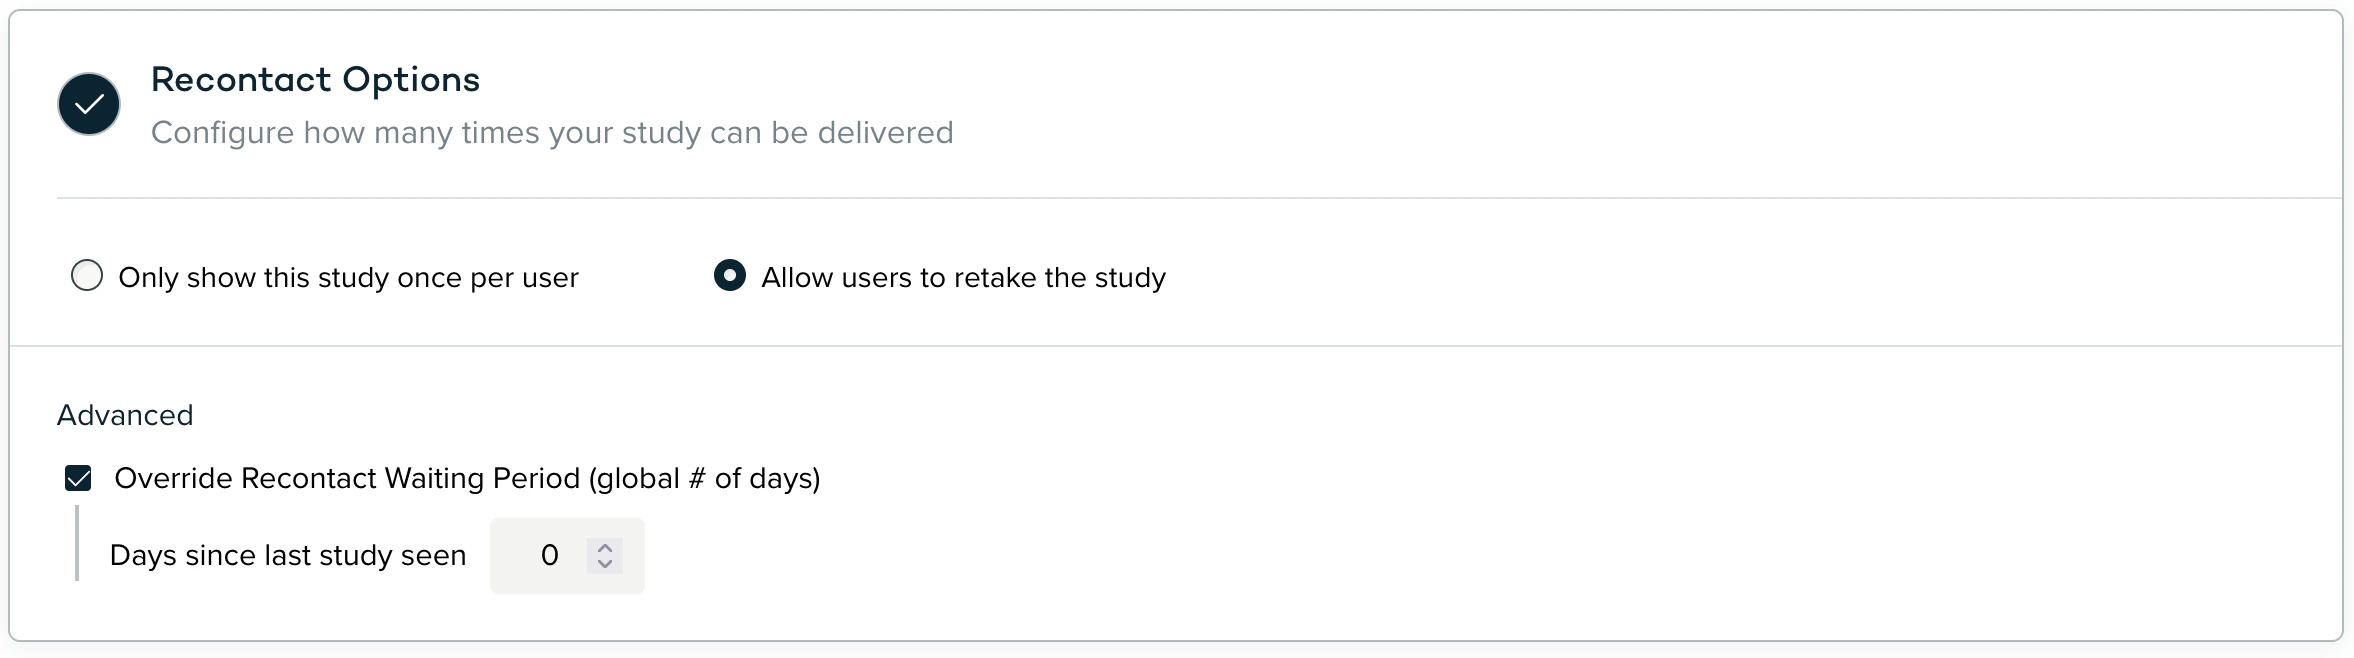
- [For testing purposes only] Allow users to retake the survey and set the recontact waiting period to 0 days
- Track the approved event from your app
Advanced Customization
Study Lifecycle Notifications
Sprig exposes updates throughout the study lifecycle. Here is a sample code block for listening to SDK events in real time:Swift
Sprig Replays Lifecycle Notifications
Sprig exposes updates throughout the Sprig Replay lifecycle. Here is a sample code block for listening to replay events in real time:Swift
Set Locale
Sprig supports setting the locale for default caption and button text. The following locales are supported:- de
- en
- es-es
- fr
- hi
- ja
- ko
- pt-br
- ru
- zh
Setting the locale will only affect static text, and is only available for the iOS and Android SDKs (not React Native).
App size impact
Sprig only usesFoundation, UIKit, SystemConfiguration, and CoreGraphics with no third-party frameworks to provide the smallest disk footprint on your app binary.
The SDK size is 234 KB compressed and 592 KB uncompressed.
Note: Compressed is equivalent to the additional size downloaded from the App Store, and uncompressed is the additional size on an iPhone after installation
Methodology: Created a fresh Xcode project with and without UserLeapKit.framework and used the App Size Report tool (Apple docs)