Single Sign-On (SSO)
Sprig supports integration with the following Single Sign-On (SSO) services:
Following will be a description of how to configure Sprig with those services.
KeyCloak
- Contact [email protected] to claim the email domain(s) that your SSO users will use to sign in.
- Log into your Sprig account and navigate to Settings > Single Sign-On.
- Select the SSO Enabled option, and click Save.
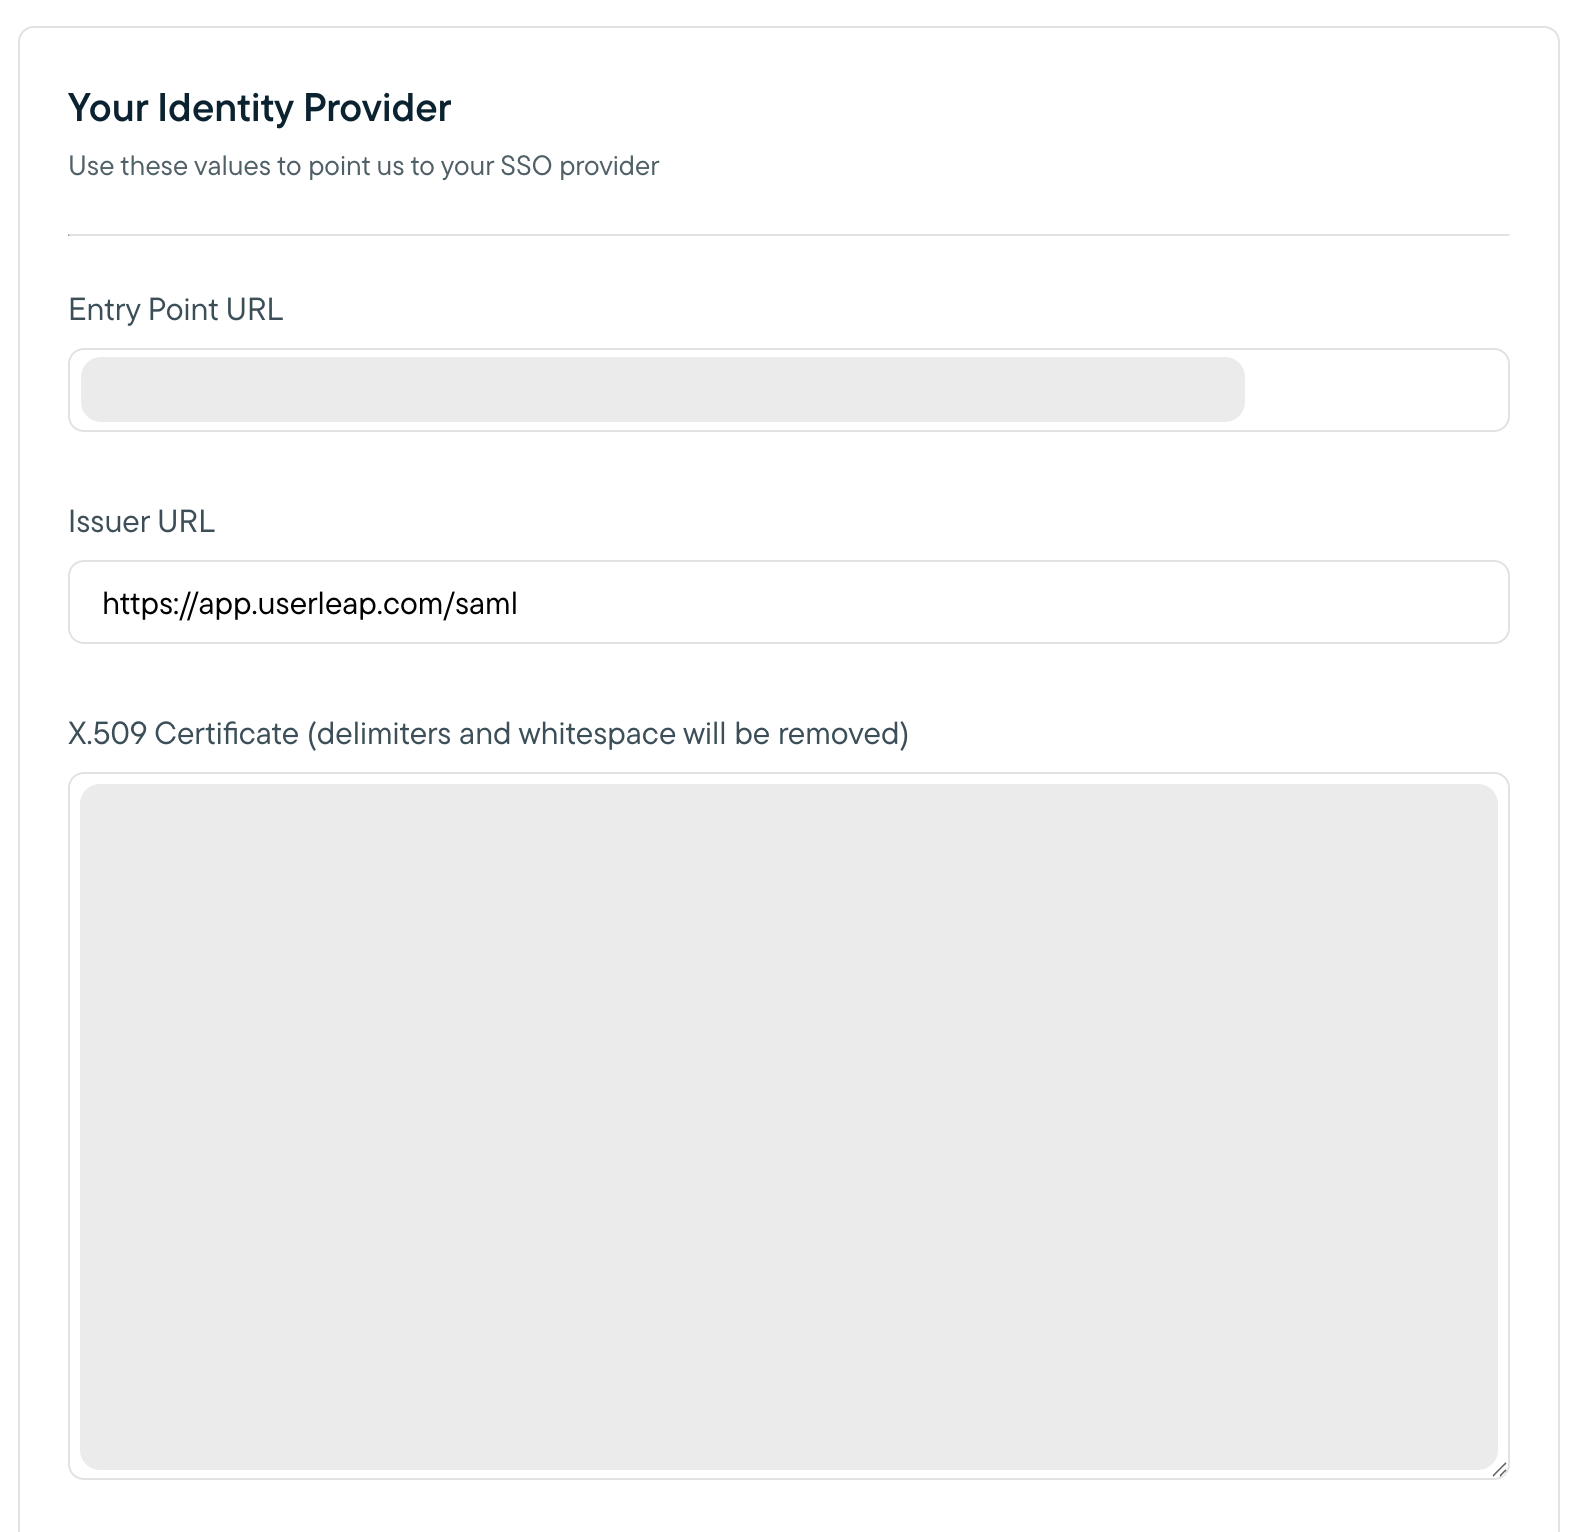
- An Important Values section should appear. Copy the value of the Entity URI field into the Issuer URL field in the Your Identity Provider, and click Save button for both sections. Take note of both values provided by the Important Values section, as you will use it in your KeyCloak client configuration in the next step.
- Log into your KeyCloak administration console. Navigate to the Clients page. Click Create and an Add Client page should appear. In the Add Client page enter the Entity URI from Step 4 into the Client ID field, and select SAML for the Client Protocol. Click Save.
- A new configuration page for the newly created Sprig client should appear. Click on the Settings tab. Switch the Enabled and Sign Document toggles to the ON position. All other toggles should be OFF. Select RSA_256 for the Signature Algorithm, and enter the ACS URL from Step 4 into the Valid Redirect URIs field. The values of all other fields can be as the default value or blank. Click the Save button.
- Click on the Mappers tab for the Sprig client you created. Add two mappers that will evaluate the values that will be used by the Sprig application for each user’s name and role. The SAML attribute names must be _name_and role, respectively. Name values must be less than 255 characters, and valid values for role are admin, developer, or viewer. Sprig roles are described here.
- Click on the Realm Settings tab on the left. Click on the Keys tab in the Realm page under which your Sprig client was created. On that page, under the Active tab you should see a set of rows for each key. Find the one that has type RSA and click on the Certificate button on the right side of the row. A long string value should appear. Enter this value into the X.509 Certificate field in the Your Identity Provider section of the Sprig SSO Settings Page. Click Save.
Users that are assigned to the KeyCloak application integration will now be able to sign in using the Sprig SSO login.
Okta
- Contact [email protected] to claim the email domain(s) that your SSO users will use to sign in.
- Log into your Sprig account and navigate to the Settings > Single Sign-On.
- Select SSO Enabled and click Save.
- An Important Values section should appear. Take note of the values provided. You will use them to configure your Okta integration in Step 10.
- Log into your Okta account and go to the Admin section. Open the side menu with the hamburger button in the top left corner, and navigate to Applications > Applications.

- Click on Create App Integration.

- A modal window should appear. Select SAML 2.0 for the sign-in method. Then click Next.

- Enter Sprig for the App Name, and click Next.
- The next screen is where you will input the SAML settings. Use the values you were provided on the Sprig SSO settings page in Step 4 to enter the ACS URL into the Single sign on URL field, and the Entity URI into the Audience URI (SP Entity ID) field. Select EmailAddress from the Name ID format dropdown, then select Email from the Application username dropdown. Do not edit the checkboxes under the Single sign on URL field.

- In the attributes section add an attribute so that there are two. Enter “name” and “role” for the Name fields. Leave the Name format fields as Unspecified. In the Value fields enter Okta Expression Language expressions that will provide the name and role for your Sprig users. The “role” field needs to evaluate to one of:
admin,editor,developer, orviewer. Sprig roles are described here. If you are not sure what to enter here you can addString.join(" ", user.firstName, user.lastName)for name andadminfor role.

- Leave the Group Attribute Statements section blank. Scroll down to the bottom of the page and click Next.
- Fill out the necessary fields in the Feedback section and click Finish.
- You should now be taken to your new app’s integration page. Make sure you're on the Sign On tab, then scroll down and click View SAML Setup Instructions

- A new tab will open with configuration values. You will be using these values to configure Sprig SSO in the next step.

- Navigate to the Sprig SSO Settings Page. Copy the values from the previous step into the corresponding fields in the “Your Identity Provider” section
- Identity Provider Single Sign-On URL → Entry Point URL
- Identity Provider Issuer → Issuer URL
- X.509 Certificate → X.509 Certificate
- Click the Save button in the Your Identity Provider section. You now can assign users in the Assignments tab of your Okta application integration.

Users that are assigned to the Okta application integration will now be able to sign in using the Sprig SSO login.
OneLogin
- Contact [email protected] to claim the email domain(s) that your SSO users will use to sign in.
- Log in to Sprig and go to Settings > Single Sign On.
- Select SSO Enabled option, and click Save.
- An Important Values section will appear. Take note of the values provided. You will use them to configure your OneLogin integration in step 8.
- Log in to your OneLogin account and go to the Administration section. Navigate to the Applications page.

- Click the Add App on the right side of the page. In the search field, enter Saml Custom Connector. Choose SAML Custom Connector (Advanced) provided by OneLogin Inc:

- In the Display Name field, enter a name and click Save.

- Click Configuration. Use the Important Values you were provided in step 4 to cut and paste the Entity URI into the Audience (EntityID) field, and the ACS URL into both the ACS (Consumer) URL Validator field and the ACS (Consumer) field.

9 ) Click Parameters. Click on
 to add a parameter.
- Enter
namein the Field name field. Select the Include in SAML assertion option. Click Save.

- In the Value drop-down list select Name.

12 ) Click again on Parameters. Click on
to add another parameter.
- Enter
rolein the Field name field. Select the Include in SAML assertion option. Click Save. - In the Value drop-down list select - Macro - . Either enter
admin,editor,developer, orviewerin the field. Sprig roles are described here. Roles can be configured on a per-user basis using user attribute macros. If you don’t have the appropriate attribute configured for users yet, you can choose “- Macro -” again and enteradmin, and all assigned users will receive “admin” permissions. - You will configure the SAML settings. Click on the SSO tab. In the SAML Signature Algorithm dropdown, select SHA-256.
- Navigate to the Sprig's Settings>Single Sign-On. Copy the values from the SSO tab in the previous step into the corresponding fields in the Your Identity Provider section:
- Issuer URL → Issuer URL
- SAML 2.0 Endpoint → Entry Point URL
- Now in the OneLogin SSO tab, click View Details link under the X.509 Certificate field. A new page will appear. Copy the text inside the X.509 Certificate field and paste it into the X.509 Certificate field in Sprig's Settings>Single Sign-On. Click “Save”.
Users that are assigned to the OneLogin application integration will now be able to sign in using the Sprig SSO login.
Microsoft Entra ID
- Contact [email protected] to claim the email domain(s) that your SSO users will use to sign in.
- Log into your Sprig account and navigate to Settings > Single Sign-On.
- Select the SSO Enabled option, and click Save.
- An Important Values section should appear. Copy the value of the Entity URI field into the Issuer URL field in the Your Identity Provider section, and click Save. Take note of the Entity URI and the ACS URL values provided by the Important Values section, as you will use them in your Microsoft Entra ID client configuration.
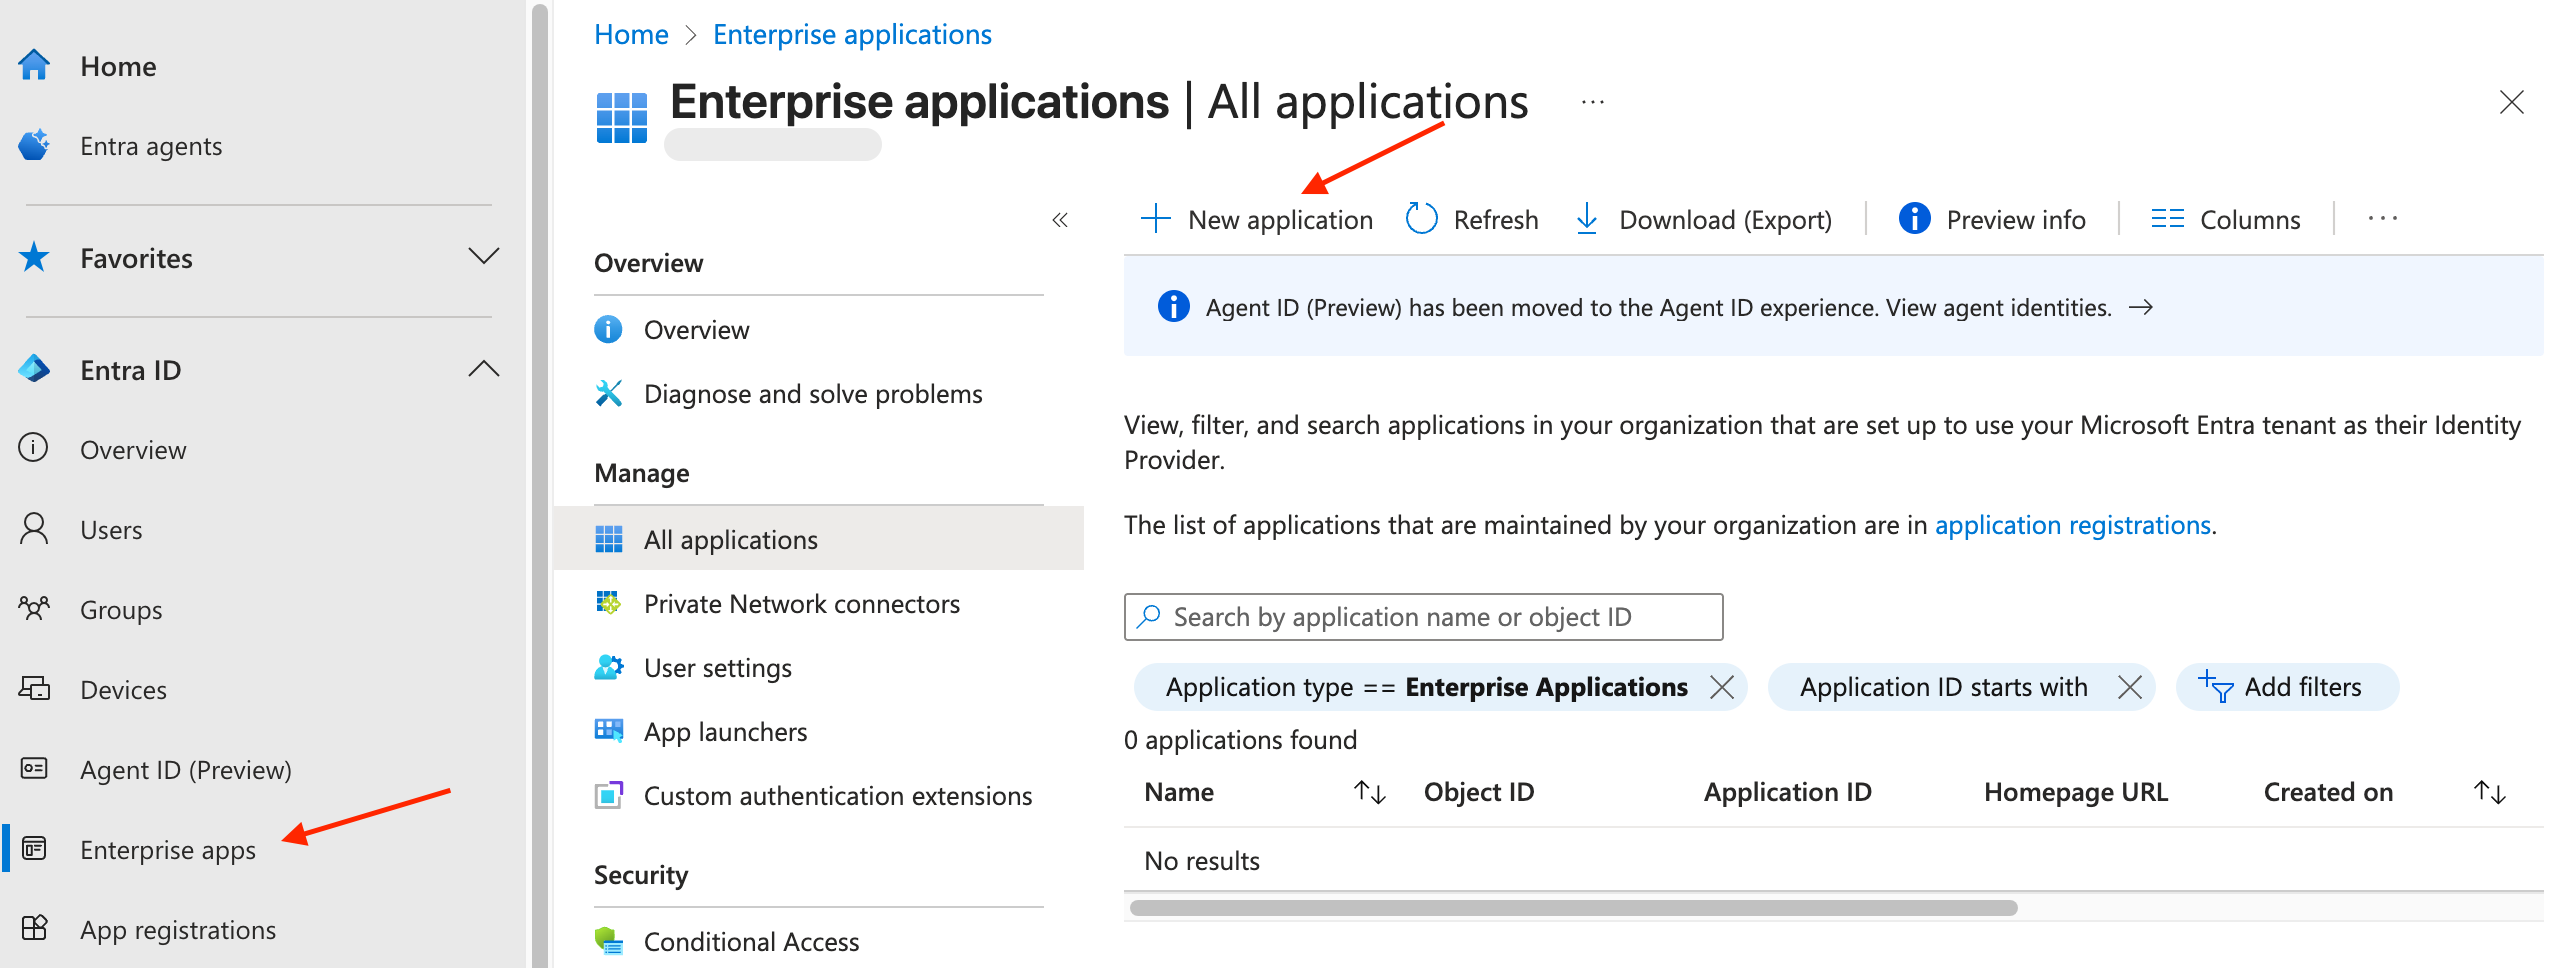
- Log into your Microsoft Entra admin center. Navigate to the Enterprise app page. Click “+ New application” at the top of the page and then “+ Create your own application” in the window that opens on the right.

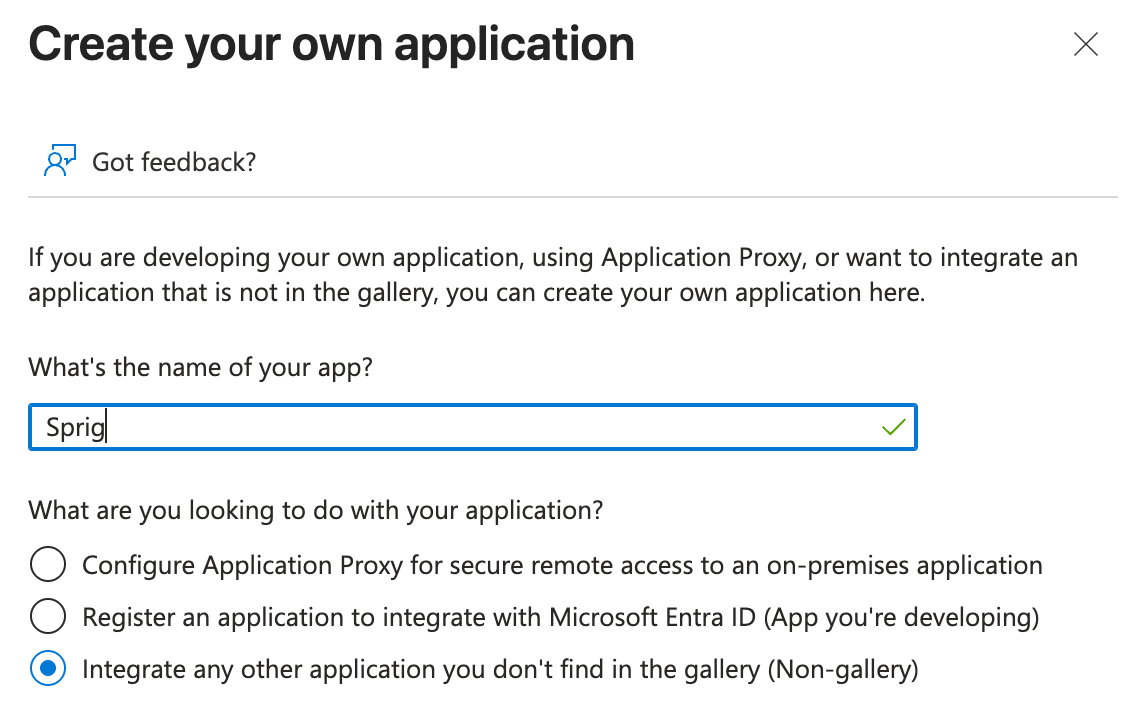
- In the “What’s the name of your app?” field, enter “Sprig” or whatever you would like the application to be called, and select “Integrate any other application you don’t find in the gallery (Non-gallery)” and click Create.
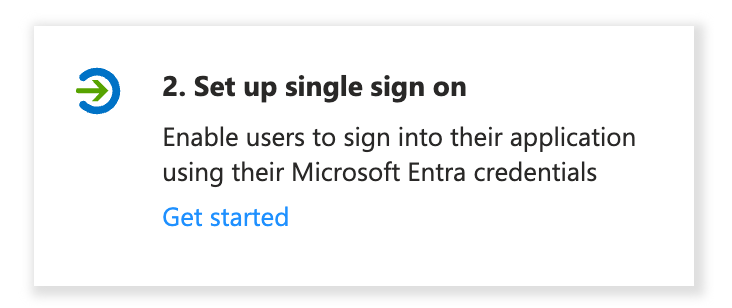
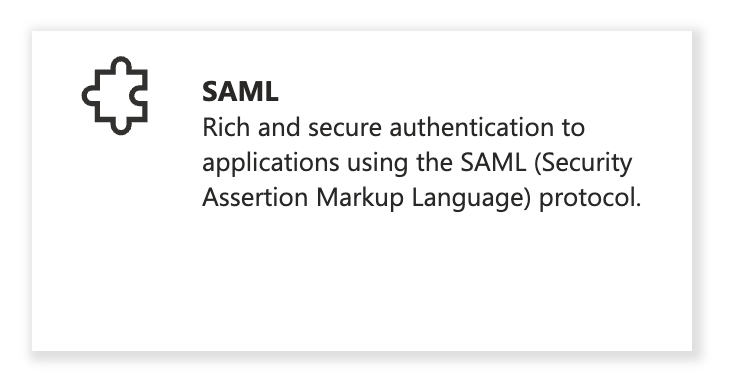
- Under “Set up single sign on,” click “Get started” and choose SAML.
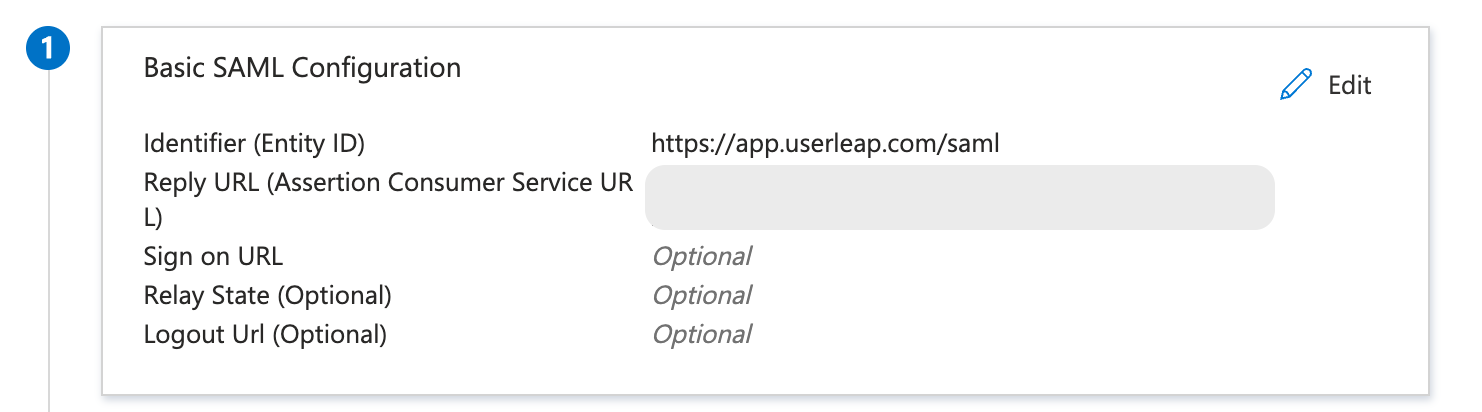
- In the Basic SAML Configuration section, click Edit, and:
- Paste the Entity URI from the Sprig dashboard into the Identifier (Entity ID) field
- Paste the ACS URL into the Reply URL (Assertion Consumer Service URL) field.
- Copy the Login URL from section 4 in the Microsoft Entra admin center and paste it into the Entry Point URL field in the Sprig dashboard.
- Then, click download next to Certificate (Base64) from section 3 in the Microsoft Entra admin center to download the X.509 certificate.
- Open the downloaded certificate in a text editor.
- Copy the contents of the certificate, paste it into the X.509 Certificate field in the Sprig dashboard, and click Save.
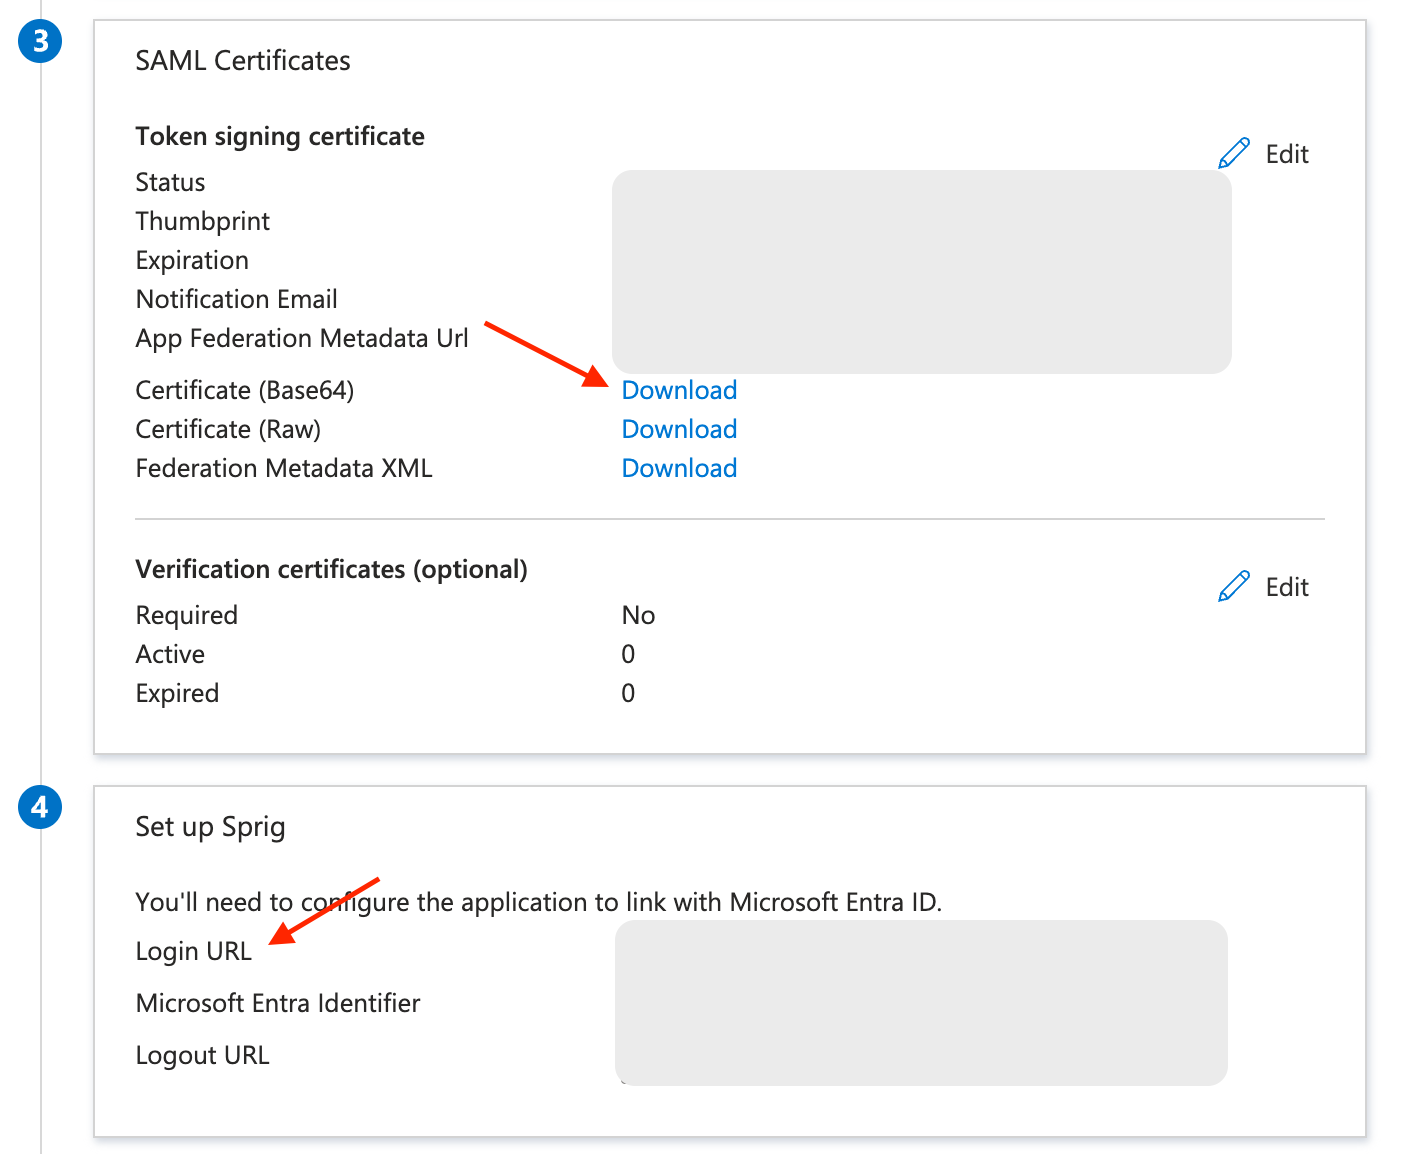
- Back in the Microsoft Entra admin center, navigate to the “Users and groups” page to add users or groups to the application. The users or groups that you add will determine which users will be able to use SSO to login to Sprig.
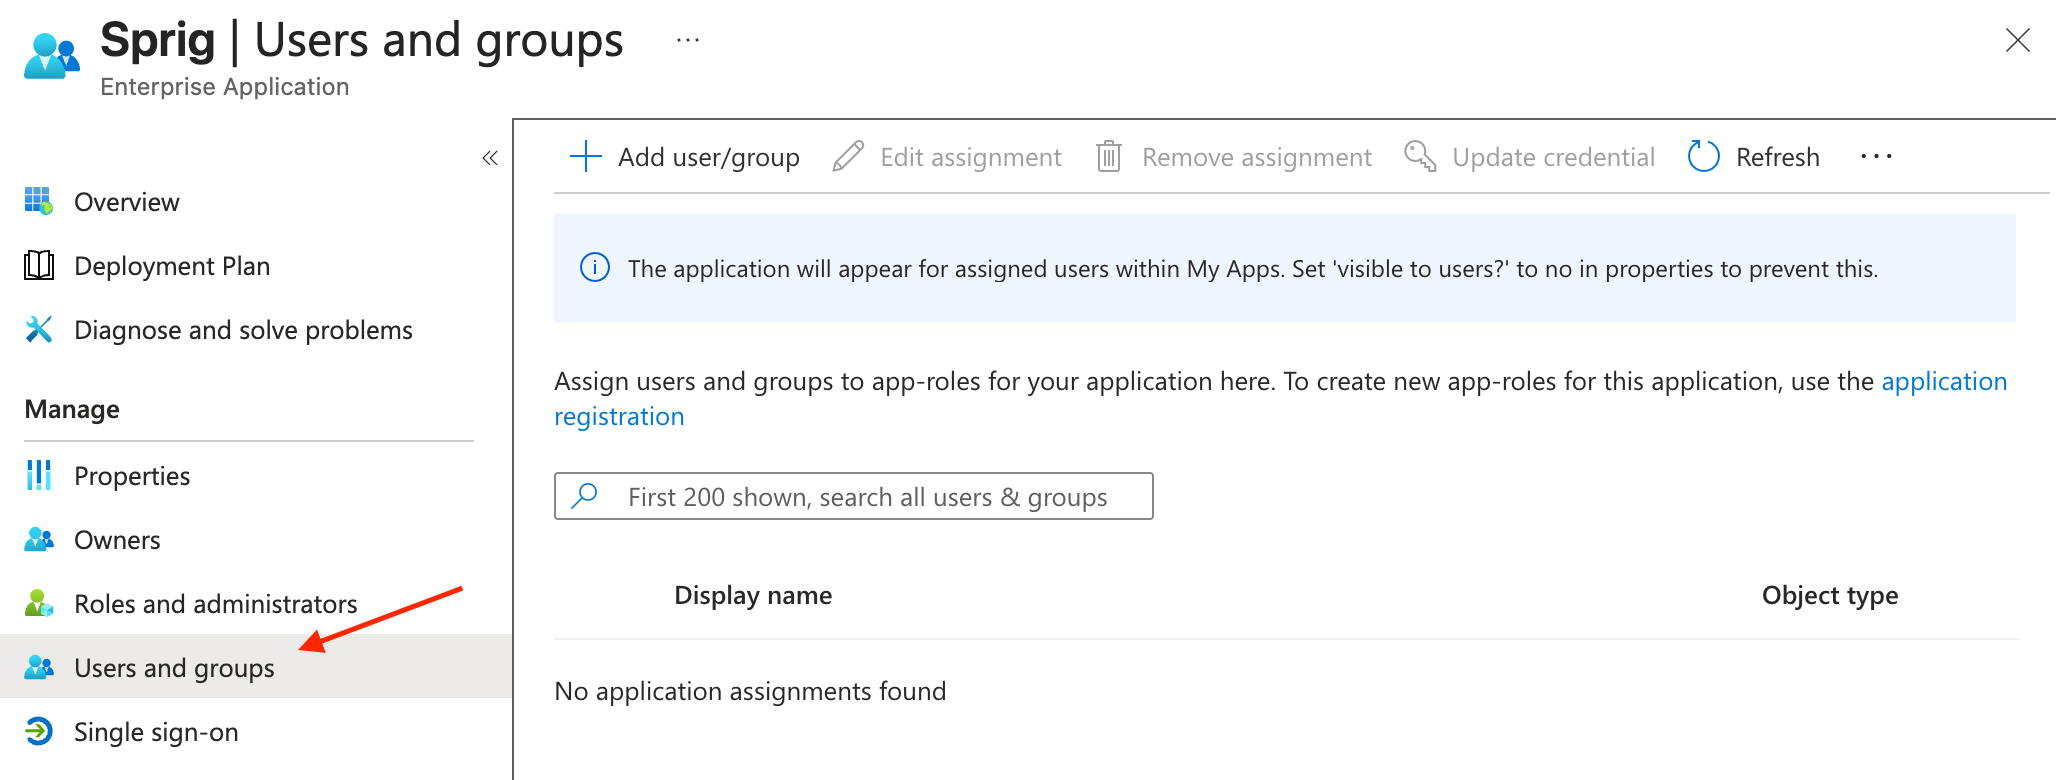
Users that are assigned to the Microsoft Entra ID application integration will now be able to sign in using the Sprig SSO login page.
Updated 18 days ago