Google Tag Manager
Getting Started
Overview
Google Tag Manager (GTM) is a free tool that allows you to manage and deploy tags (snippets of code or tracking pixels) on your website, browser-based app, or mobile app without having to modify the code. It requires little to no coding and is deployed in minutes.
If your organization is already running Google Tag Manager, or if you wish to install Google Tag Manager, you can use it to install Sprig on your website or browser-based app, as well as send events and attributes to Sprig.
This is an effective low-to-no-code option because it requires no changes to your codebase to deploy in-product Sprig studies. Even many of Sprig’s advanced features also require no changes to your codebase as long as you know what Google Tag Manager functions your organization is already deploying.
Are you already running Google Tag Manager?If you don't have the Chrome Tag Assistant extension installed, you can check if GTM is installed by invoking the
inspectoption in your web browser while viewing your team's website or application.
- To open the Inspect window in Chrome, Firefox and Edge, press
Control+Shift+I(orOption+Command+Ion Chrome and Safari for Mac).- Make sure you are on the Elements tab (or Inspector tab in Firefox), then press
Control+F(orCommand+Ffor Mac) to open the search field. Firefox displays the search field by default.- Search for the string GTM. If GTM is already deployed, you should get results similar to the following:
<script async="" src="//www.googletagmanager.com/gtm.js?id=GTM-XXXXXX-X"></script>. The container id XXXXXX-X is specific to your deployment.
Requirements
- Join your teammates on Sprig (check with your Sprig admin whether team discovery is on, or simply have a team member invite you via your email address). This will give you access to your team’s environment IDs, as well as the interactive Installation Guide.
- If you have not already installed Google Tag Manager, and wish to do so, you will need access to your web codebase, and be able to deploy to a development and/or production environment. You will also need to sign up for a Google Tag Manager account and set up Google Tag Manager on all pages where you plan to trigger Sprig studies.
- If your organization is already running Google Tag Manager, you will need administrator access to the account. Google Tag Manager administrators can follow these steps to add new users.
- If you are planning to use Google Tag Manager as a source for certain events and attributes, you may wish to consult with a developer on your team who has knowledge of how these events and attributes are expressed in JavaScript.
Install SDK
Assuming that you are already running Google Tag Manager, you will first need to install the Sprig SDK following these steps.
Obtain an Environment ID
Sprig provides two environments, Development and Production, each with its own corresponding ENVIRONMENT_ID (which can be found in Integrations > Google Tag Manager).
The Development environment is recommended for initially setting up and verifying your installation. Then, you can use the Production environment to deploy studies to real users.
Create a Variable with the Sprig Environment ID
Variables in Google Tag Manager are placeholders that populate the code on your website with specific values. To install Sprig with Google Tag Manager, you will first need to create a variable specifying your Sprig Environment ID. This will then be used to populate the Sprig Installation Tag (see below), and specify which Sprig Environment it should target.
Here are the steps for creating a variable with your Sprig Environment ID:
- Open Google Tag Manager app and click Variables.
- In User-Defined Variables, click New.
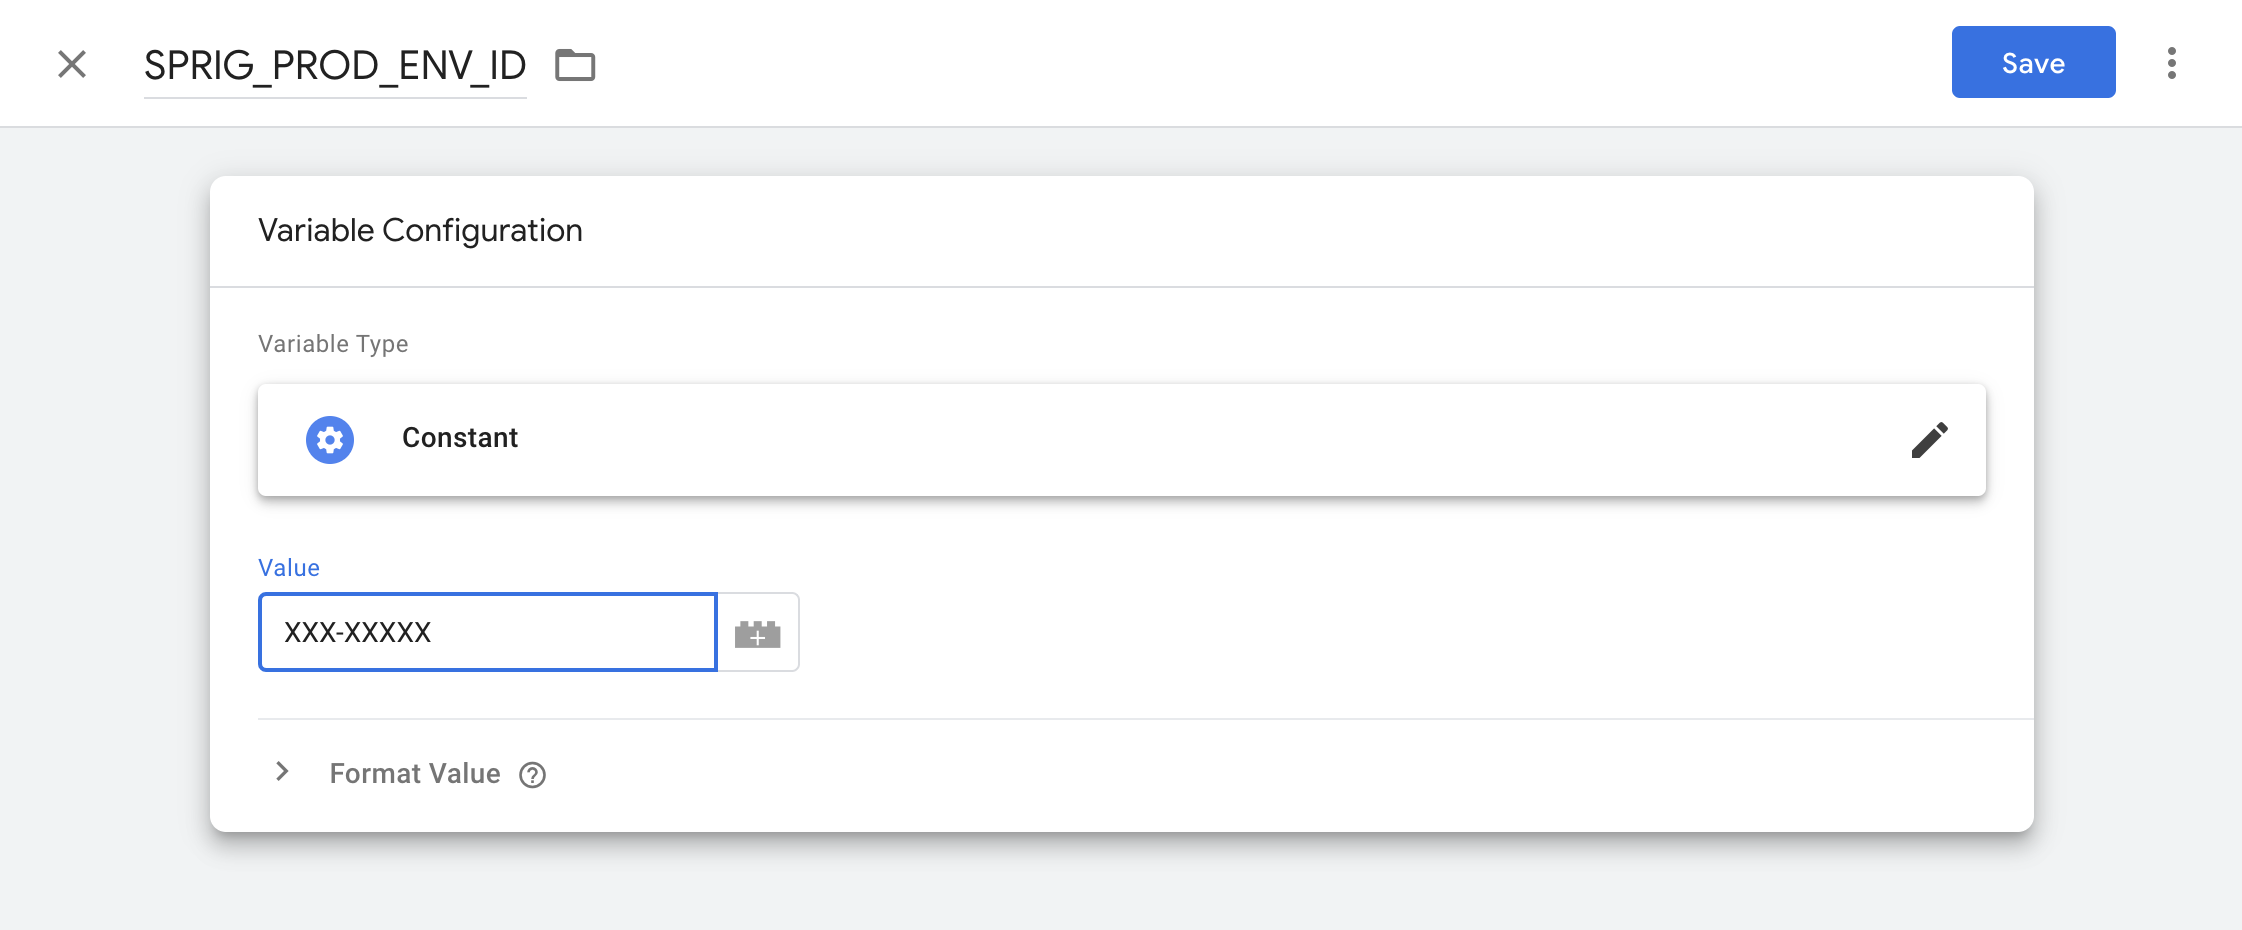
- In the Untitled Variable field, give the variable an appropriate name, like SPRIG_PROD_ENV_ID (if you are installing for your Production environment) or SPRIG_DEV_ENV_ID (if you are installing for your Development environment).
- Click anywhere on the Variable Configuration box, and scroll down the new sidebar to find Constant (under the Utilities subheading).
- Paste your Sprig Environment ID into the Value field and click Save.
Add the Sprig Installation Tag to your Google Tag Manager Account
A Tag in Google Tag Manager is a snippet of code that executes on web pages with Google Tag Manager installed. Sprig has created an installation tag, called Sprig Tag, which can be found in Google Tag Manager’s Community Template Gallery, and which you will now add to your Google Tag Manager account. This will execute the Sprig SDK on all pages on your website where you have Google Tag Manager installed.
Here are the steps for adding the Sprig Installation Tag to your account:
- Open Google Tag Manager and click Tags.
- Click New to create a new tag.
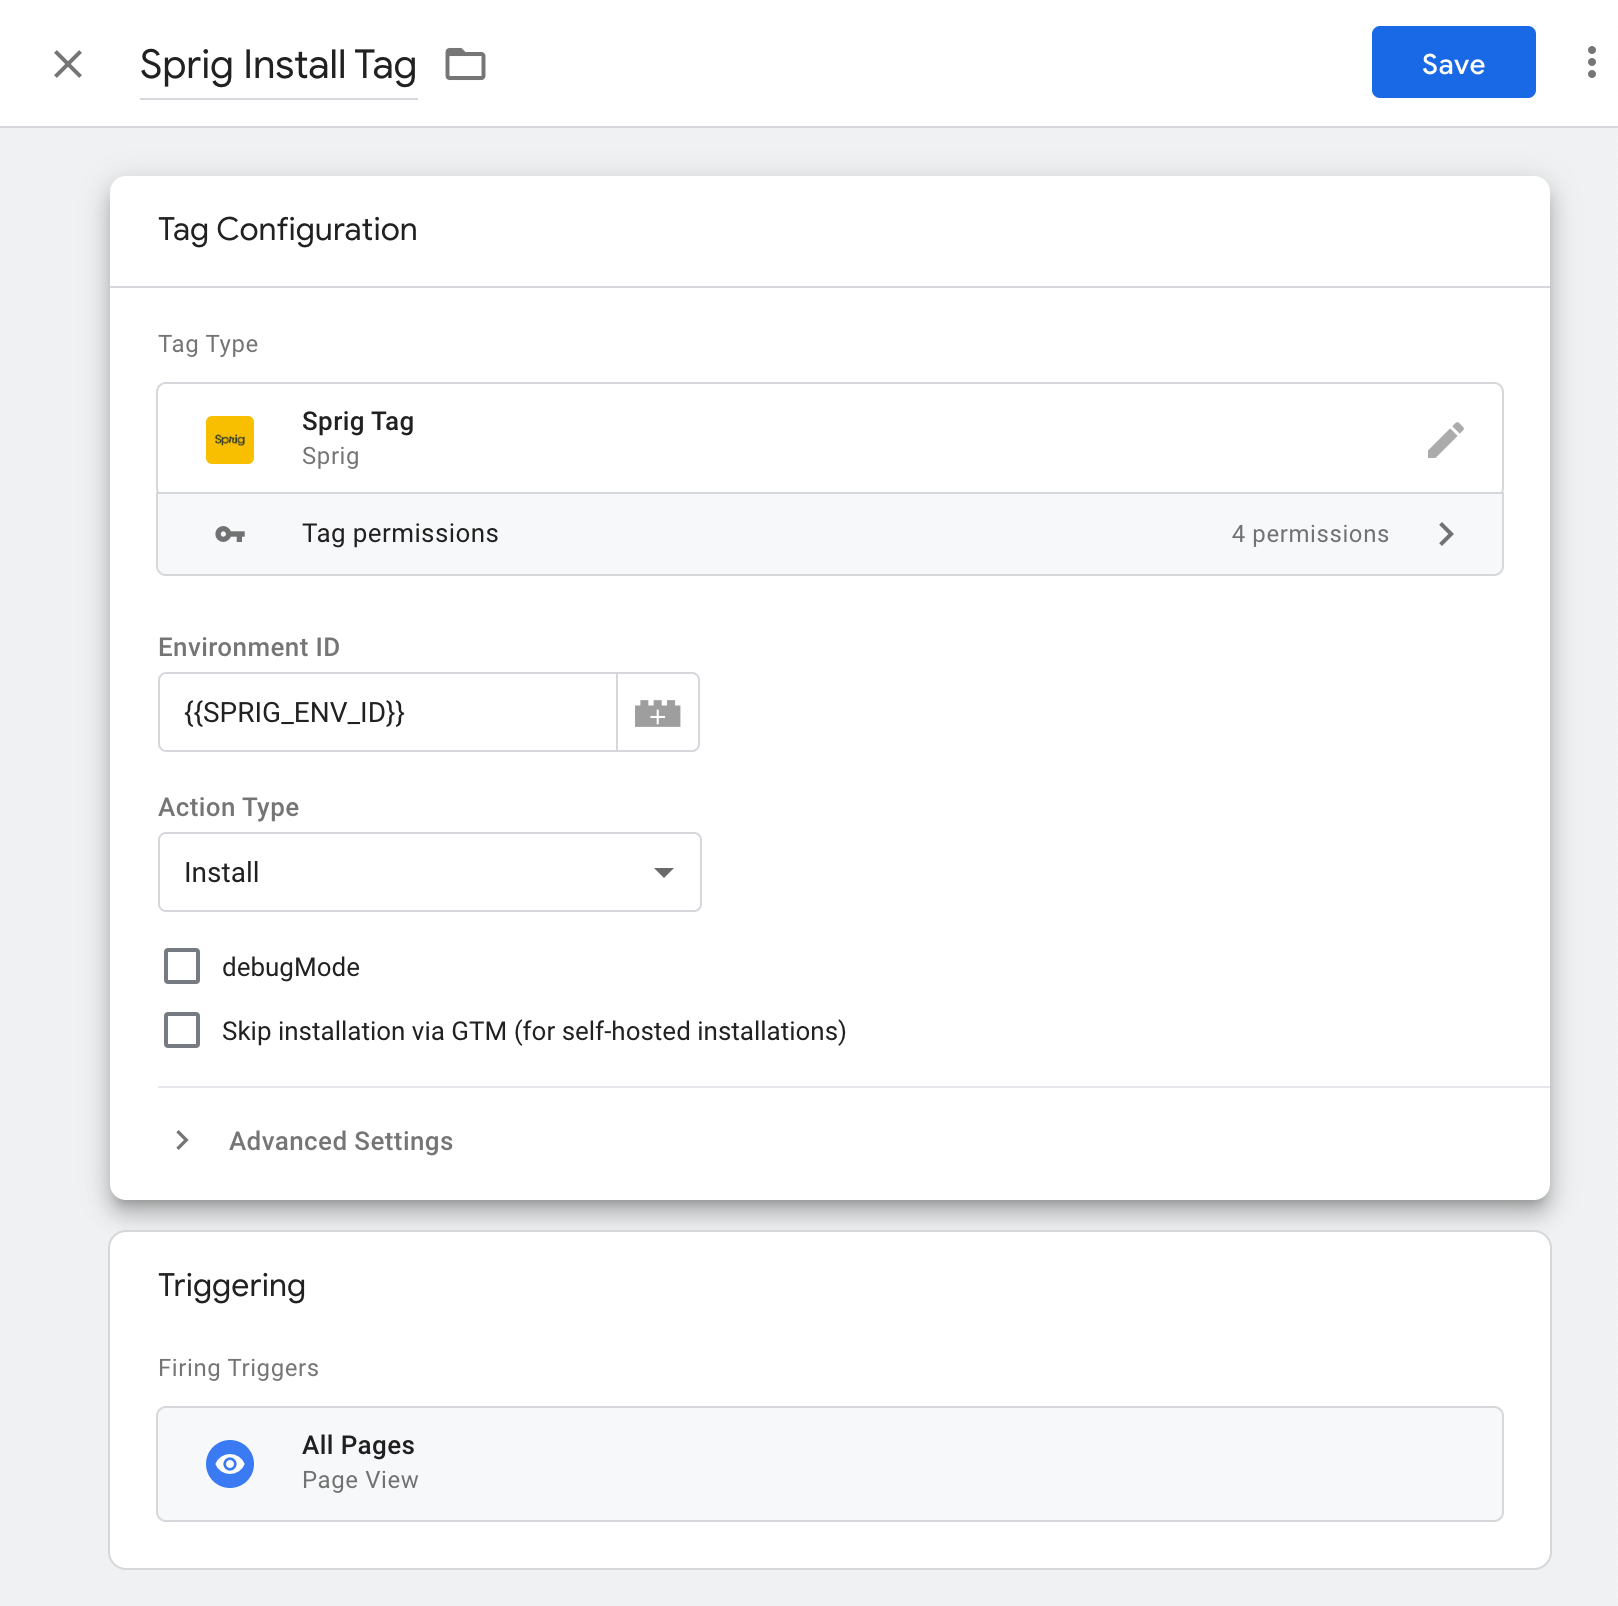
- In the Untitled Tag field, give the tag an appropriate name, like Sprig Install Tag.
- Click anywhere on the Tag Configuration box, and click on Discover more tag types in the Community Template Gallery in the new sidebar. Search for Sprig, click on Sprig Tag, and then click Choose Template to confirm your selection.
- Click
 and select the Environment Variable you created earlier (for example, SPRIG_PROD_ENV_ID or SPRIG_DEV_ENV_ID).
 - Make sure the Action Type is set to Install.
- Click anywhere on the Triggering box below and select All Pages in the new sidebar.
- Click Save.
- Click Submit and then Publish to push your changes out to your website.
Using the Sprig Tag in Google Tag ManagerThroughout this page, we will be leveraging the Sprig Tag to execute a number of Sprig functions, including configuring Events, Attributes, User IDs, and Data Layer variables. For each function, you will begin by creating a new Sprig Tag as outlined in Steps 1-5 above, and then changing the action type.
Verify Installation
- As you did before to check for the installation of GTM, open the Inspect window in your browser.
- Make sure you are on the Elements tab (or Inspector tab in Firefox), then open the search field.
- Search for the string sprig. If Sprig is installed, you should get results similar to the following:
<script type="text/javascript" async="" src="https://cdn.sprig.com/shim.js?id=XXX-XXXXX"></script>, where XXX-XXXXX is your Environment ID. Sprig has now been successfully installed using GTM.
Identify Users
Each time a user is tracked by Sprig on a webpage with the SDK installed, they are assigned a unique visitor ID in Sprig that allows users to be targeted with studies when they perform specified behaviors.
While this is a requirement for targeting users with Sprig studies, these are still considered unauthenticated users until their Sprig visitor IDs are coupled with the unique USER_IDs assigned to users within your platform’s internal authentication framework.
We recommend that you follow this best practice when installing Sprig:
- This ensures consistency between the visitor IDs generated by Sprig and the ones in your internal database, product analytics/CDP, or data warehouse, allowing more effective targeting of studies.
- Your users have a consistent experience across platforms, and do not see the same study multiple times.
- It also optimizes the number ofMonthly Tracked Users (MTUs) sent to Sprig, which impacts your billing.
If necessary, you can also use an anonymizing function or hash.
A good User ID is:
- Unique: Two users should not share the same User ID.
- Mappable: User IDs sent to Sprig should map back to your internal User IDs, either directly or anonymously.
- Static: Once assigned, a User ID should not change.
We can use the same Sprig Installation Tag described above to couple the Sprig visitor ID with your system’s internal USER_ID or EMAIL_ADDRESS in Google Tag Manager:
- Follow Steps 1-5 in the instructions for adding the Sprig Installation Tag to Google Tag Manager, though when naming the tag, choose a different name, like Sprig User ID Tag.
- Under Action Type, use the dropdown menu to select “User ID” (or, if adding email address, “User Email”).
- Enter your internal USER_ID string to the User ID field.
- Click anywhere on the Triggering box below and select All Pages in the new sidebar.
- Click Save, then click Submit and then Publish to push your changes out to your website.
Identifying Users in the Data LayerIf your team is leveraging Google Tag Manager's Data Layer, user IDs may be information stored there. Sending information from the Data Layer to Sprig is treated below under Track Attributes.
Track Events
Sprig uses events to trigger (display) studies after the user performs a specific action. They can also be used as a filter to target users who have previously performed an action.
Once you’ve installed the Sprig SDK via Google Tag Manager, the next step is to configure the tracking of events that you would like to use to trigger a study. You can configure events either through Google Tag Manager, or by configuring No-Code events within Sprig.
No-Code Events
No-Code events let teammates without access to the codebase create events in Sprig based on the page’s URL, HTML elements, or CSS, which can then be used to trigger or filter Web studies. No-code events tend to be used to define more straightforward user actions, like viewing a page or clicking a button. For more information, see No-Code events.
Configuring Events as Google Tags
For more complex user actions, Google Tag Manager contains a library of common triggers that you can use to configure events in Sprig. Some common triggers in the Google Tag Manager trigger library include:
- scroll depth
- form submission
- element clicks
For more information on Google Tag Manager triggers, click here.
There are four main steps in configuring Google Tag Manager to generate triggers that can be used by Sprig to display a study:
- Create and configure the Trigger in Google Tag Manager
- Create a new Sprig Tag associated with the Trigger
- Publish your changes to the server
- Approve the event when it appears in Sprig’s Events page
The next section describes this workflow in greater detail, using Scroll Depth as an example Trigger.
Sending an example Event to Sprig
In this example, we want the user to scroll to certain depth on the webpage in order to trigger the study. This example will use the Google Tag Manager built-in trigger Scroll Depth.
- In the Google Tag Manager app, click Triggers
- Click New on the Triggers dashboard.
- Click Untitled Tag and give the trigger an appropriate name, for example Scroll Depth.
- Click anywhere on the Trigger Configuration card and select Scroll Depth from the sidebar that appears.
- Configure the trigger (for example, the direction & percentage of scroll depth you want for the trigger) and click Save.
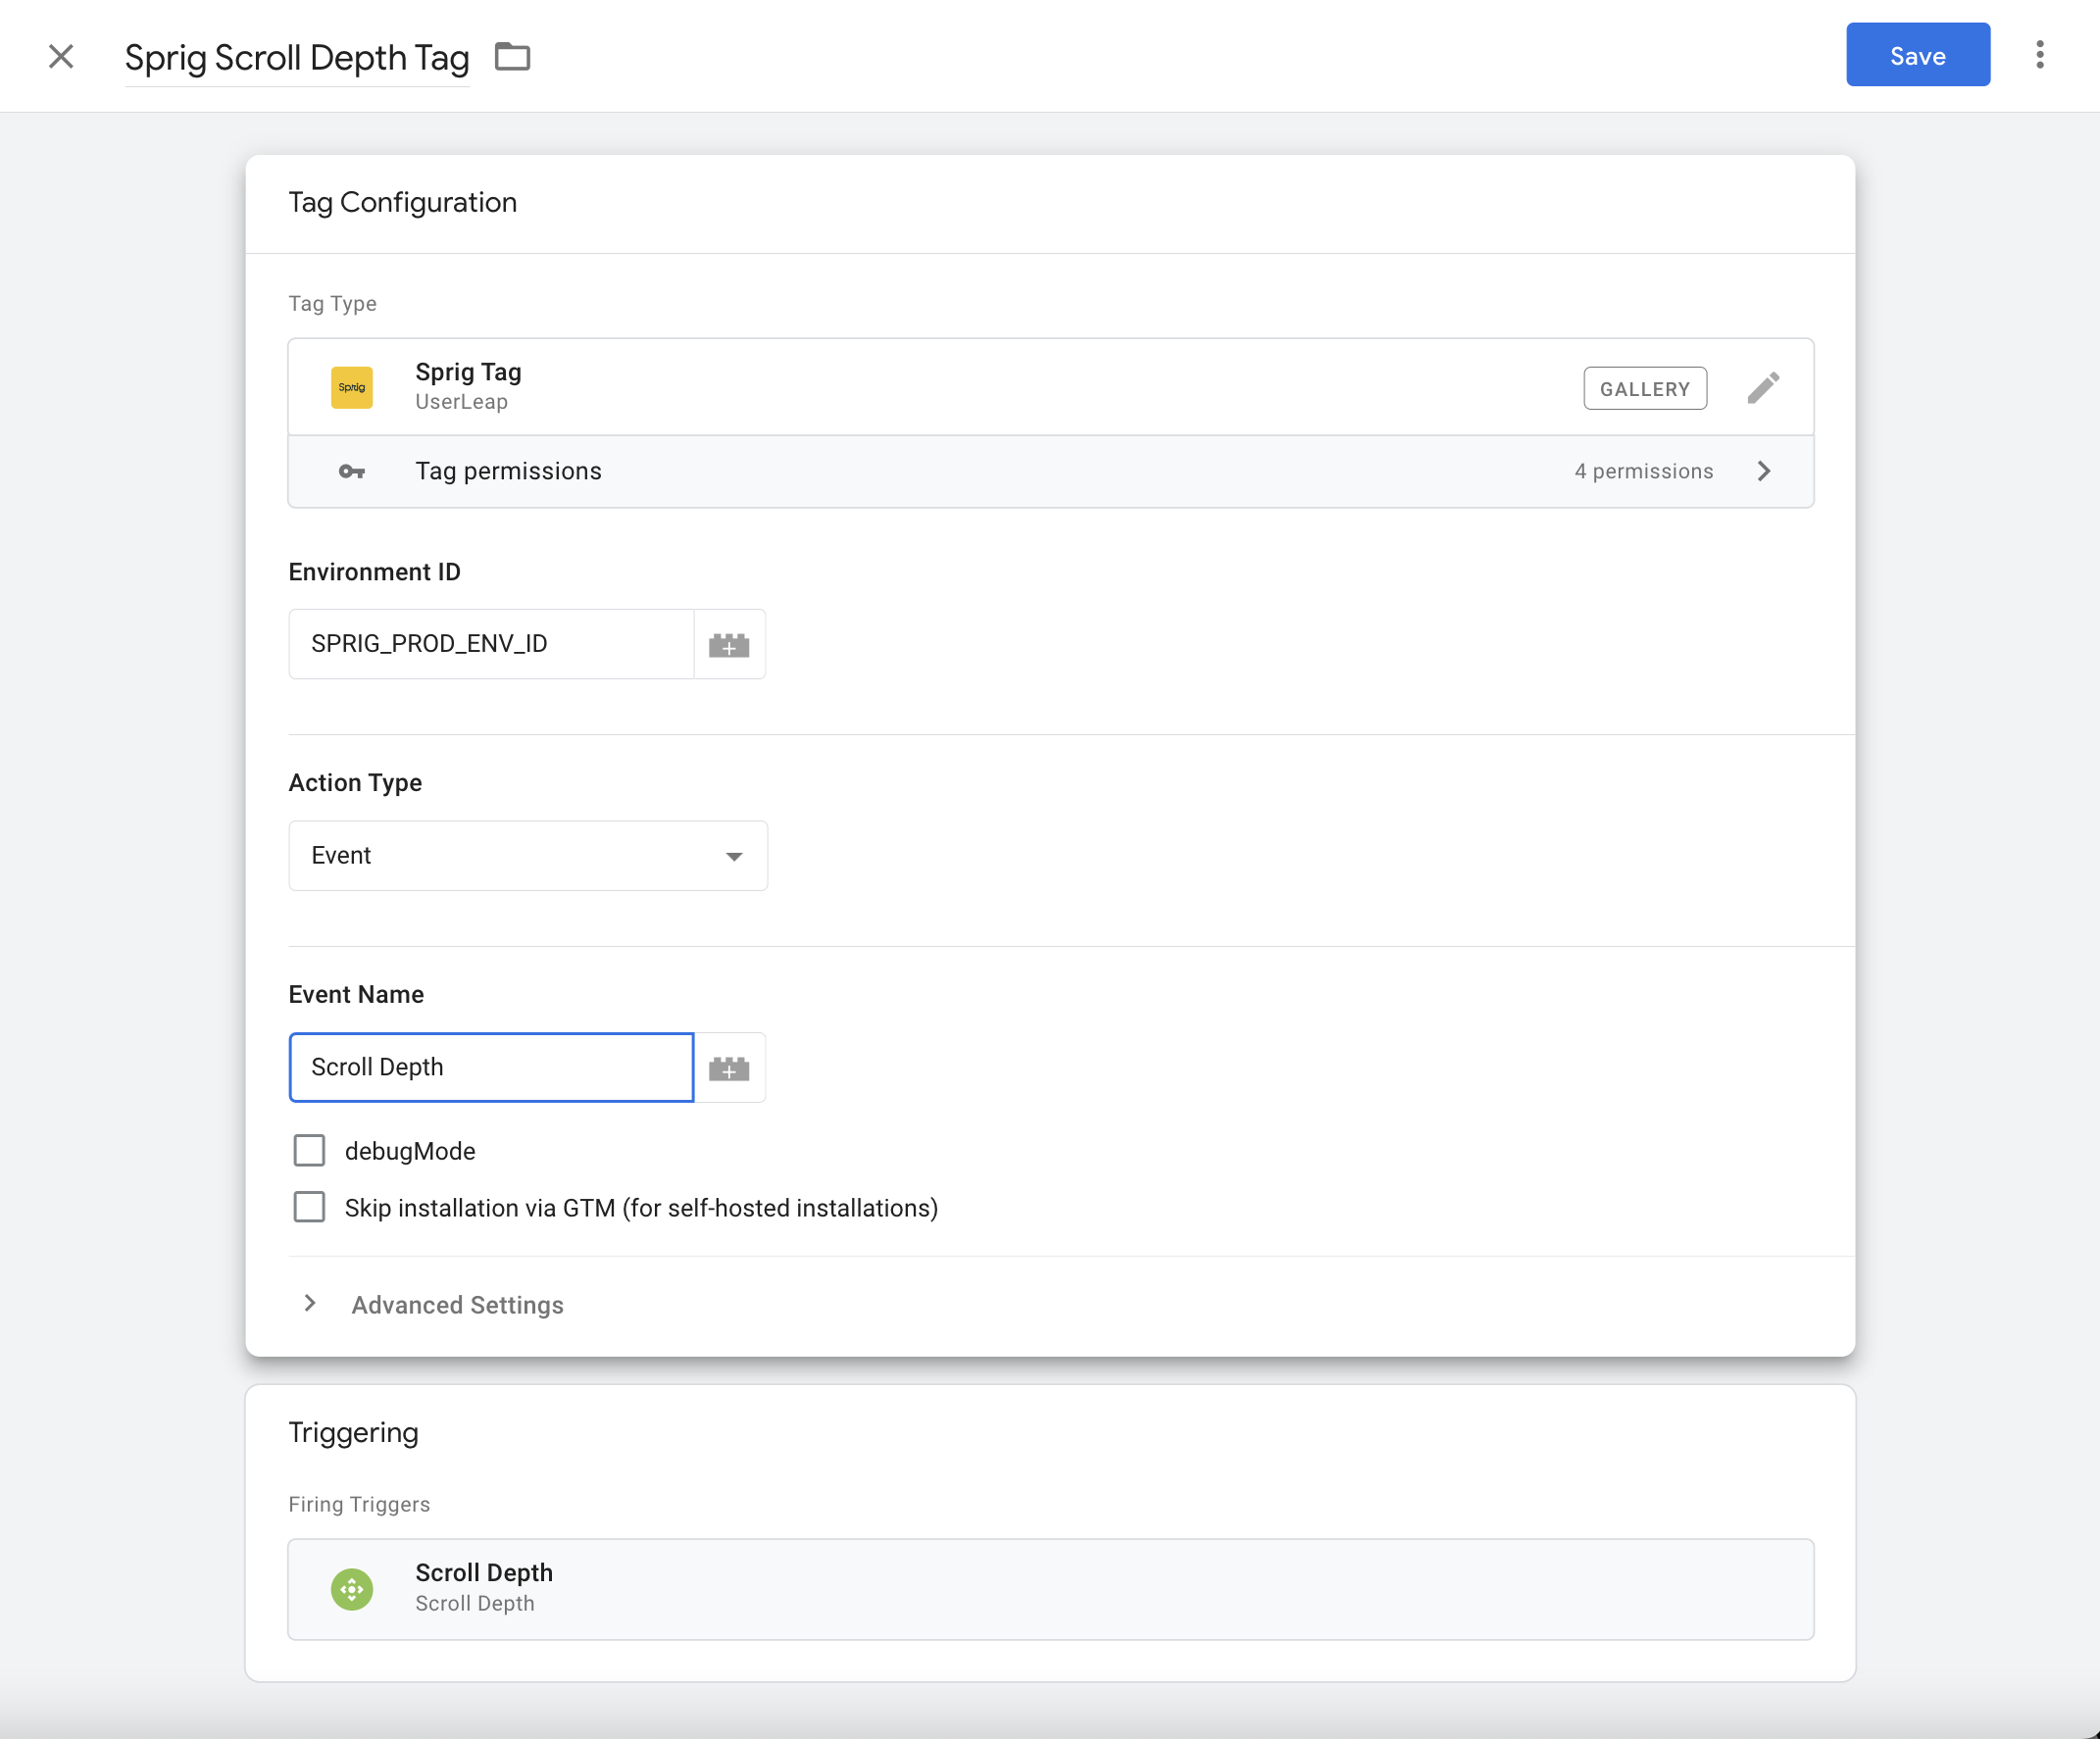
- Follow Steps 1-5 in the instructions for adding the Sprig Installation Tag to Google Tag Manager, though when naming the tag, choose a different name, like Sprig Scroll Depth Tag.
- Under Action Type, use the dropdown menu to select “Event”.
- Under Event Name, enter the name of the event as you would like it to appear in Sprig (for example, Scroll Depth).
- Click anywhere on the Triggering card to bring up the sidebar where you can select the Scroll Depth trigger you configured earlier.
- Click Save then click Submit and Publish to push the changes to the server.
- In the target site, go to a page with Google Tag Manager installed and scroll to trigger the event. Then, in Sprig, open the Events, where you will see a prompt to approve a new event under review. Click Manage Requests to add this event.
For more information, Google also provides documentation describing methods and tools to diagnose variables, tags, and triggers.
Track Attributes
Sprig allows you to track attributes, which can provide more context about the user to help you better understand their feedback. You can also use these attributes to filter your audience and target specific kinds of users. Some example attributes that can be tracked are:
- Plan type
- Super users / power users
- Company
A user’s attributes can be seen on their profile in the Users page, and are recorded and attached to any surveys response they submit. For more information, see Attributes.
In Google Tag Manager, there are two methods by which you can pass attributes to Sprig:
- Determine if your organization already leverages Google Tag Manager Data Layers, and identify variables stored in the Data Layer you wish to send to Sprig.
- Configure a discrete attribute and use the Sprig Install Tag to pass the attribute
If you are setting attributes with Google Tag Manager, it is likely your team is leveraging the Data Layer. The following section describes how to send these attributes to Sprig, with some further information on individual attributes following.
Configuring Attributes in SprigIf your team is not already tracking user attributes in Google Tag Manager, you will likely require some knowledge of JavaScript to configure these attributes and direct to Sprig. Note that in order for Sprig to receive attributes, your website or web app must also be able to parse that information to the JavaScript layer. You may have to engage your Web engineering team to find out which attributes are visible to JavaScript and ask them to enable visibility for those attributes that are not.
Sending Data Layer Variables to Sprig
Google Tag Manager's Data Layer is a JavaScript array that stores data which you can process and pass from your website to other applications. If your team is leveraging the Data Layer to supply data to your analytics tool about the details of your website visitor (such as login status, user ID, and location), you can also use these details as attributes to filter your studies in Sprig.
The most likely use case for leveraging the Data Layer as a source for Sprig is therefore if your organization is already storing user data there that would be useful for targeting studies. To check your current Data Layer, follow these steps:
- Make sure Google Tag Manager is installed.
- Go to a page where you wish to check the Data Layer, and open up the browser JavaScript console with
Ctrl + Shift + J(command + option + Jon Mac). - Enter
window.dataLayerin the console prompt. Note: The dataLayer name is case-sensitive, meaning that only dataLayer will work, not for example, datalayer.
If you are running a Data Layer on this page, you will see the data it is storing. If you are not, the console will return an 'undefined' response.
Example Data Layer Variable
Once you have determined that a Data Layer is present, the next step is to identify some information to send to Sprig. In this example, we are going to send information about which plan a user purchased when the checkout event occurred. This example will just treat this information as static data; in the real world a developer would generate this information dynamically for each checkout event.
Data is stored in the Data Layer in key-value pairs. The key is a variable name in string format, and values can be any allowed JavaScript type. At our example checkout event, we might store the following information in the Data Layer:
| Key | Value |
|---|---|
| event | checkout |
| planid | 99 |
| costPerMonth | 79 |
| planName | Enterprise |
| userid | 12345 |
In JavaScript, this would be described as follows:
'event': 'checkout',
'planid': 99,
'costPerMonth': 79,
'planName': 'Enterprise',
'userid': 12345
Instructions
In order to pass this information to Sprig, we first need to add the following code snippet to the <head> of the webpage before the Google Tag Manager snippet as follows:
<head>
  <script>
    window.dataLayer = window.dataLayer || [];
    dataLayer.push({
      'event': 'checkout',
      'planid': 99,
      'costPerMonth': 79,
      'planName': 'Enterprise',
      'userid': 12345
    });
  </script>
  <!-- Google Tag Manager -->
   ...
  <!-- End Google Tag Manager -->
</head>
Next, we will need to go to Google Tag Manager to create a variable that points to the Data Layer and identifes planid as the key we wish to select to pass to Sprig.
- In Google Tag Manager, click Variables.
- In User-Defined Variables, click New.
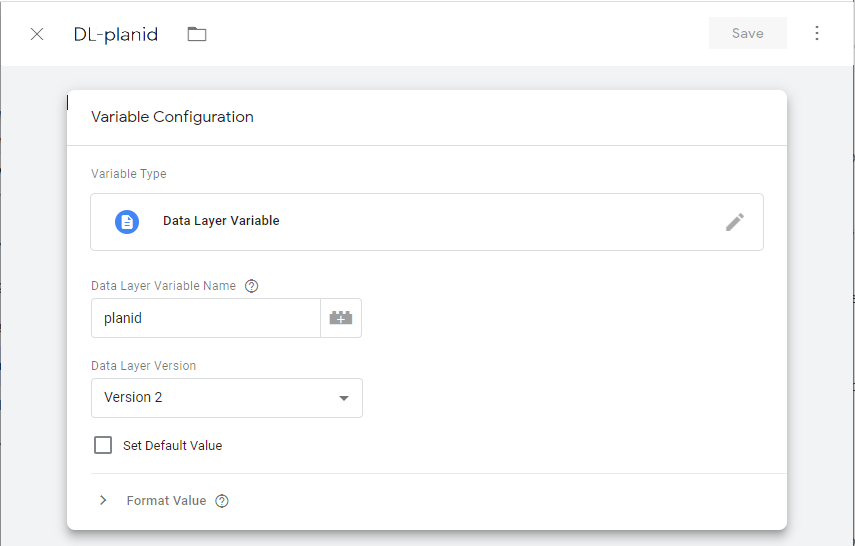
- Click Untitled Variable and give the variable an appropriate name, for example, DL-planid.
- In Variable Configuration, click anywhere on the card to choose the variable type, and select Data Layer Variable as the variable type in the sidebar.
- In the Data Layer Variable Name field type
planid. The Data Layer Variable Name field is case-sensitive.
Click Save.
Finally, you need to create a Sprig tag that fires at the appropriate time to send planid to Sprig:
- Follow Steps 1-5 in the instructions for adding the Sprig Installation Tag to Google Tag Manager, though when naming the tag, choose a different name, like Sprig DL.
- Under Action Type, select User Attribute. This will allow you to define a custom attribute.
- In Attribute Key type in the name your attribute as you wish it to appear in Sprig; in this case, 'PlanID'. Don't forget to put single quotes around the attribute key name.
- Select the Custom JavaScript variable you created in the last step; in the previous example it was called, DL-planid.
- Click anywhere on the Triggering box below and select All Pages in the new sidebar.
- Click Save, then click Submit and then Publish to push your changes out to the server.
Whenever a user clicks Finish to return a Study to Sprig, the current value of planid will be associated with the Study response. In the Sprig app, click Users, then click on the last User ID. If you look under Profile, you will be able to see the custom attribute that you defined.
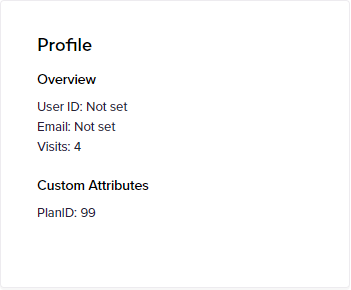
Custom Attributes
In addition, if you go to Studies > YOUR_STUDY_NAME > Responses, then click on Download CSV. In the CSV file that you download there will be one column containing all the custom attributes.
Using GTM to Trigger Dismissal of an Active Survey
Using Sprig’s tag, you can configure the action of dismissing an Active Sprig Survey directly through GTM. Here are the steps for creating a trigger to dismiss an active Sprig Survey given a set of criteria.
- Open Google Tag Manager and click Tags
- Click New to create a new tag
- Find the Sprig Tag and select the Action Type Dismiss Active Survey
- Click
 and select the appropriate Environment Variable (for example, SPRIG_PROD_ENV_ID or SPRIG_DEV_ENV_ID)
 - In the Triggering section, select the set of criteria that will dictate when an Active Sprig Survey will be automatically dismissed.
Triggering Logout User using GTM
While using Sprig to track user behaviors there may be a need to have Sprig reset a users status to track a different user’s behavior across your website or application. Some common reasons this may be necessary include:
- A user is accessing your app or website on a shared device
- A user has multiple accounts across your website or application
If it becomes necessary to reset a user via Sprig in either of those scenarios, configuring the Sprig tag to trigger a Logout User Action. You can set this up by following the typical tag and trigger configuration steps and selecting Logout User as the action type.
Sending Discrete Attributes to Sprig
The simplest way to send attributes to Sprig individually is to create a custom variable containing the Javascript identifying the attribute, then configuring the Sprig Tag in a similar manner as above. Simply follow the steps, but when identifying the Variable Configuration, select Custom Javascript (instead of Data Layer Variable). Supply your attribute's Javascript call here, then follow the remaining steps to action the User Attribute in the Sprig Tag as with the Data Layer Variable.
Test & Deploy
To confirm everything is working as expected with survey delivery, you can create a survey and manually trigger delivery from the Developer Console.
- You'll first need to create a Study and set the delivery method to Web. If you're testing in the Development environment, you'll need to create the Study in Development.
- In the Sprig app, go to Settings > Configure and select Allow Manual Study Display (on by default for the Development environment)
- Open the developer console and run
Sprig('displaySurvey', SURVEY_ID);. The SURVEY_ID of a study can be found at the end of its URL (https://app.sprig.com/surveys/SURVEY_ID). - If the Sprig snippet is already installed on that page, your browser will display the study.
4a. If the questions are not rendering correctly or responses aren’t uploaded, check your browser console for any errors. You may have to work with your engineering and security teams to update your installation or CSP settings to resolve the errors.
After you have finished your testing, consider returning to Settings > Configure and select Disable Manual Study Display. This will prevent any other visitor from using displaySurvey in your environment.
Congratulations! Your installation is complete and you can begin deploying.
Updated 4 months ago
